How to Delete a User Account in Windows 11
Getting rid of old user accounts in Windows 11 can help you reclaim space and keep your computer tidy. A user account in Windows 11 is like your own personal space on the computer, holding your unique settings, files, and app data. This keeps your information private from anyone else using the PC. To remove an account, you must be logged in as an administrator and ensure the account you want to delete is not currently active. For example, deleting a dormant account that hasn’t been used in over a year can reclaim gigabytes of storage. You’ll need to sign out any active users before proceeding with the deletion process.
Open Settings and navigate to Accounts > Family & other users. Select the account to delete, click Remove, and confirm. Alternatively, use Control Panel, Command Prompt, or PowerShell, ensuring you are logged in as an administrator and have backed up any necessary files.
Method 1Delete User Account Using Settings
- Press ⊞ Win+I to open Settings.
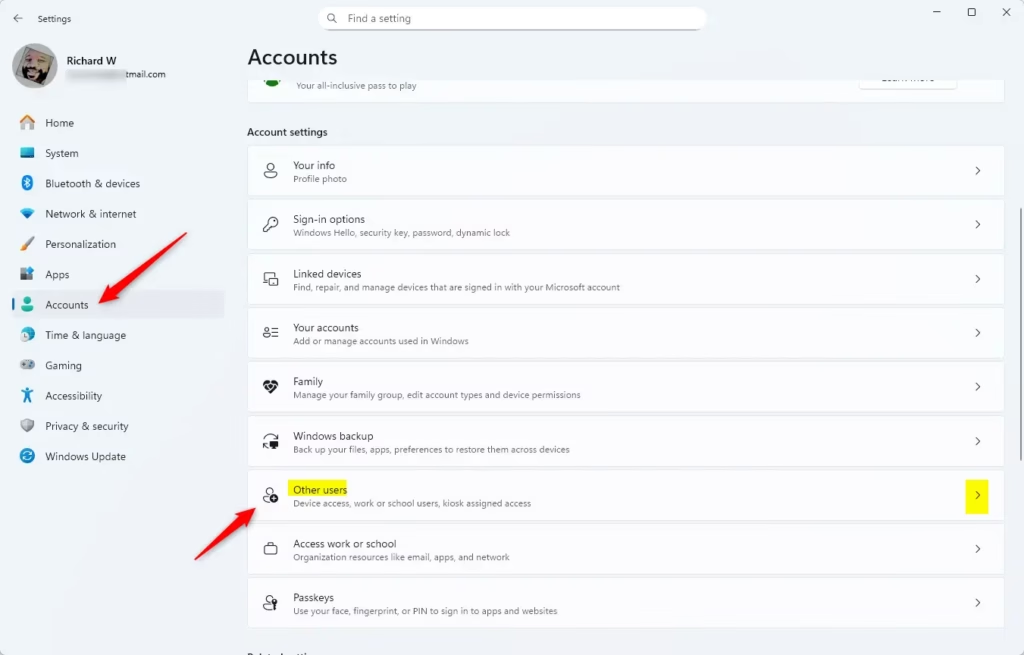
- Click Accounts on the left menu.
- Select Family & other users (or Other Users).
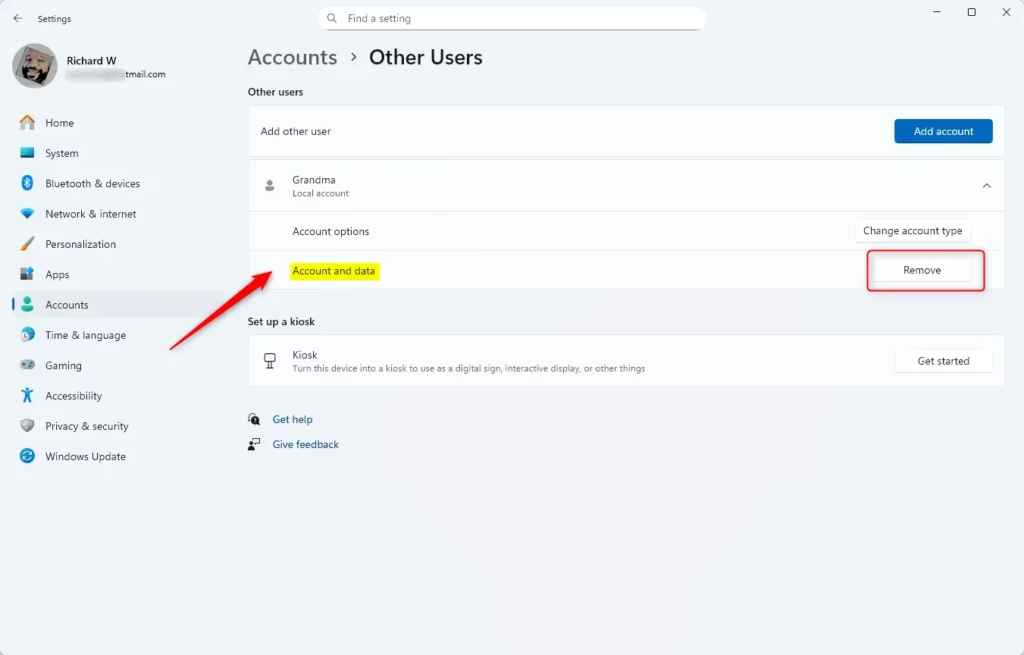
- Find the user account you want to delete under Other users, click on it, then click Remove.
- Click Del account and data to confirm the removal.
- You can now close Settings.
You can easily delete a user account in Windows 11 using the Settings app by going to Accounts and then selecting ‘Family & other users’. From there, you can choose the account you want to remove and confirm the deletion, which also removes all associated data.
You can easily delete a user account in Windows 11 using the Settings app by going to Accounts and then selecting ‘Family & other users’. From there, you can choose the account you want to remove and confirm the deletion, which also removes all associated data.
Method 2Delete User Account Using Control Panel
- Open the Control Panel. To do this, type Control Panel in the search box and click it.
- Set the view to Small icons or Large icons (top-right dropdown).
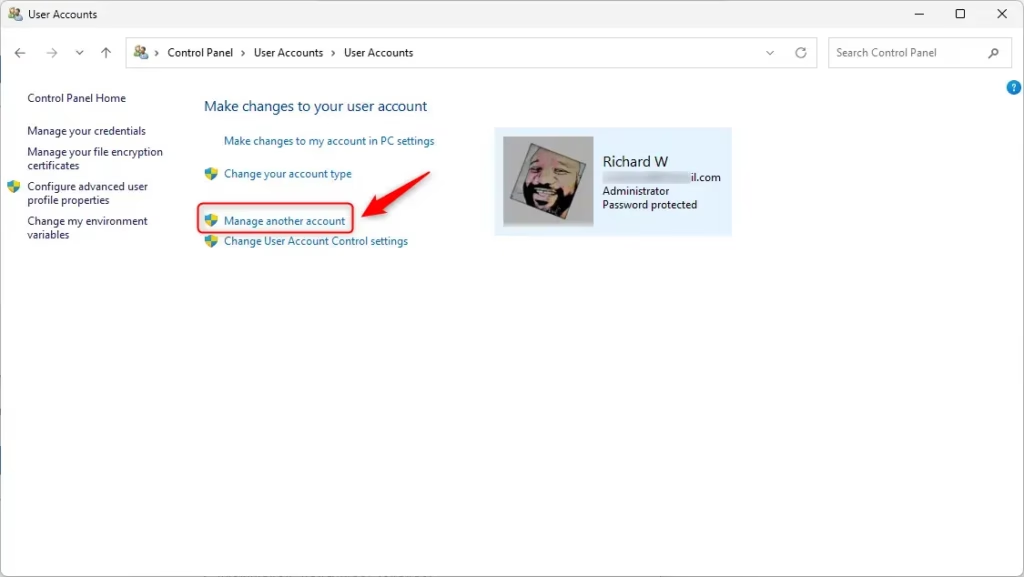
- Click User Accounts.
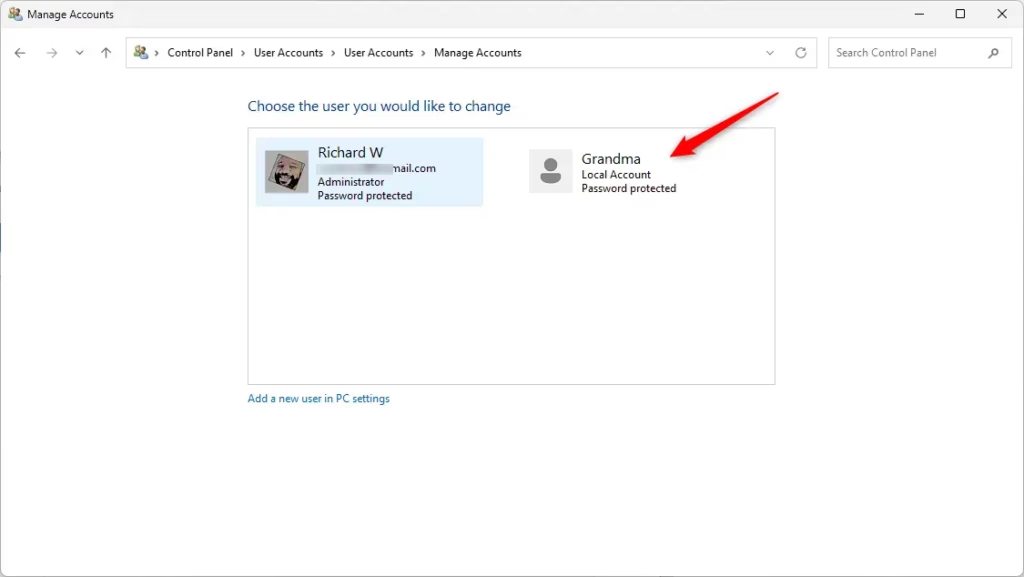
- Click Manage another account.
- Choose the account you want to delete.
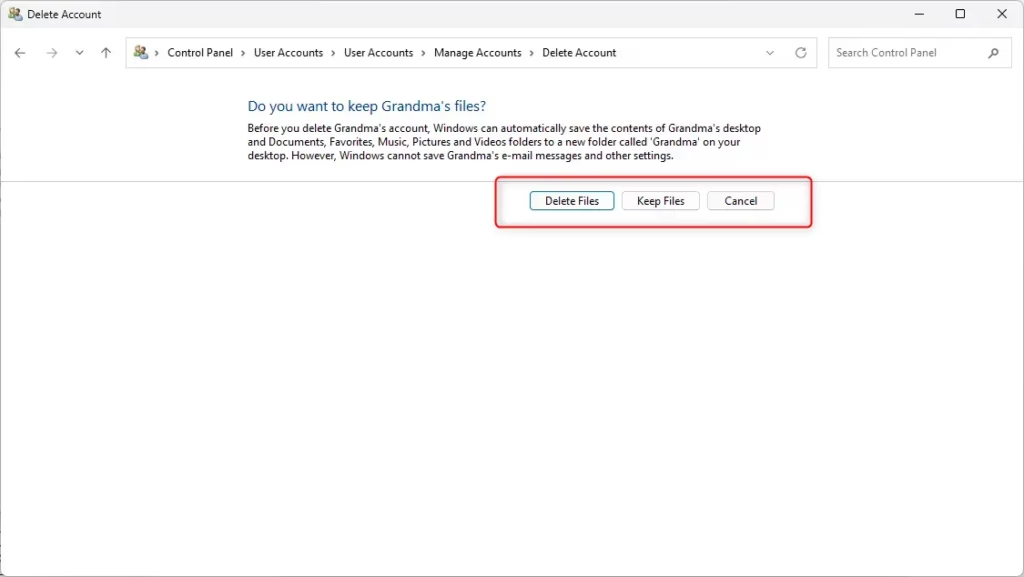
- Click Del the account.
- Choose whether to Delete Files or Keep Files. This is your choice — decide if you want to keep the user’s files or remove them.
- Click Del Account to confirm.
- Close Control Panel when done.
Deleting a user account in Windows 11 can also be done through the Control Panel, which offers a straightforward way to manage user accounts. After opening the Control Panel, navigate to ‘User Accounts’ and then ‘Manage another account’ to select and delete the desired user, with an option to keep or delete their files.
Deleting a user account in Windows 11 can also be done through the Control Panel, which offers a straightforward way to manage user accounts. After opening the Control Panel, navigate to ‘User Accounts’ and then ‘Manage another account’ to select and delete the desired user, with an option to keep or delete their files.
Deleting a user account in Windows 11 can also be done through the Control Panel, which offers a straightforward way to manage user accounts. After opening the Control Panel, navigate to ‘User Accounts’ and then ‘Manage another account’ to select and delete the desired user, with an option to keep or delete their files.
Method 3Delete User Account Using Command Prompt
For those comfortable with commands, you can delete a user account in Windows 11 using the Command Prompt, but you’ll need administrator rights. Open Windows Terminal as an administrator, then use the ‘net user’ command to list accounts and a specific command to remove the one you no longer need.
- Right-click the Start button and select Windows Terminal (Admin).
- Make sure you are in the Command Prompt tab. You can switch from the dropdown arrow at the top.
- Type
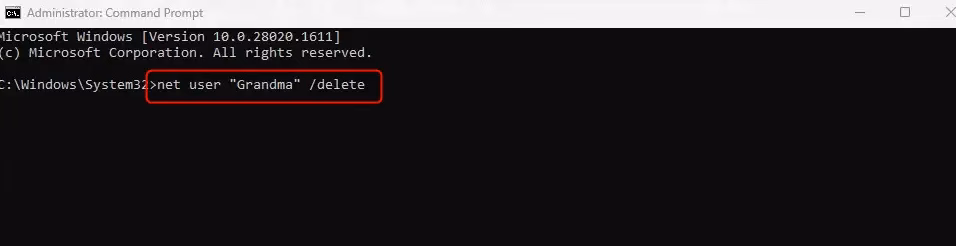
net userand press Enter to see a list of user accounts on your computer. - Find the exact name of the account you want to delete.
- Type the following command and press Enter. Replace UserName with the real user name:
net user "UserName" /delete - Close Windows Terminal when done.
Method 4Delete User Account Using PowerShell
Windows 11 users can delete accounts using PowerShell, a powerful tool that requires administrator privileges. After opening Windows Terminal as an administrator and switching to PowerShell, you can list all local users with ‘Get-LocalUser’ and then use the ‘Remove-LocalUser’ command to delete a specific account.
- Right-click the Start button and select Windows Terminal (Admin).
- Switch to the PowerShell tab.
- Type
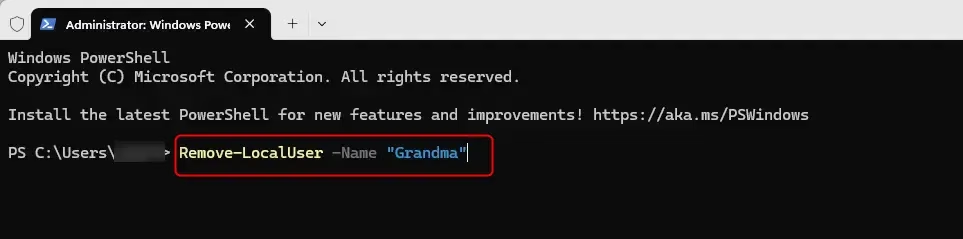
Get-LocalUserand press Enter to see all user accounts. - Note the user account name you want to delete.
- Type the following command and press Enter. Replace UserName with the actual name:
Remove-LocalUser -Name "UserName" - Close Windows Terminal when finished.
Tips Before Deleting a User Account
Before you delete a user account in Windows 11, it’s important to follow a few key tips to avoid losing data or causing issues. Always back up important files from the account, ensure you’re signed in as an administrator, and never try to delete an account that’s currently in use.- Make sure the account you want to delete is no longer needed.
- Backup any important files from that user before deleting.
- You must be signed in as an administrator account to delete users.
- Do not delete an account that is currently signed in.
- Choose the deletion method you feel most comfortable with.
Summary
Deleting a user account in Windows 11 helps keep your PC tidy and frees up space by removing unused profiles and their data. You can delete accounts using Settings, Control Panel, Command Prompt, or PowerShell, but always remember to back up important files first and ensure you have administrator rights.
How do I completely delete a user?
To completely delete a user, you might need to access the Task Manager. Right-click it, then select ‘More details’. Go to the ‘Users’ tab, right-click your user, and choose ‘Manage user accounts’. From there, select ‘Manage another account’.
Was this guide helpful?

About the Author
Richard
Tech Writer, IT Professional
Richard, a writer for Geek Rewind, is a tech enthusiast who loves breaking down complex IT topics into simple, easy-to-understand ideas. With years of hands-on experience in system administration and enterprise IT operations, he’s developed a knack for offering practical tips and solutions. Richard aims to make technology more accessible and actionable. He's deeply committed to the Geek Rewind community, always ready to answer questions and engage in discussions.


No comments yet — be the first to share your thoughts!