How to Set Up WordPress on Your Windows 11 PC Using XAMPP
Want to try WordPress on your own computer without needing the internet? This simple guide will help you do it using a free program called XAMPP.
What is XAMPP?
XAMPP is free software that makes your computer work like a web server. It includes everything WordPress needs:
- Apache (the web server)
- MariaDB (the database where WordPress stores your content)
- PHP (the language WordPress is written in)
You can install XAMPP on Windows 11 or other systems. This guide focuses on Windows 11.
Step 1Install XAMPP
If you don’t have XAMPP yet, follow this guide to install it on Windows 11:
How to Install XAMPP on Windows 11
Once installed, open the XAMPP Control Panel. This is where you manage your web server and database.
Step 2Create a Database for WordPress
WordPress needs a database to save your posts, pages, and settings. Here’s how to create one:
- Open the XAMPP Control Panel.
- Click the Shell button (see image below) to open a command window.
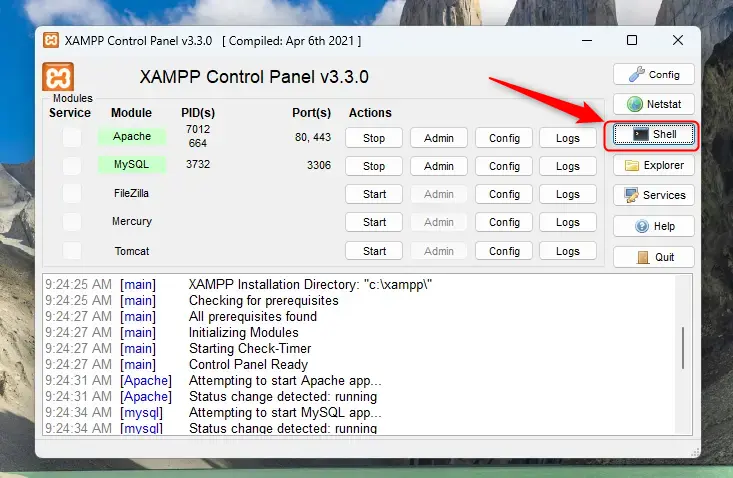
- In the shell window, type this command to open the database:
mysql -u root
Now enter these commands one by one. Replace your_password_here with a password you choose:
CREATE DATABASE wordpressdb CHARACTER SET utf8mb4 COLLATE utf8mb4_general_ci;

CREATE USER 'wordpressdbuser'@'localhost' IDENTIFIED BY 'your_password_here';

GRANT ALL PRIVILEGES ON wordpressdb.* TO 'wordpressdbuser'@'localhost';

FLUSH PRIVILEGES;

exit
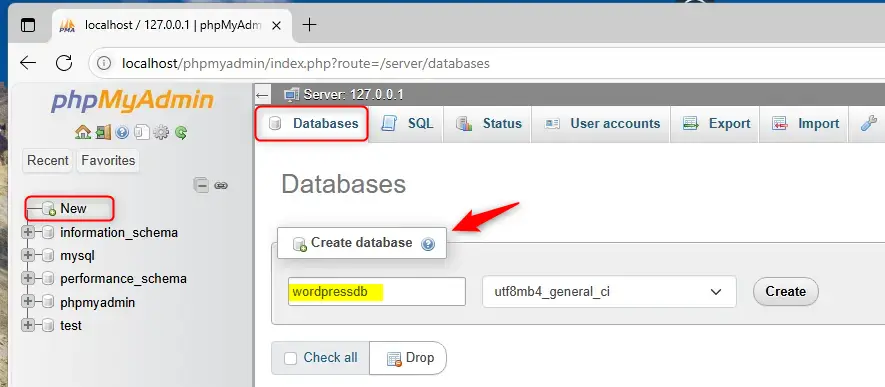
If you prefer using a graphical interface instead, click the Admin button next to MySQL in the XAMPP Control Panel to open phpMyAdmin. From there, create a new database and user with full permissions using the user-friendly interface (see image below):
Step 3Download and Set Up WordPress
Now let’s get the WordPress files ready on your computer.
- Go to the folder
C:\xampp\htdocson your PC. - Create a new folder inside called
wordpress. - Download WordPress from the official WordPress download page.
- Extract the WordPress files you downloaded into the
wordpressfolder you just created.

- Next, open the file
C:\xampp\htdocs\index.htmlwith a text editor like Notepad. This file controls what shows up when you visit your local server. - Replace its content with this code to make your browser go directly to the WordPress site:
<?php

  if (!empty($_SERVER['HTTPS']) && ('on' == $_SERVER['HTTPS'])) {

    $uri = 'https://';

  } else {

    $uri = 'http://';

  }

  $uri .= $_SERVER['HTTP_HOST'];

  header('Location: '.$uri.'/wordpress/');

  exit;

?>
Something is wrong with the XAMPP installation 🙁
- Save the file.
Step 4Restart Apache Server
Go back to the XAMPP Control Panel. Stop the Apache service and then start it again. This makes sure your changes take effect.
Step 5Install WordPress
Open your web browser and go to:
http://localhost/wordpress
You will see the WordPress setup screen. Follow these simple steps:
- Choose your language and click Continue.
- Click Let’s go! to start.
- Enter the database details you created earlier:
- Database Name:
wordpressdb - Username:
wordpressdbuser - Password: the password you set
- Database Host:
localhost - Table Prefix: leave it as
wp_
- Database Name:
- Click Submit.
- Click Run the installation.
- Fill in your site title, choose an admin username and password, and enter your email.
- Click Install WordPress.
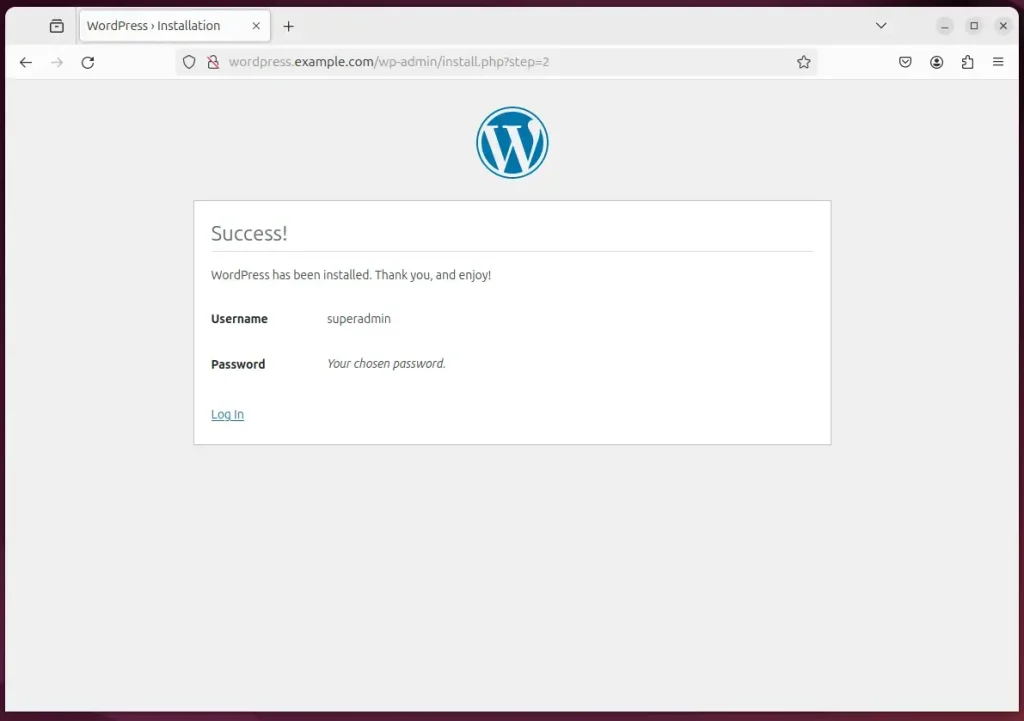
If everything is correct, WordPress will finish the installation and you can log in to your new site!
Summary
- You installed WordPress on your Windows 11 PC using XAMPP — no internet needed!
- You created a database for WordPress to save your website data.
- You downloaded WordPress and set it up to run on your local server.
- You installed WordPress through the web setup wizard.
Now you can try out themes, plugins, and build your website safely on your computer before putting it online. Enjoy your new WordPress playground!
Was this guide helpful?

About the Author
Richard
Tech Writer, IT Professional
Richard, a writer for Geek Rewind, is a tech enthusiast who loves breaking down complex IT topics into simple, easy-to-understand ideas. With years of hands-on experience in system administration and enterprise IT operations, he’s developed a knack for offering practical tips and solutions. Richard aims to make technology more accessible and actionable. He's deeply committed to the Geek Rewind community, always ready to answer questions and engage in discussions.


No comments yet — be the first to share your thoughts!