This article explains how to uninstall or reinstall Recall in Windows 11.
Recall & Snapshots is an AI feature in Windows 11 that functions like a photographic memory by saving snapshots of your screen. You can then use the Recall feature to quickly search your snapshots and find things you’ve seen on your PC.
A snapshot is taken every 5 seconds and stored only if it has changed since the last snapshot.
When you first start using Windows, saving snapshots is turned on. You can turn them off anytime by going to Settings> Privacy & security > Recall & snapshots on your PC.
Other recall options are available to users, such as disabling saving snapshots, temporarily pausing, filtering applications and websites, deleting snapshots, and more.
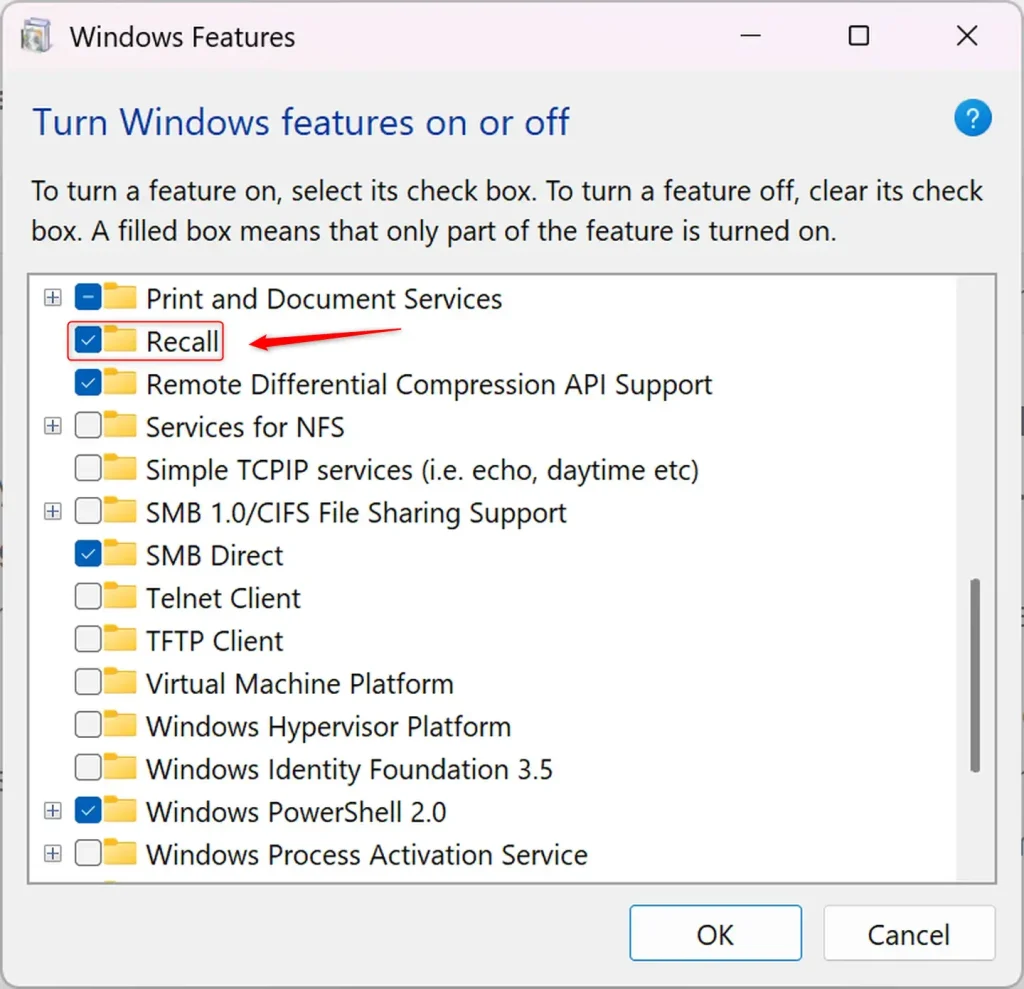
Beginning with KB5041865 Windows 11 build 26100.1591 (24H2), Recall is now a Windows Feature you can add or remove on demand.
Add or remove Recall using Windows Features
As mentioned, users can now add or remove the Recall features in Windows using the Windows Features options.
Here’s how to do it.
First, open Windows Features (OptionalFeatures.exe).
Then, scroll down the list and check to add or uncheck to remove the Recall feature in Windows.

Click the OK button to apply the changes to your computer.
Uninstall or Reinstall Recall using Command
Another way to uninstall or reinstall Recall in Windows is to use the command (Windows Terminal).
First, open the Windows Terminal as an administrator and select Windows PowerShell or Command Prompt tab.
Then, run the command below to install or uninstall.
DISM /Online /Enable-Feature /FeatureName:"Recall"
Disable or uninstall Recall:
DISM /Online /Disable-Feature /FeatureName:"Recall"
The same can be performed using PowerShell.
First, open the Windows Terminal as administrator and select the PowerShell tab.
Then, run the command below.
Enable-WindowsOptionalFeature -Online -FeatureName "Recall"
Disable or uninstall Recall:
Disable-WindowsOptionalFeature -Online -FeatureName "Recall"
You may have to restart your computer for the changes to apply fully.
That should do it!
Conclusion:
- Enabling or disabling Recall in Windows 11 can enhance user privacy and control over snapshot saving.
- The Recall feature, introduced in Windows 11, regularly captures screen snapshots as photographic memory.
- Users can manage Recall settings, including pausing, filtering applications and websites, deleting snapshots, and more for a tailored experience.
- With the latest Windows update, Recall is now available as a Windows Feature that can be added or removed based on user preference.
- Recall can be added or removed using Windows Features or the DISM command in the Windows Terminal.
- Verifying the changes and restarting the computer can ensure that the modifications to the Recall feature are successfully applied.


Leave a Reply Cancel reply