
This article explains how to change the mouse scrolling direction in Windows 11.
What Is Mouse Scrolling Direction?
Mouse scrolling direction is how your mouse wheel moves content on your screen. By default, scrolling up moves content up. Scrolling down moves content down.
Windows 11 uses reverse scrolling by default. This means the content moves in the opposite direction of your scroll wheel movement.
Two Types of Scrolling
Reverse Scrolling: When you roll the mouse wheel backward, the page scrolls upward. When you roll forward, the page scrolls downward.
Natural Scrolling: When you roll the mouse wheel backward, the page scrolls downward. When you roll forward, the page scrolls upward.
Why Change Your Scrolling Direction?
Some users prefer natural scrolling. It feels more intuitive. It matches how you swipe on phones and tablets. Changing this setting makes your mouse feel more natural to use.
How to Change Mouse Scrolling Direction in Windows 11
You can customize your scrolling direction in just a few steps. Here’s how.
Step 1: Open Device Manager
First, find your mouse device. Open the Device Manager by typing devmgmt.msc in the Windows search box and pressing Enter.
Step 2: Find Your Mouse Device
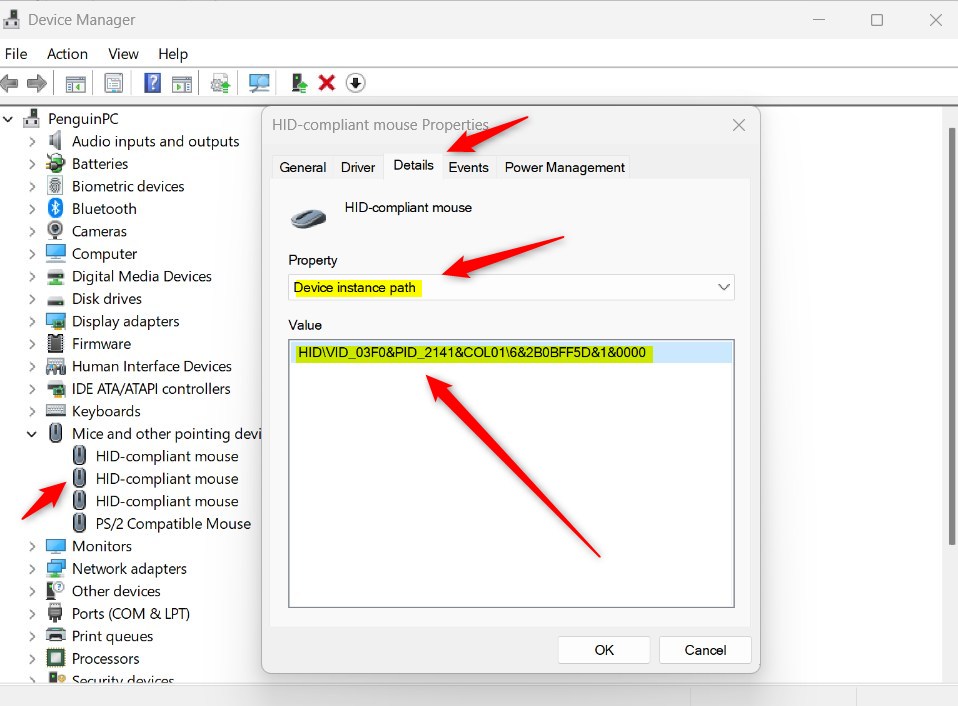
In Device Manager, expand the “Mice and other pointing devices” section. Find your mouse in the list. Double-click on it to open the Properties window.
Step 3: Get the Device ID
Click on the “Details” tab in the Properties window. At the top, change the “Property” dropdown to “Device instance path.” You will see a long code. Copy this code. It contains your mouse’s VID/HID key. You need this for the next step.
Step 4: Open Registry Editor Windows Registry Editor
⚠️ Admin Privileges Required: You need admin rights to edit the registry. Right-click on Registry Editor and choose “Run as administrator.”
Open the Registry Editor. Type regedit in the Windows search box and press Enter.
Step 5: Navigate to the Registry Path
In Registry Editor, go to this location:
Computer\HKEY_LOCAL_MACHINE\SYSTEM\CurrentControlSet\Enum\HID
Paste your VID/HID key from Step 3. Find and select the “Device Parameters” folder.
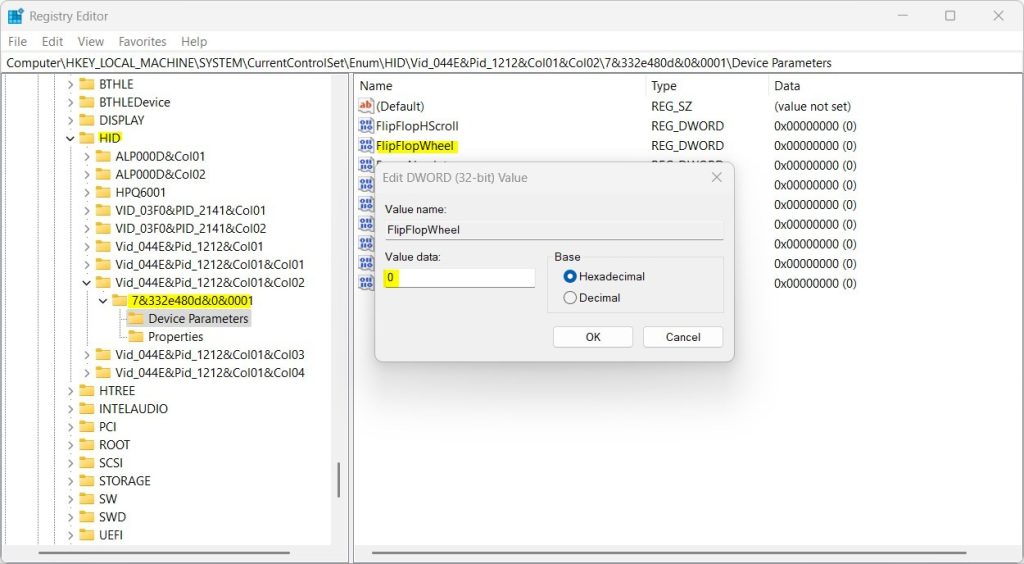
Step 6: Change the FlipFlopWheel Value
In the right pane, look for “FlipFlopWheel.” Double-click it to open. The default value is 0 (reverse scrolling). Change it to 1 for natural scrolling.
If you don’t see “FlipFlopWheel”: Right-click in the empty space on the right. Select “New” and then “DWORD (32-bit) Value.” Name it “FlipFlopWheel.” Set the value to 1.
Step 7: Restart Your Computer
Close Registry Editor. Restart your computer. What happens when you restart? Windows applies the scrolling changes you made.
Summary
Changing your mouse scrolling direction in Windows 11 takes just a few minutes. First, find your mouse device ID in Device Manager. Then, go to the registry path and change the FlipFlopWheel value from 0 to 1. Finally, restart your computer. The change takes effect after the restart. Always be careful when editing the registry. Make sure you follow each step correctly. If something goes wrong, you can always change the value back to 0.
Important Tips
- Be cautious when editing the Windows Registry. Wrong changes can cause problems.
- Always back up your registry before making changes.
- Restart your computer for changes to take effect.
- If scrolling feels wrong after the change, you can always change the value back.


Leave a Reply