How to Change Mouse Scrolling Direction in Windows 11
What Is Mouse Scrolling Direction?
Mouse scrolling direction controls how a page moves when you spin your mouse wheel. By default, moving the wheel up moves the page up. Moving the wheel down moves the page down.
Windows 11 often uses “reverse scrolling.” This makes the content move in the opposite direction of your wheel. Many people find this confusing.
Why Change Your Scrolling Direction?
Changing your scroll settings can make your computer feel more natural. If you use a smartphone or tablet, you are likely used to “natural scrolling.” This is where the page moves with your finger. Making this change helps your mouse act more like a touchscreen.
What Happens When Done?
After you finish these steps and restart, your mouse wheel will move pages in the way that feels best to you. If you pick the “natural” setting, rolling the wheel backward will move the page down, and rolling it forward will move it up.
How to Change Mouse Scrolling Direction in Windows 11
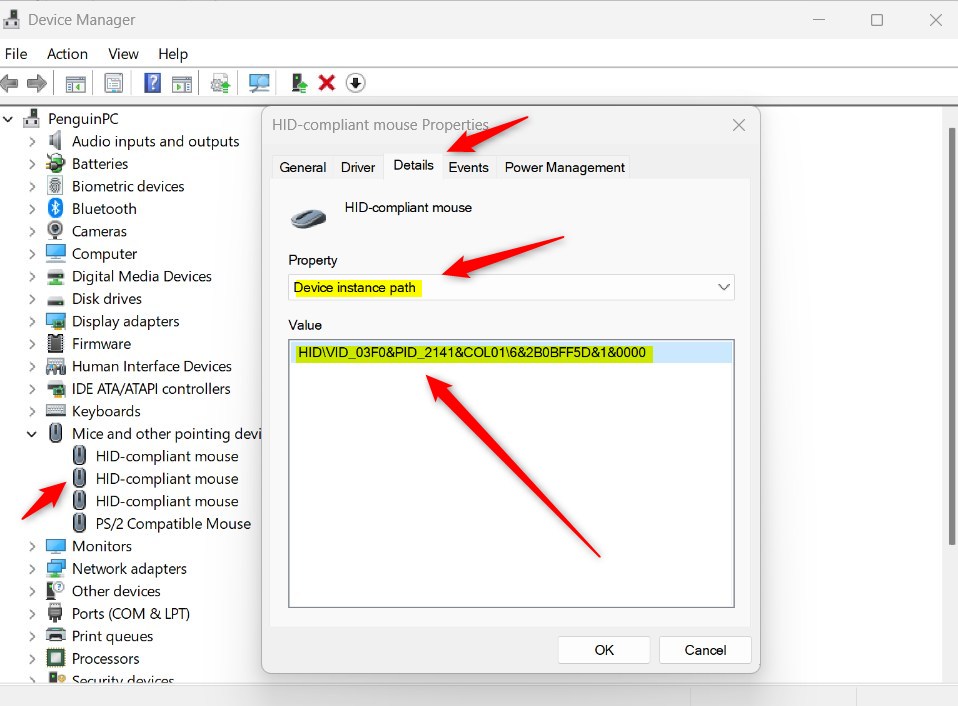
- Open Device Manager: Click the search box, type
devmgmt.msc, and press Enter. - Find Your Mouse: Open the “Mice and other pointing devices” section. Double-click your mouse to open its properties.
- Find the Device ID: Click the “Details” tab. In the “Property” menu, choose “Device instance path.” Copy the long code you see there.
- Open Registry Editor Windows Registry Editor: ⚠️ Admin Privileges Required: You must have administrator rights to do this. Search for
regedit, right-click it, and choose “Run as administrator.” - Find the Registry Path: In the Registry Editor, go to this folder:
Computer\HKEY_LOCAL_MACHINE\SYSTEM\CurrentControlSet\Enum\HID. Paste your Device ID code here and select the “Device Parameters” folder. - Change the Scrolling Setting: On the right side, find
FlipFlopWheel. Double-click it and change the value from 0 to 1. If you do not see it, right-click, select “New,” choose “DWORD (32-bit) Value,” and name itFlipFlopWheel. Set its value to 1. 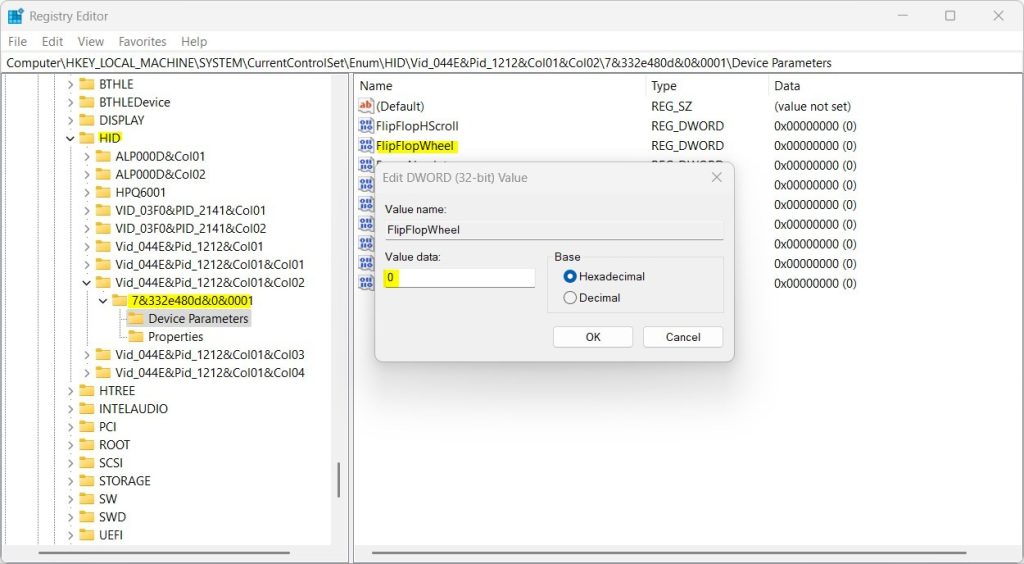
- Restart Your Computer: Close the editor and restart your PC. Your new settings will start working once the computer turns back on.
Summary
You can change your scroll direction by updating a setting in the Windows Registry. You find your mouse ID in the Device Manager, then use that ID to locate the FlipFlopWheel setting in the Registry Editor. Changing the value from 0 to 1 enables natural scrolling. Always be careful when editing the registry, as it is an important part of your system. If you ever want to switch back, simply change the value back to 0.
How do I change mouse scrolling direction in Windows 11?
What is the difference between reverse and natural scrolling?
Where do I find my mouse HID VID key in Windows 11?
What does the FlipFlopWheel registry value do?
Do I need to restart my computer after changing mouse scrolling settings?
Was this guide helpful?


Leave a Reply