Let’s walk through how to view and delete your browsing history in Microsoft Edge.
Your browser history, sometimes called browsing data, is basically a list of every website you’ve visited. Microsoft Edge keeps this data, like other browsers do, so you can revisit sites more easily and get a more personalized experience.
Knowing how to manage this history is essential for privacy and security, especially when using a shared computer. This tutorial shows you how to access and clear your browsing data in Edge.
Access the “Settings and more” menu (three dots) and navigate to Settings, then “Privacy, search, and services” to find “Clear browsing data.” Choose the desired time range and select what data to delete.
What Do You Want to Clear?
Before we start deleting things, think about what you want to remove. Microsoft Edge lets you choose what to delete. You can delete everything, or you can pick and choose specific items. This choice often depends on whether you want to clear your history only on the computer you are using now, or if you want it gone from all your devices where you are signed into Edge.
Clearing Data on Just One Device
If you only want to clean up your browsing history and other data on the computer you’re using right now, make sure Edge isn’t syncing this information to your other devices. Syncing is a handy feature that keeps your history, passwords, and settings the same across all your devices, like laptops, desktops, and phones. But if you’re clearing data on just one machine, it’s best to turn sync off temporarily.
Here is how to turn off sync:
- Open Microsoft Edge.
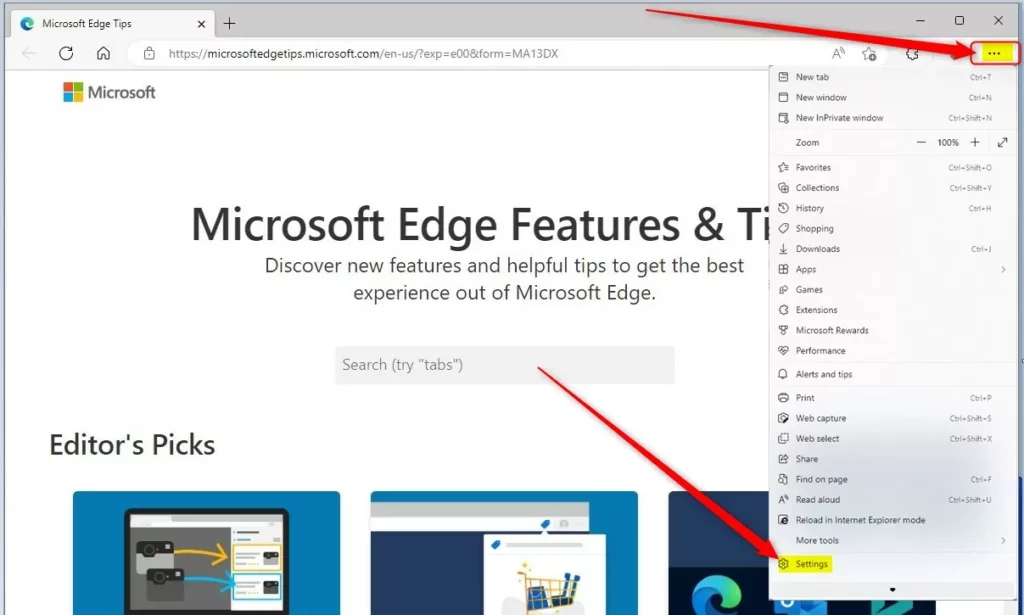
- Click the three dots
...in the top-right corner. This opens the “Settings and more” menu. - In the menu, choose “Settings.”
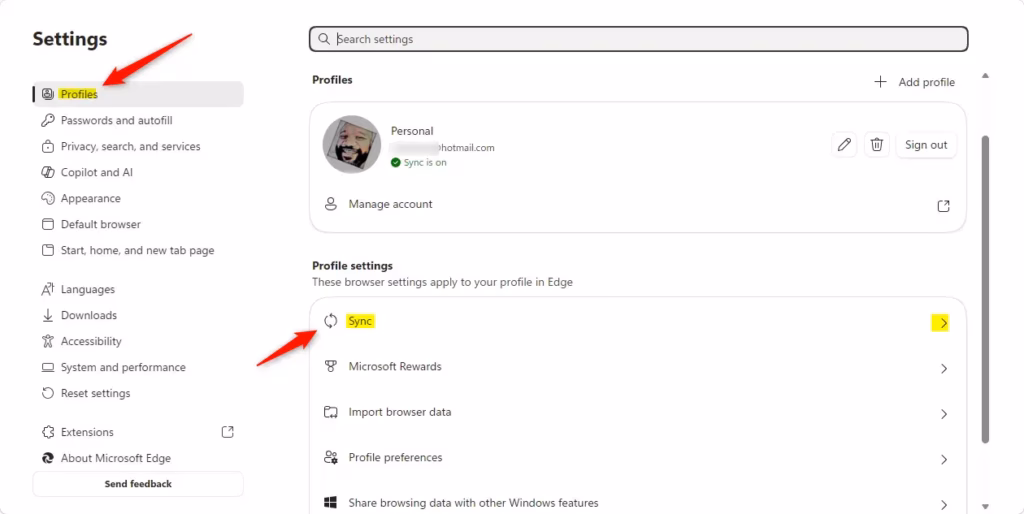
- In the Settings menu, click on “Profiles” on the left side.
- Under your profile info, find the “Sync” section. Click “Turn off sync.”
Tip: Don’t worry, turning off sync does not delete anything. It just stops Edge from sharing your browsing data between your devices. You can turn sync back on later if you want.
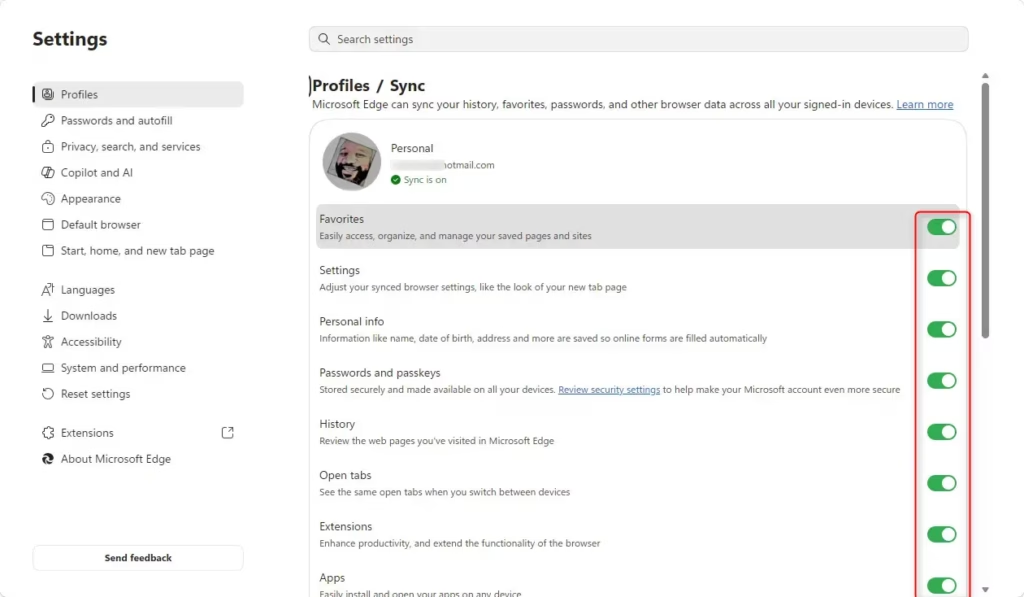
Clearing Data Across All Synced Devices
On the other hand, if you want to erase your browsing history from your PC, your work laptop, and your tablet all at once, you need to make sure sync is turned ON. You also need to be signed into your Microsoft account. When sync is on, any data you clear will be removed from all devices linked to your account.
Warning: Be careful! If you have many devices, clearing data with sync turned on means it will disappear everywhere. Make sure this is what you want before you continue.
How to Clear Your Browsing Data
Now that you know if you want to clear data locally or on all your synced devices, let’s get to the actual clearing process. It’s something you can do once you know where to look.
Step 1Go to the Clearing Tools
First, you need to find the right place in Edge’s settings. This is where the deletion happens.
- Start Microsoft Edge.
- Click the “Settings and more” button (the three dots
...) in the top-right corner. - Go to “Settings.”
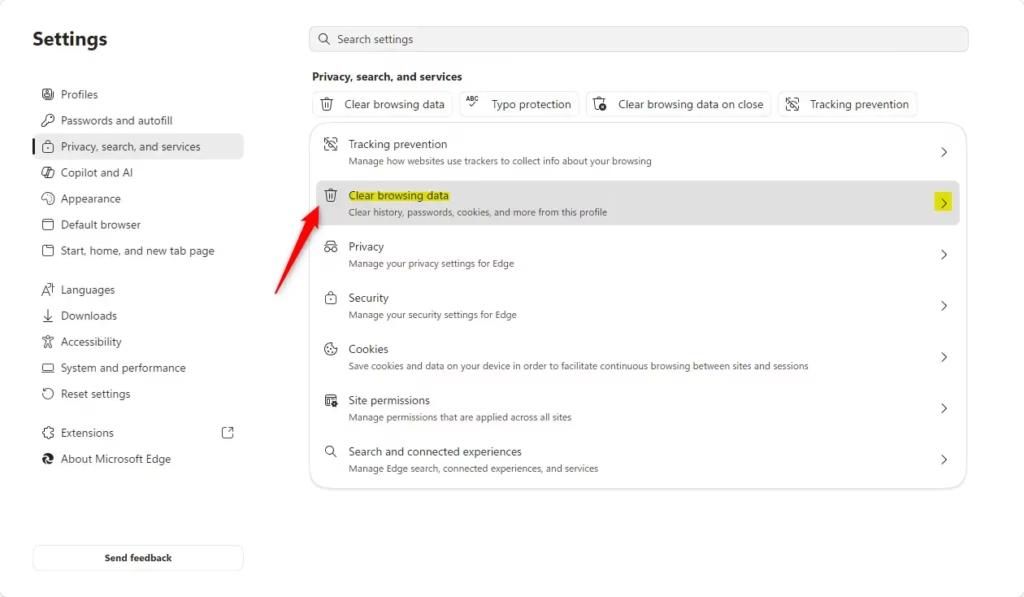
- In the Settings menu, click on “Privacy, search, and services” in the left sidebar.
Step 2Start Clearing Data
Once you are in the “Privacy, search, and services” area, you will see many options. Look for “Clear browsing data.” You will probably see a button that says “Choose what to clear” next to it. Click that button.
Tip: You might also see an option for “Clear browsing data now.” This often lets you clear basic data right away. But clicking “Choose what to clear” gives you more control, which we will use for these steps.
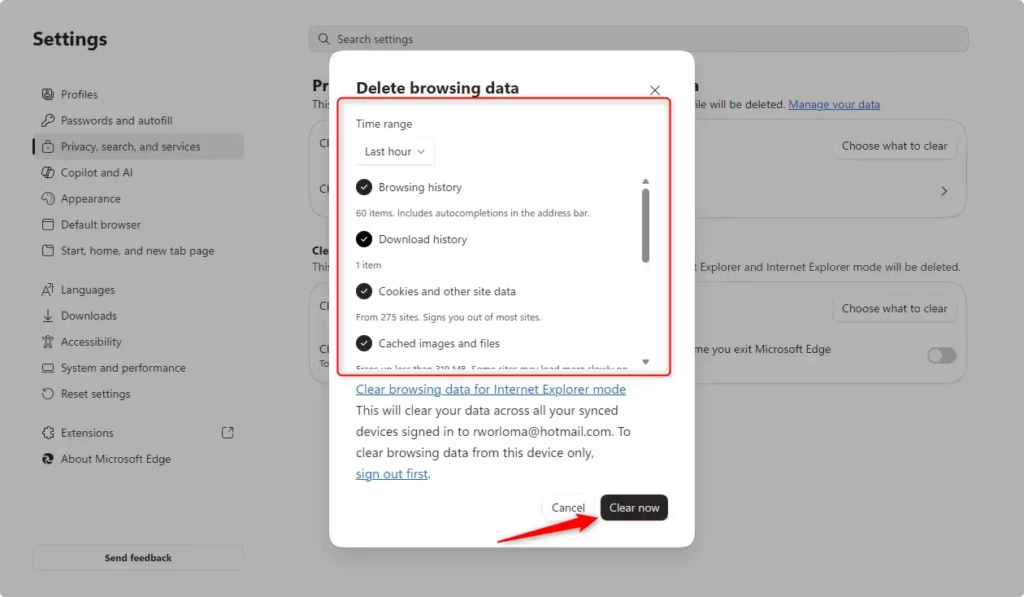
Step 3Choose Your Time Range
Here, you tell Edge how far back it should look for data to delete. You will see a dropdown menu called “Time range.” Click it to see several choices:
- Last hour: Good for a quick cleanup if you were just browsing something you don’t want saved.
- Last 24 hours: A good option for general tidying up from the day before.
- Last 7 days: Useful for a weekly reset.
- Last 4 weeks: For a bigger cleanup over the past month.
- All time: This is the big one. If you want to delete all your browsing history and related data since you started using Edge, choose this option.
Practical Tip: If you are not sure, start with a shorter time range like “Last 24 hours” or “Last 7 days.” You can always come back later and clear “All time” if you need to.
Step 4Select What Data to Delete
This is the most important part. You decide exactly what gets deleted. Edge shows a list of different types of browsing data. You need to check the boxes next to the items you want to remove.
- Browsing history: This is the list of all the websites you have visited, with the dates and times. Most people want to clear this.
- Download history: This only removes the *list* of files you have downloaded from the internet in Edge. It does NOT delete the actual files from your computer.
- Cookies and other site data: Cookies are small files that websites save on your computer. They remember things about you, like your login details or items in a shopping cart. Clearing these will sign you out of most websites.
- Cached images and files: When you visit a website, Edge saves copies of images and other parts of the page on your computer. This makes the site load faster the next time you visit. Clearing the cache means Edge will have to download these elements again. This can sometimes fix problems with how a website looks.
- Passwords: If you saved your website passwords in Edge, checking this box will remove them.
- Autofill form data (includes forms and cards): This includes information you typed into web forms, like your name, address, or credit card details that Edge offered to save.
- Site permissions: These are permissions you gave to websites, like letting them use your camera or send you notifications. You can manage these one by one in another settings area, but clearing them here resets those permissions.
- All data from the previous version of Microsoft Edge: If you recently updated Edge or switched from an older version, this option helps clear out old data from that previous version.
- Media Foundation data: This is more technical. It relates to licenses and keys used for playing media content in Edge. Clearing this usually requires restarting the browser.
Practical Tip: Most people often clear “Browsing history,” “Cookies and other site data,” and “Cached images and files.” If you want to keep your passwords saved or your form data filled automatically, make sure those boxes are NOT checked!
Step 5The Final Click – “Clear now”
After you select the time range and the types of data, you are ready to finish. Click the “Clear now” button. Edge will then remove the data you selected. This might take a few moments, especially if you selected ‘All time’ and have a lot of data saved.
Warning: Once this data is cleared, it is gone! There is no undo button in Edge. If you accidentally delete something important, you may need to enter it again or hope you have a backup somewhere else.
Reference:
https://support.microsoft.com/en-us/edge/view-and-delete-browser-history-in-microsoft-edge
Summary
Managing your Microsoft Edge browsing data is important for privacy and a smooth online experience. You can choose to clear data on just one device or across all devices by adjusting sync settings. The process involves going to Settings, then Privacy, search, and services, and selecting “Clear browsing data.” From there, you pick a time range and the specific types of data to delete, like browsing history, cookies, or cached files. Finally, click “Clear now.” This action removes the selected data, which can help protect your privacy, fix website issues, and give you a fresh start online.
What happens if I clear the cache on Edge?
Clearing the cache in Microsoft Edge removes temporary internet files, which can free up disk space and resolve website loading issues. It may cause some websites to load slightly slower on the first visit after clearing, as they'll need to re-download assets.
How do I delete unwanted browsing history?
To delete unwanted browsing history in Microsoft Edge, go to Settings > Privacy, search, and services > Clear browsing data. Select "Choose what to clear" and choose a time range. Check "Browsing history" and any other data you want to remove, then click "Clear now".
Is it a good idea to delete browsing history?
Deleting browsing history is a good idea for privacy and security, especially on shared computers. It prevents others from seeing where you've been online. Regularly clearing it can also help free up storage space and resolve potential browser performance issues.
How do I delete all my history?
To delete all your browsing history in Microsoft Edge, navigate to Settings > Privacy, search, and services > Clear browsing data. Choose "All time" for the time range. Ensure "Browsing history" is selected, along with any other data you wish to remove, then click "Clear now".
Was this guide helpful?

About the Author
Richard
Tech Writer, IT Professional
Richard, a writer for Geek Rewind, is a tech enthusiast who loves breaking down complex IT topics into simple, easy-to-understand ideas. With years of hands-on experience in system administration and enterprise IT operations, he’s developed a knack for offering practical tips and solutions. Richard aims to make technology more accessible and actionable. He's deeply committed to the Geek Rewind community, always ready to answer questions and engage in discussions.


No comments yet — be the first to share your thoughts!