How to Set HDR JXR Wallpapers in Windows 11
You set HDR JXR wallpapers in Windows 11 by applying a JPEG XR (.jxr) image file as your desktop background on a compatible monitor.
HDR wallpapers leverage the JXR format to display a significantly wider range of colors and brightness, resulting in more vivid visuals with deeper blacks and brighter highlights than standard images.
Windows 11, starting with build 22621.1610, offers native support for these high-dynamic-range images, allowing you to take full advantage of your DisplayHDR certified screen.
This enhancement transforms your desktop, making your chosen wallpaper appear more realistic and immersive, bringing out subtle details you might otherwise miss.
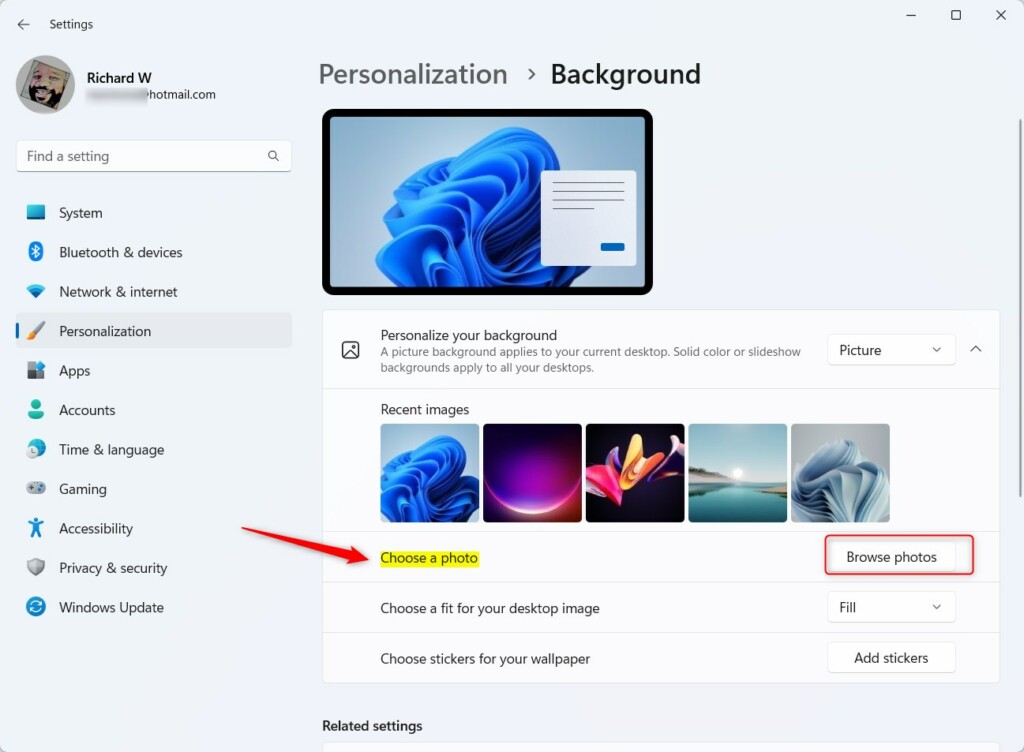
Open Settings, go to Personalization, then Background. Ensure the background is set to Picture, click Browse photos, and select your .jxr file. Your monitor must support HDR and have it enabled in Windows display settings.
Hardware Requirements
To show HDR JXR wallpapers on your Windows 11 PC, you need specific hardware and software. Your monitor should have DisplayHDR certification, and your computer needs a modern graphics card that supports HDR. Make sure you’re running Windows 11 build 22621.1610 or newer, and that HDR is turned on in your display settings.
- Display: A monitor with DisplayHDR certification is recommended.
- GPU: A modern graphics card that supports HDR output is required.
- Software: Windows 11 build 22621.1610 or newer.
- Settings: HDR must be enabled in Windows 11 display settings.
Comparison: SDR vs. HDR Wallpaper
| Feature | SDR (JPG/PNG) | HDR (JXR) |
|---|---|---|
| Color Range | Limited | Wide Color Gamut |
| Brightness | Standard | High Peak Brightness |
| Visual Quality | Flat | Vivid and Realistic |
How to set your HDR wallpaper
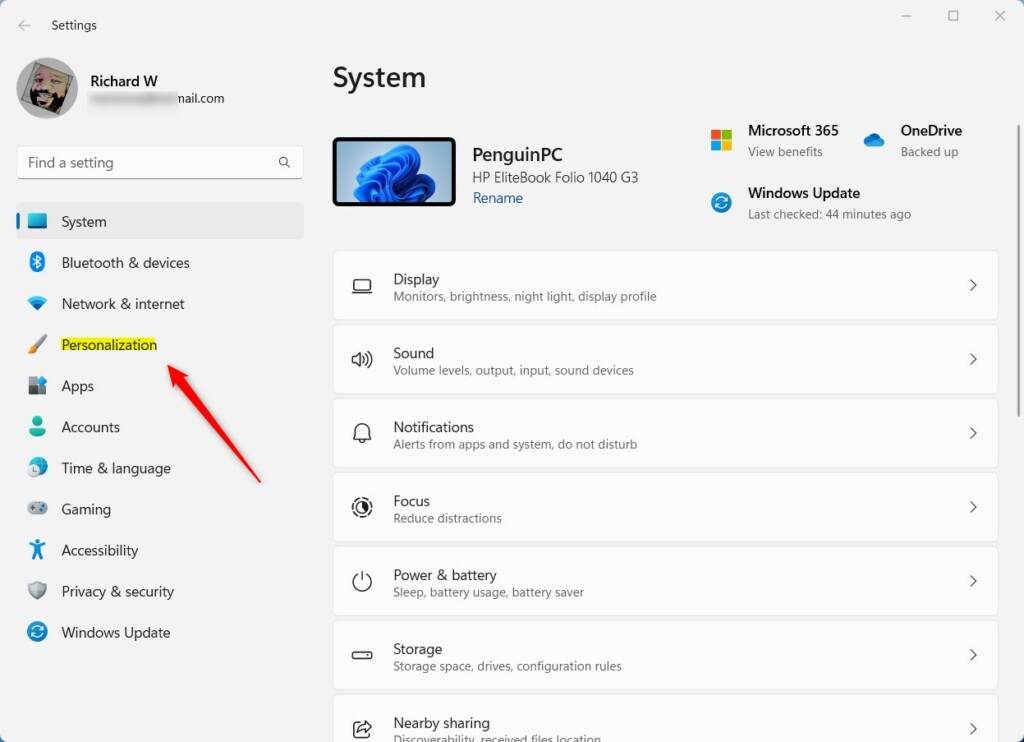
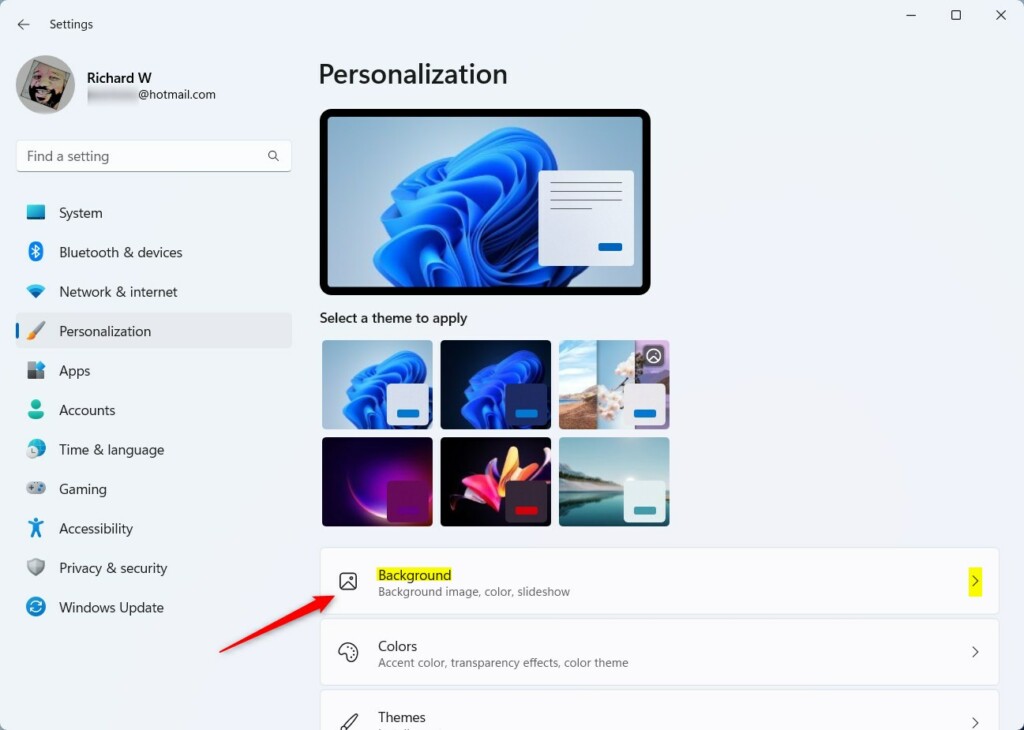
Setting your HDR JXR wallpaper in Windows 11 is straightforward and lets you enjoy vibrant HDR visuals quickly. First, open the Settings app by pressing the Windows key and ‘I’ together. Then, click on ‘Personalization’ in the menu on the left. Select the ‘Background’ tile, make sure the dropdown is set to ‘Picture’, and then click ‘Browse photos’ to choose your .jxr wallpaper file.
- Open the Settings app by pressing Windows key + I.
- Click on Personalization in the left menu.
- Click the Background tile.
- Ensure the dropdown is set to Picture.
- Click Browse photos and select your .jxr file.
- Open the Settings app by pressing Windows key + I.
- Click on Personalization in the left menu.
- Click the Background tile.
- Ensure the dropdown is set to Picture.
- Click Browse photos and select your .jxr file.
Troubleshooting
Summary
- Windows 11 supports JXR files for high-quality HDR backgrounds.
- Ensure your monitor has HDR support enabled in display settings.
- Use the Windows HDR Calibration app for the most accurate colors.
- HDR wallpapers may increase battery usage on portable devices.
Reference: Windows Blog
Does HDR wallpaper consume more battery on laptops?
Yes, HDR wallpapers do use more battery power on laptops because they need to make your screen brighter. To save power, Windows might dim your screen or turn off HDR when you’re not plugged in. It’s best to use HDR wallpapers when your laptop is charging.
Can I use standard JPG/PNG files as HDR wallpapers?
No, you can’t use regular JPG or PNG files for true HDR wallpapers in Windows 11. These file types don’t have the special information needed for HDR. For the best HDR JXR wallpaper look, you need to convert your images to the .jxr format.
Was this guide helpful?

About the Author
Richard
Tech Writer, IT Professional
Richard, a writer for Geek Rewind, is a tech enthusiast who loves breaking down complex IT topics into simple, easy-to-understand ideas. With years of hands-on experience in system administration and enterprise IT operations, he’s developed a knack for offering practical tips and solutions. Richard aims to make technology more accessible and actionable. He's deeply committed to the Geek Rewind community, always ready to answer questions and engage in discussions.


No comments yet — be the first to share your thoughts!