How to Toggle Personalization in Microsoft Edge


Personalization in Microsoft Edge is a built-in feature that tracks your browsing history, web addresses, and site visits to serve targeted ads and news. Microsoft Edge turns on this data collection by default when you click “Got it!” on the initial setup prompt.
You can turn off this feature at any time in the browser settings to stop Microsoft from collecting your web activity. Managing these controls helps you protect your privacy and keeps your browsing data off ad networks.
To enable or disable the Personalize Web Experience, open Edge Settings, navigate to Privacy, search, and services, and toggle the Personalization & advertising switch. Alternatively, use the Registry Editor to create or modify the PersonalizationReportingEnabled DWORD value under 🗝️HKEY_LOCAL_MACHINE\
Turn on or off Personalization & advertising in Edge
Microsoft Edge personalization settings let you control whether Microsoft uses your browsing history to show tailored ads and search results . You can easily turn this feature on or off through the main settings menu. Open Microsoft Edge, go to your settings, and look for privacy options to change how your data is used for web experiences.
If you’d prefer Microsoft not to store your browsing data for web personalization, you can turn this feature off.
Conversely, you can turn it back on if you want your information used for web personalization.
Begin by opening the Microsoft Edge browser.
Next, click on Setting and more (Alt+F), which is the 3 horizontal dots button in the top right corner, and select Settings.

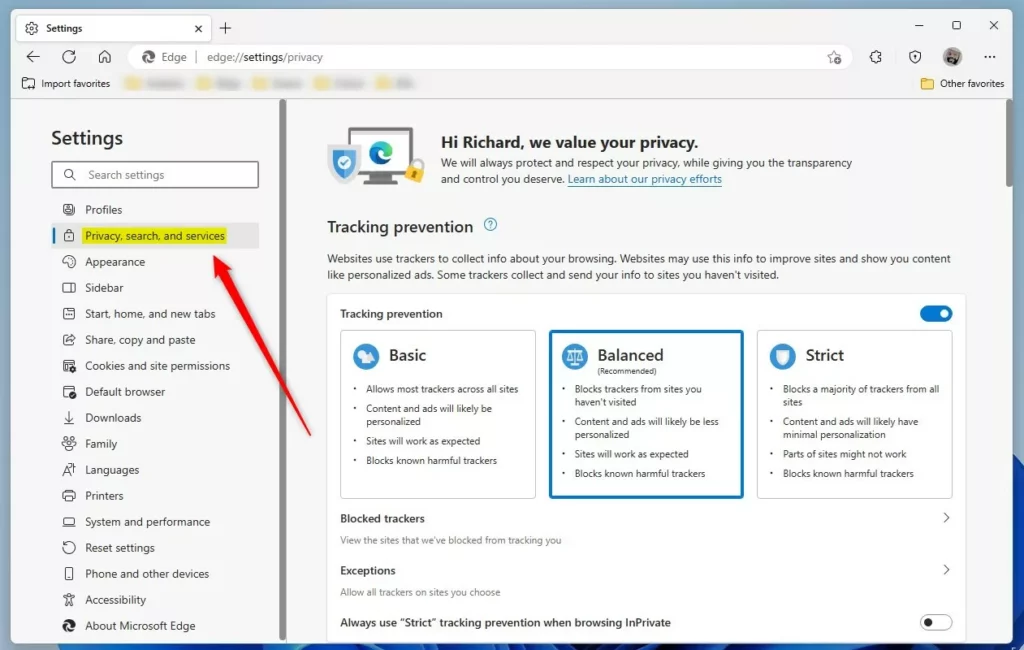
On the Settings page, click the Privacy, search, and services button in the left panel.
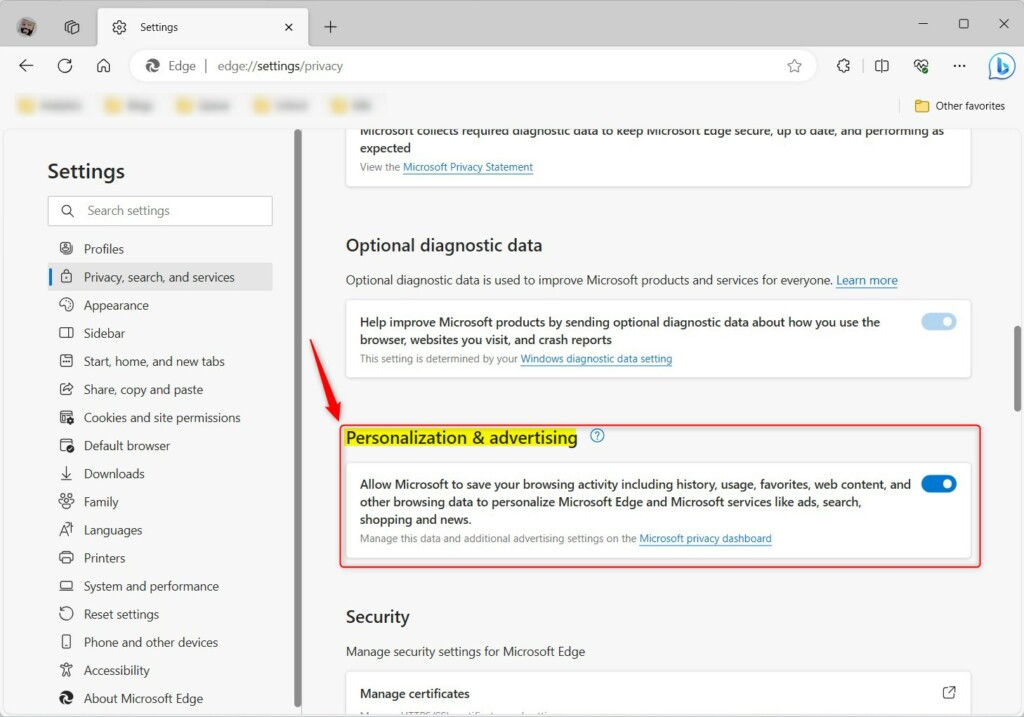
Select the "Personalization & advertising" tile on the right side.
Then, use the switch button to toggle the feature On or Off.
Close the browser settings once you finish.
Enable or disable Personalization and advertising in Microsoft Edge via the Registry Editor
Windows Registry Editor lets you change Microsoft Edge personalization settings if you prefer not to use the main browser menu. Press the Windows Key + R, type regedit, and press Enter to open the Registry Editor. Go to HKEY_LOCAL_MACHINE\SOFTWARE\Policies\Microsoft\Edge to update the registry keys and control how your browsing data is handled.
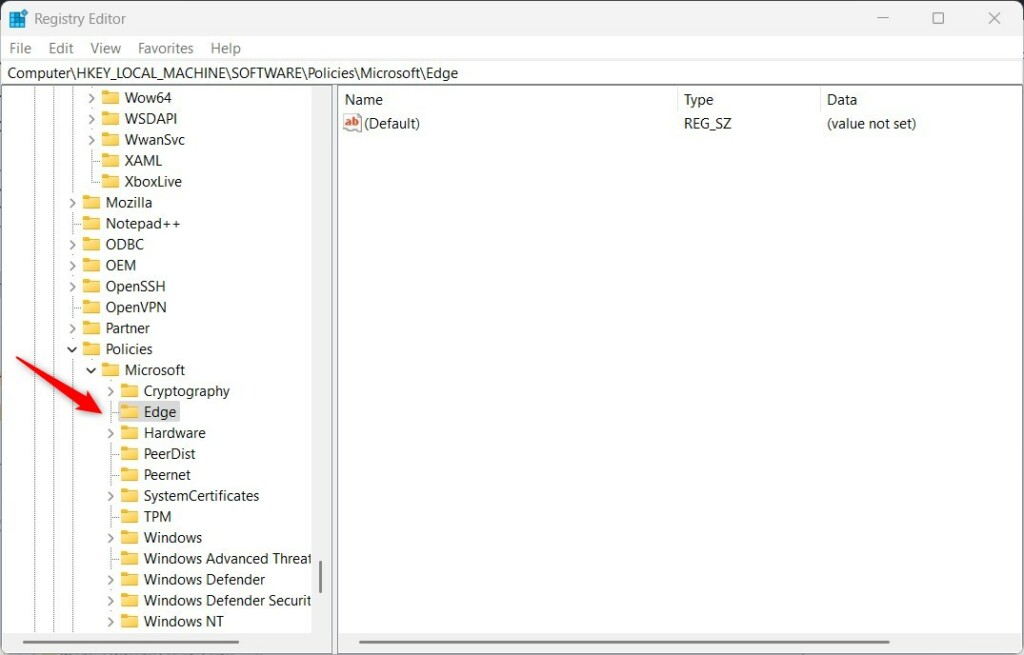
Press Windows Key + R, type regedit, and press Enter to open the Registry Editor. Go to this key:
HKEY_LOCAL_MACHINE\SOFTWARE\Policies\Microsoft\Edge
If you don't see the 'Personalization' folder (key), right-click on its parent key, and then create a new subkey named 'Edge'.
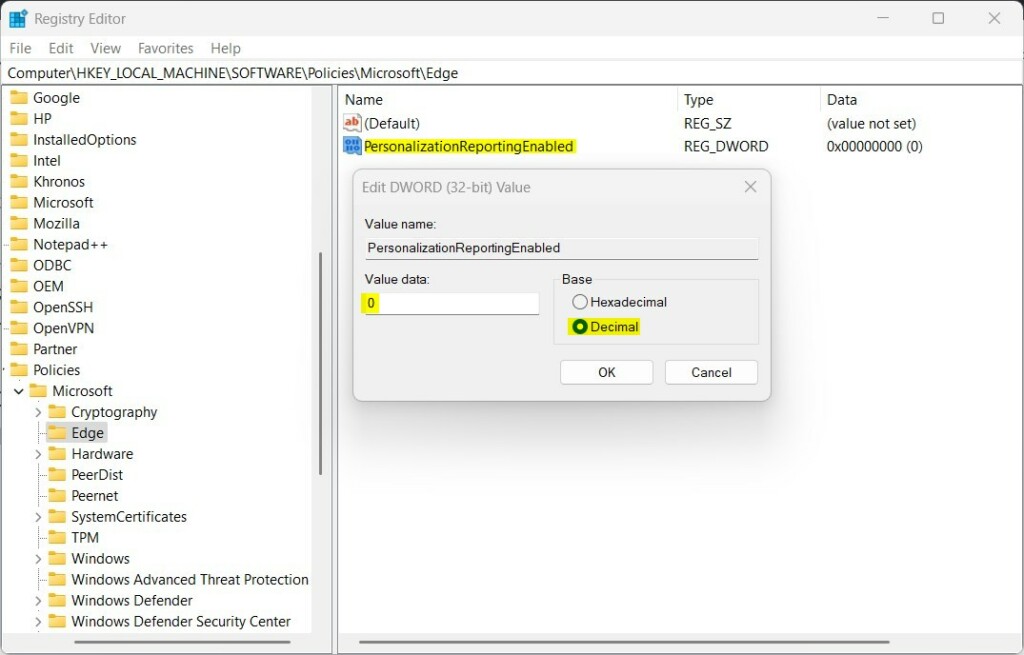
In the right pane of the Edge folder (key), right-click and select 'New' > 'DWORD (32-bit) Value'. Name this new item 'PersonalizationReportingEnabled'.
Double-click the item you created (PersonalizationReportingEnabled) and update its 'Value data':
- To disable personalization & advertising, type 0.
- To enable Personalization & advertising, delete the PersonalizationReportingEnabled item created above.
By opting out of sharing this data, Microsoft stops collecting and using your browsing activity for personalization of advertising or experiences from that point forward.
Restart your computer for the changes to take effect.
You can also manage data and additional advertising settings via your Microsoft account privacy dashboard.
Device-level advertising settings in Windows can also be controlled.
You're all set!
Reference:
Conclusion:
- In this article, you learned how to manage Personalization & advertising settings in the Microsoft Edge browser, including turning it on or off and hiding its prompts.
- By following the step-by-step guide, you can take control of your browsing data and tailor your web experience according to your preferences.
- Additionally, utilizing the Windows Registry editor provides an alternative method to enable or disable Personalization & advertising.
- You can also manage data and advertising settings through your Microsoft account privacy dashboard and device settings.
Was this guide helpful?

About the Author
Richard
Tech Writer, IT Professional
Richard is a writer at Geek Rewind who turns complex IT tasks into clear, step-by-step guides. He draws on years of hands-on experience in system administration and enterprise IT operations, focusing on Windows, Linux and WordPress: the problems people actually run into, and the fixes that work. His server and WordPress guides come from systems he runs himself. Richard builds and maintains the platform behind Geek Rewind, from its Ubuntu servers and Nginx configuration to its custom WordPress plugins. Many new tutorials start with readers' questions, and he's always glad to answer them in the comments.


No comments yet — be the first to share your thoughts!