How to Enable USB Battery Saver in Windows 11
You enable USB Battery Saver in Windows 11 to stop connected USB devices from drawing power when your screen turns off.
This feature helps extend your laptop’s battery life by intelligently managing power to idle peripherals like external hard drives, mice, and keyboards.
When your Windows 11 laptop display enters power-saving mode, the system automatically cuts power to these USB ports, preventing unnecessary battery drain.
Enable USB Battery Saver in Windows 11 by opening Settings, navigating to Bluetooth & devices, clicking USB, and toggling the USB battery saver option on. This feature conserves power by cutting electricity to idle USB devices when your screen turns off.
Is USB battery saver enabled by default in 🪟 Windows 11?
Yes, Windows 11 often enables basic power management features by default to optimize system latency and battery life. However, depending on your laptop manufacturer’s power delivery profiles, you may need to adjust these settings manually to balance performance with longevity.
How to change USB battery saver settings
Turning on USB battery saver in Windows 11 is simple and can be done right from the main Settings app without needing special admin rights.
- Open Settings by pressing the Windows key + I on your keyboard.
windows 11 start menu settings updated - In the menu on the left, click Bluetooth & devices.
- On the right side of the screen, click the USB tile.

windows 11 bluetooth and devices usb - Find the USB battery saver option and toggle it On or Off.
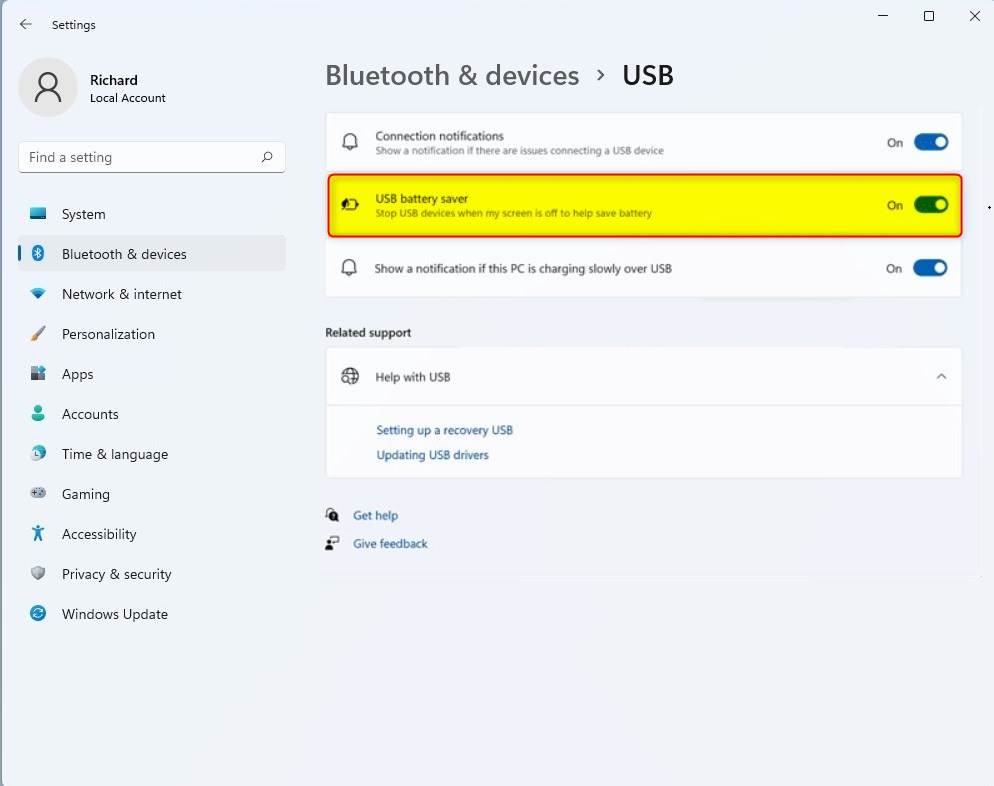
windows 11 usb battery saver on off
Advanced Power Management: USB Selective Suspend
Windows 11 includes a feature called USB Selective Suspend, which helps save power by putting individual USB ports to sleep when they aren’t being used, without turning off your PC.
Steps to access legacy Power Options (Requires Admin Privileges):
- Press Windows key + R, type powercfg.cpl, and press Enter.
- Click Change plan settings next to your active power plan.
- Click Change advanced power settings.
- Expand USB settings and then USB selective suspend setting.
Troubleshooting USB Connectivity Issues
If your USB devices, like a mouse or keyboard, keep disconnecting in Windows 11, it’s often because the system is trying too hard to save power.
Steps to disable power management for a specific device (Requires Admin Privileges):
- Right-click the Start button and select Device Manager.
- Expand Universal Serial Bus controllers.
- Right-click your USB Root Hub and select Properties.
- Go to the Power Management tab and uncheck Allow the computer to turn off this device to save power.
USB4 and Power Delivery
Modern devices supporting USB4 80Gbps require stable power delivery profiles. While USB battery saver is great for basic peripherals, high-performance docks and external GPUs may require consistent power. Always check the official Microsoft USB documentation for compatibility details.
Pro-Tip: Prevent Windows from turning off USB ports
If you have a device that keeps disconnecting, navigate to the Device Manager, find the device under Human Interface Devices, and uncheck the power saving box in the Power Management tab to keep it active at all times.
Summary
The USB battery saver in Windows 11 is a straightforward way to help your laptop battery last longer by stopping power to USB devices when not needed.
Does USB battery saver affect gaming mouse performance?
Yes, it can. If the system cuts power to your USB port, your gaming mouse may experience input lag or disconnect entirely when the screen goes dark. For competitive gaming, it is recommended to disable power-saving features for your specific USB ports to ensure consistent peripheral latency.
Why does my keyboard disconnect after enabling USB power saving?
This happens because the power management system incorrectly identifies your keyboard as an idle device. When the screen turns off, Windows suspends the USB port to save energy. You can fix this by disabling the power management setting for that specific device in the Device Manager.
Was this guide helpful?

About the Author
Richard
Tech Writer, IT Professional
Richard, a writer for Geek Rewind, is a tech enthusiast who loves breaking down complex IT topics into simple, easy-to-understand ideas. With years of hands-on experience in system administration and enterprise IT operations, he’s developed a knack for offering practical tips and solutions. Richard aims to make technology more accessible and actionable. He's deeply committed to the Geek Rewind community, always ready to answer questions and engage in discussions.


No comments yet — be the first to share your thoughts!