How to Turn On or Off Delete Warnings for Cloud Files in Windows 11
You can turn delete warnings for cloud files on or off in Windows 11 to control confirmation prompts when deleting items stored in cloud services like OneDrive or Dropbox.
These warnings appear when you attempt to delete files that are exclusively stored in the cloud, preventing accidental data loss.
For instance, if you’re using OneDrive’s “Files On-Demand” feature and try to delete a file that hasn’t been downloaded locally, Windows 11 can prompt you before proceeding.
This ensures you consciously confirm the deletion of cloud-only files, giving you a crucial second chance.
To turn off delete warnings for cloud files in Windows 11, check the “Don’t ask me again” box that appears with the warning prompt. Alternatively, use the Registry Editor to create or modify the “Donotshowagain” DWORD value to 1.
What is File Explorer?
File Explorer is the tool on your Windows computer that helps you find, copy, move, delete, and organize your files and folders. It shows files stored on your PC and in the cloud.
What are Online-Only Cloud Files?
When you use cloud services like OneDrive or Dropbox, some files may be stored only in the cloud to save space on your computer. These are called “online-only” files.
Why Do You See a Delete Warning?
When you delete an online-only file, Windows shows a warning to make sure you really want to delete it. Why? Because the file will be removed permanently and won’t go to the Recycle Bin. You can’t get it back easily.
How to Turn the Delete Warning On or Off in File Explorer
When you delete an online-only file, the warning popup appears. Here’s what to do:
- Look for the box that says “Don’t ask me again”.
- To keep seeing warnings: Make sure this box is unchecked.
- To stop seeing warnings: Check this box, and you won’t be asked again.
How to Turn the Delete Warning On or Off Using the Registry Editor
You can also change this setting using the Windows Registry. But be careful! Making wrong changes can cause problems. Always back up your registry or create a system restore point before you start.
⚠️ Admin privileges required for the following steps.
Follow these steps:
- Open the Registry Editor by typing
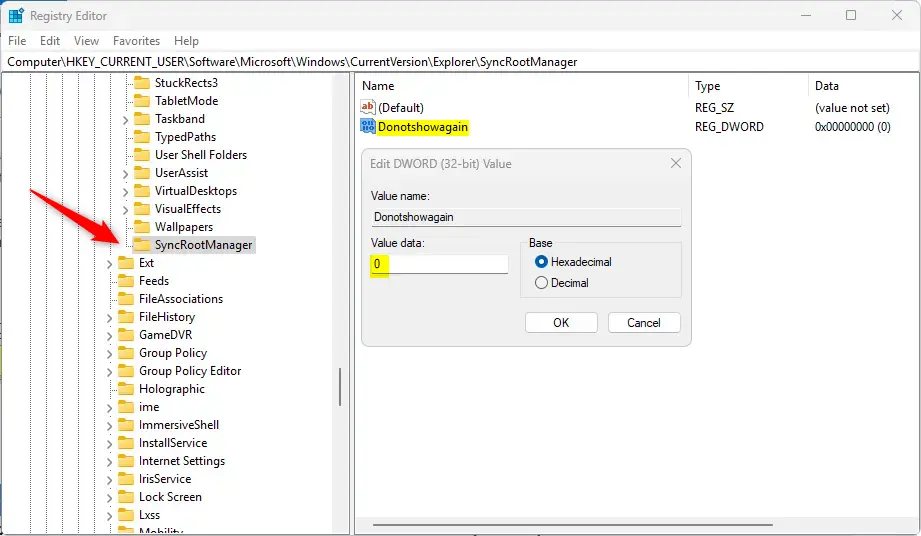
regeditin the Start menu search and pressing Enter. - Go to this folder path:
Computer\HKEY_CURRENT_USER\Software\Microsoft\Windows\CurrentVersion\Explorer\SyncRootManager - Right-click on
SyncRootManager, choose New > DWORD (32-bit) Value. - Name the new value
Donotshowagain. - Double-click
Donotshowagainand set the value to:0to enable the delete confirmation prompt (you will see the warning).1to disable the prompt (no warning will appear).
- Close Registry Editor and restart your computer to apply changes.
Summary
- The delete confirmation helps prevent accidentally deleting important cloud files.
- If you delete files often and don’t want interruptions, you can turn off the warning.
- You can toggle this setting either when the warning pops up or by using the Registry Editor.
- Always back up your system before making registry changes.
- Understanding these settings helps you manage your cloud files safely and easily.
That’s it! Now you know how to control the delete warning for your cloud files in Windows 11.
How do I turn off Ask before deleting?
And then go down and select the settings. Button. Select general settings. And then scroll down underneath.
How do I delete a file that says the cloud file provider is not running?
The error is often caused when the folder you are trying to delete still has cloud-linked files inside it (or a sub-directory). You need to remove all files from the folder and sub-folders first, then delete the folders. A quick way to achieve this is with the “del” command from the command-line.
Was this guide helpful?

About the Author
Richard
Tech Writer, IT Professional
Richard, a writer for Geek Rewind, is a tech enthusiast who loves breaking down complex IT topics into simple, easy-to-understand ideas. With years of hands-on experience in system administration and enterprise IT operations, he’s developed a knack for offering practical tips and solutions. Richard aims to make technology more accessible and actionable. He's deeply committed to the Geek Rewind community, always ready to answer questions and engage in discussions.


No comments yet — be the first to share your thoughts!