How to Enable or Disable Automatic Sign-in After Windows 11 Update
You can enable or disable automatic sign-in after a Windows 11 update to skip manual login for setup completion.
This feature allows Windows 11 to use your existing credentials to log into your account automatically, speeding up the post-update setup process.
For example, Windows 11 version 23H2 introduced enhancements to this login behavior.
When enabled, your PC logs you in only after a Windows update finishes its setup. This does not affect your standard login when you start your computer; you’ll still need your PIN or password then.
Security Risks of Automatic Login
Method 1Using the Settings App
You can adjust this setting through the main Windows Settings menu. Note: This process requires administrator privileges.
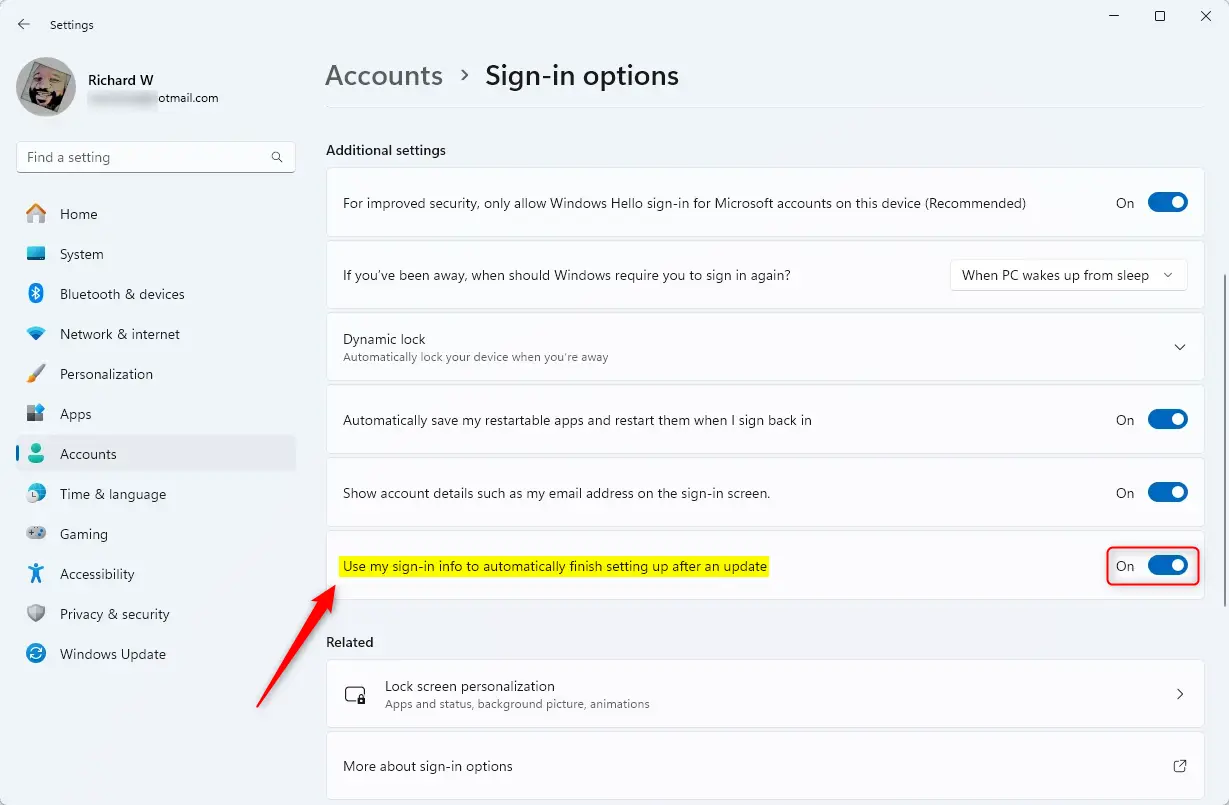
- Open the Settings app. You can do this by pressing the Windows key + I on your keyboard or by clicking Start and selecting the Settings icon.
- Click on Accounts in the left-hand menu.
- Select the Sign-in options tile on the right side of the screen.

- Look for the section labeled Additional settings.
- Find the option that says “Use my sign-in info to automatically finish setting up after an update”.
- Toggle the switch to On to enable it , or Off to disable it .
Method 2Using netplwiz for Automatic Logon
The netplwiz tool allows you to configure automatic logon for your user account. Note: This process requires administrator privileges.
- Press Windows key + R to open the Run box.
- Type netplwiz and press Enter.
- Select your user account from the list.
- Uncheck the box that says “Users must enter a user name and password to use this computer”.
- Click Apply and enter your current password twice to confirm.
Method 3Using Sysinternals Autologon
For a more reliable method, use the official Microsoft Sysinternals Autologon tool. It encrypts your credentials, making it safer than manual registry edits.
Method 4Registry Editor (Advanced)
You can configure automatic logon via the registry. Note: This process requires administrator privileges and carries risks if done incorrectly.
- Press Windows key + R, type regedit, and press Enter.
- Navigate to: 🗝️HKEY_LOCAL_MACHINE\SOFTWARE\Microsoft\Windows NT\CurrentVersion\Winlogon
- Locate AutoAdminLogon and set the value to 1.
- Ensure DefaultUserName and DefaultPassword are set correctly.
Troubleshooting and Tips
If you need to bypass automatic login temporarily, hold the Shift key during the boot process. This forces Windows to show the login screen.
Summary
Enabling automatic sign-in features can streamline your workflow, but it comes with significant security trade-offs. Always weigh the convenience of a faster login against the risk of unauthorized access. For the best balance, use the official Sysinternals tool or stick to the built-in update-only setting.” }
Can I use auto login on a domain-joined computer?
Generally, no. Domain-joined computers are managed by group policies that enforce password requirements for security. Enabling auto login on these devices is often blocked by your organization’s IT department to protect sensitive network data and ensure compliance with corporate security standards.
How do I stop Windows from requiring a password after waking from sleep?
Go to Settings, select Accounts, then Sign-in options. Under Additional settings, look for “If you’ve been away, when should Windows require you to sign in again?” Change the setting to “Never.” This prevents the lock screen from appearing when your computer wakes from sleep mode.
Was this guide helpful?

About the Author
Richard
Tech Writer, IT Professional
Richard, a writer for Geek Rewind, is a tech enthusiast who loves breaking down complex IT topics into simple, easy-to-understand ideas. With years of hands-on experience in system administration and enterprise IT operations, he’s developed a knack for offering practical tips and solutions. Richard aims to make technology more accessible and actionable. He's deeply committed to the Geek Rewind community, always ready to answer questions and engage in discussions.

No comments yet — be the first to share your thoughts!