How to Remove a Color Profile in Windows 11
Want to clean up your computer’s color settings? Removing a color profile in Windows 11 is a process. Here’s how to do it using the Settings app.
Navigate to Settings > System > Display > Color profile. Select the display and the profile you wish to remove. Expand the profile details and click the Remove button. Confirm the removal if prompted.
Why Remove a Color Profile?
You might want to remove a color profile if it’s no longer needed, if it’s causing display issues, or if you’ve installed a new one and want to clear out the old ones. Keeping your settings organized can sometimes help your computer run a bit smoother.
What Happens When You Remove a Color Profile?
When you remove a color profile, your computer reverts to its default color settings for that display. This means the specific color adjustments that profile made will no longer be active. Your screen might look slightly different, usually returning to a more standard appearance.
Steps to Remove a Color Profile
Step 1Open Windows Settings
Opening Windows Settings is the first step to manage your display and remove a color profile. You can open Settings quickly by pressing the Windows key and I at the same time, or by clicking the Start button and then the gear icon.
- Using the Keyboard Shortcut: Press the
Windows key+Ikeys on your keyboard at the same time. This is usually the quickest way to open Settings. - Using the Start Menu: Click the Start button (the Windows icon) on your taskbar. Then, click on the Settings icon, which looks like a gear.
Either of these methods will open the Settings window.
Step 2Go to Display Settings
After opening Settings, you’ll need to go to Display settings to manage your screen’s color profile. In the Settings window, click ‘System’ on the left, then click ‘Display’ on the right to find your display options.
- In the Settings window, look at the left-hand side. Click on System.
- On the right side, under the System options, click on Display.
This brings you to the main display settings page, where you can adjust things like brightness and screen resolution.
Step 3Find Color Profile Settings
Now, let’s find the section for managing color profiles. You’ll see the profiles currently linked to your display there.
- Scroll down the Display settings page.
- Look for the option called Color profile and click on it.
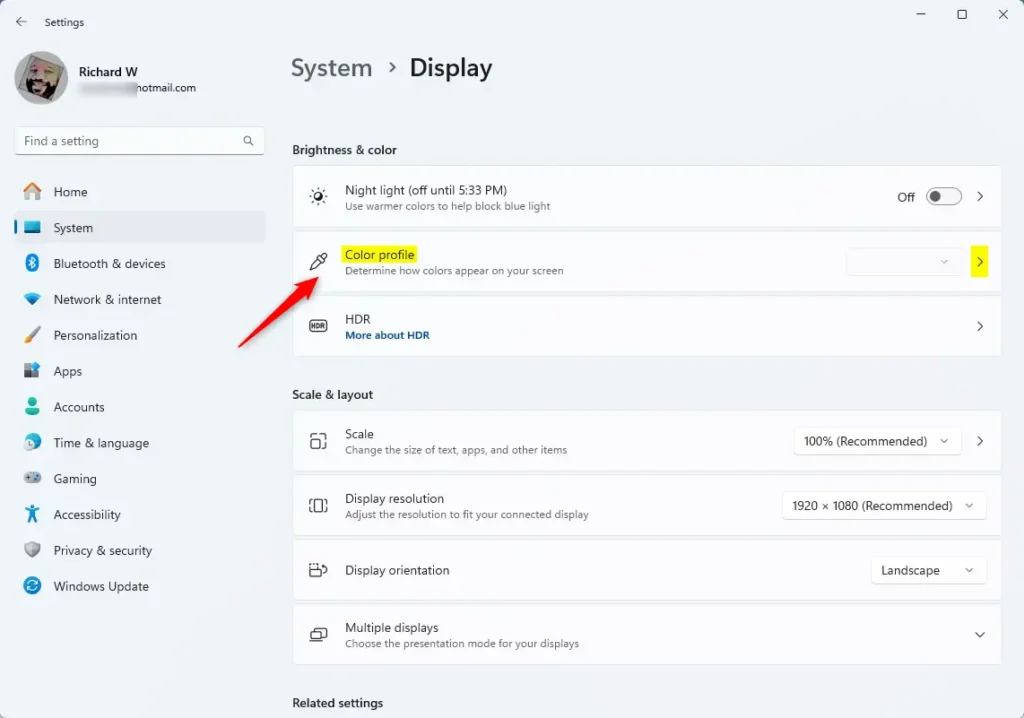
A new page will open, showing you the color profiles for your display.
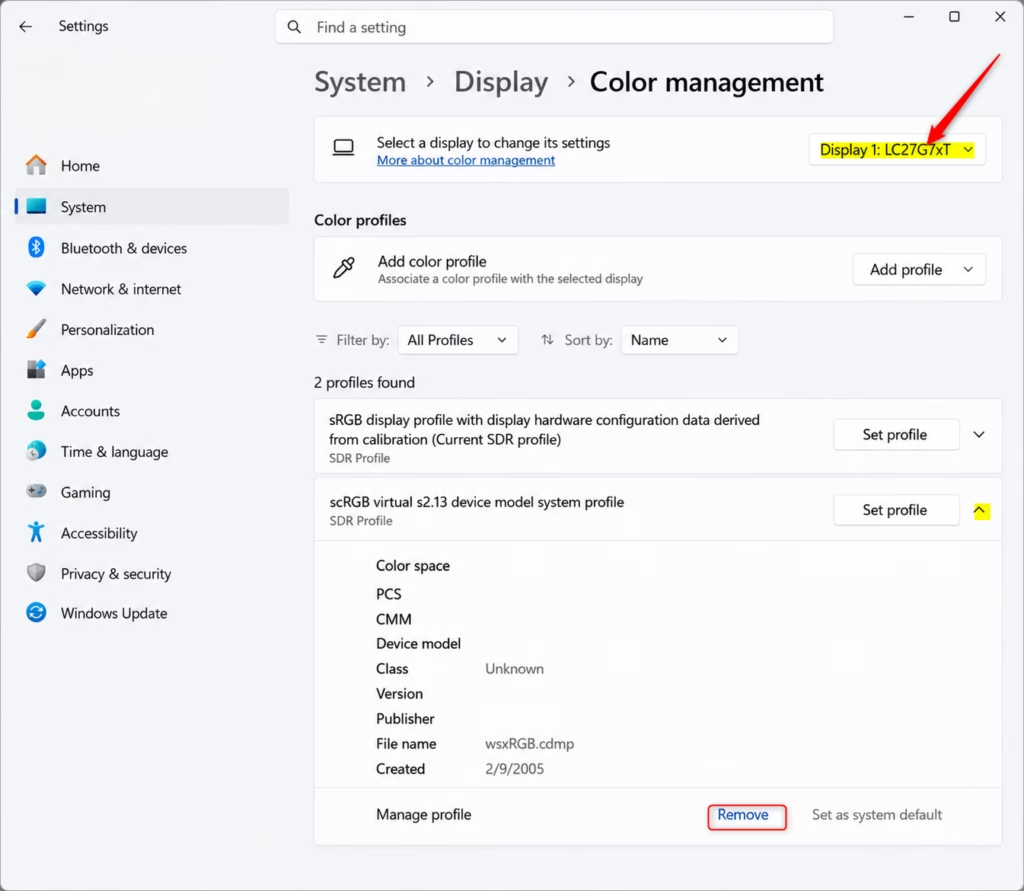
Step 4Choose Your Display and Profile
Before you can remove a color profile, you need to choose the right display and find the specific profile you want to get rid of. At the top of the Color profile page, select your display from the dropdown menu, then look below to see the list of profiles.
- At the top of the “Color profile” page, there’s a box that says “Select your display.” Click this and choose the monitor that has the color profile you want to remove.
- Below where you selected the display, you will see a list of color profiles. Find the one you want to delete.
Step 5Expand and Remove the Profile
To remove a color profile in Windows 11, click on the profile you want to delete to see its details, then click the ‘Remove’ button. Windows may ask you to confirm, so click ‘Remove’ again if prompted.
- Click on the color profile you want to remove. This will make a section expand, showing more details about it.
- At the bottom of this expanded section, you will see a Remove button. Click it.
- Windows might ask you to confirm. If it does, click to confirm that you want to remove the color profile.
Note: Some default color profiles cannot be removed. If the “Remove” button is grayed out or missing, that specific profile cannot be deleted.
Reference:
Summary
Removing a color profile in Windows 11 is straightforward: open Settings, go to System > Display > Color profile, select your display and the profile, expand it, and click Remove.
How do I delete a color profile?
To delete a color profile in Windows 11, open Settings, navigate to System > Display > Advanced display. Select the display, click ‘Color settings’, choose the profile you want to remove, and click ‘Remove’. Your screen will revert to default color settings.
How do I change 🪟 Windows 11 back to classic view?
Windows 11 does not have a ‘classic view’ option to revert to Windows 10’s appearance. However, you can customize the Start menu and taskbar to be more like Windows 10 by right-clicking the taskbar, selecting ‘Taskbar settings’, and adjusting alignment and other options.
How do I set screen colors back to normal?
To set screen colors back to normal in Windows 11, remove any custom color profiles. Go to Settings > System > Display > Advanced display. Select your display, click ‘Color settings’, choose the profile, and click ‘Remove’. This reverts your screen to its default color calibration.
Was this guide helpful?
0% of readers found this helpful (1 votes)

About the Author
Richard
Tech Writer, IT Professional
Richard, a writer for Geek Rewind, is a tech enthusiast who loves breaking down complex IT topics into simple, easy-to-understand ideas. With years of hands-on experience in system administration and enterprise IT operations, he’s developed a knack for offering practical tips and solutions. Richard aims to make technology more accessible and actionable. He's deeply committed to the Geek Rewind community, always ready to answer questions and engage in discussions.

No comments yet — be the first to share your thoughts!