How to Reset Apps in Windows 11: Easy Step-by-Step Guide

- 12 steps
- Needs administrator rights
Resetting an app in Windows 11 clears all its saved data and settings and puts the program back in its original, just-installed state. It is a built-in fix on Windows 11 version 22H2 and newer. Use it when an app freezes, crashes, or refuses to open.
Try the repair option first if the app offers one. Repair fixes minor bugs without touching your saved files. If repair does not help, a reset starts the app fresh. A reset cannot be undone, so back up anything important before you start.
Open Settings Apps Installed apps, find your app, click the three dots next to it, select Advanced options, then click Reset and confirm. The app returns to its original state with all data cleared.
How to Reset an App Using Windows Settings
The Settings app is the safest way to reset an app. It clears broken data, caches and temporary files, which are common causes of crashes and freezes, and you do not have to uninstall the program. The Advanced options page only appears for some apps. Microsoft Store apps and most built-in Windows apps have it. Traditional desktop programs installed from a downloaded setup file usually do not. If you cannot find it for your app, use the PowerShell method further down, or uninstall and reinstall the program.
Open the Settings app. Click the Start button (the Windows icon on the taskbar ), then click Settings. You can also press Win+I. The Settings window opens.
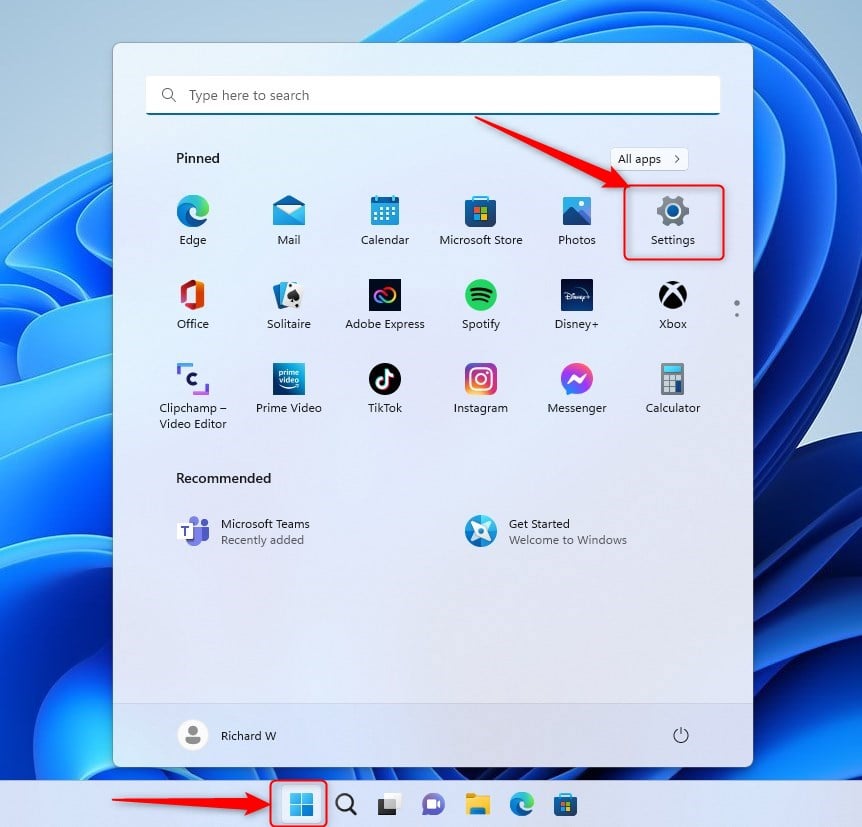
Click the Start menu then select Settings or press Win+I. Click Apps in the left-hand menu. The app settings appear on the right.
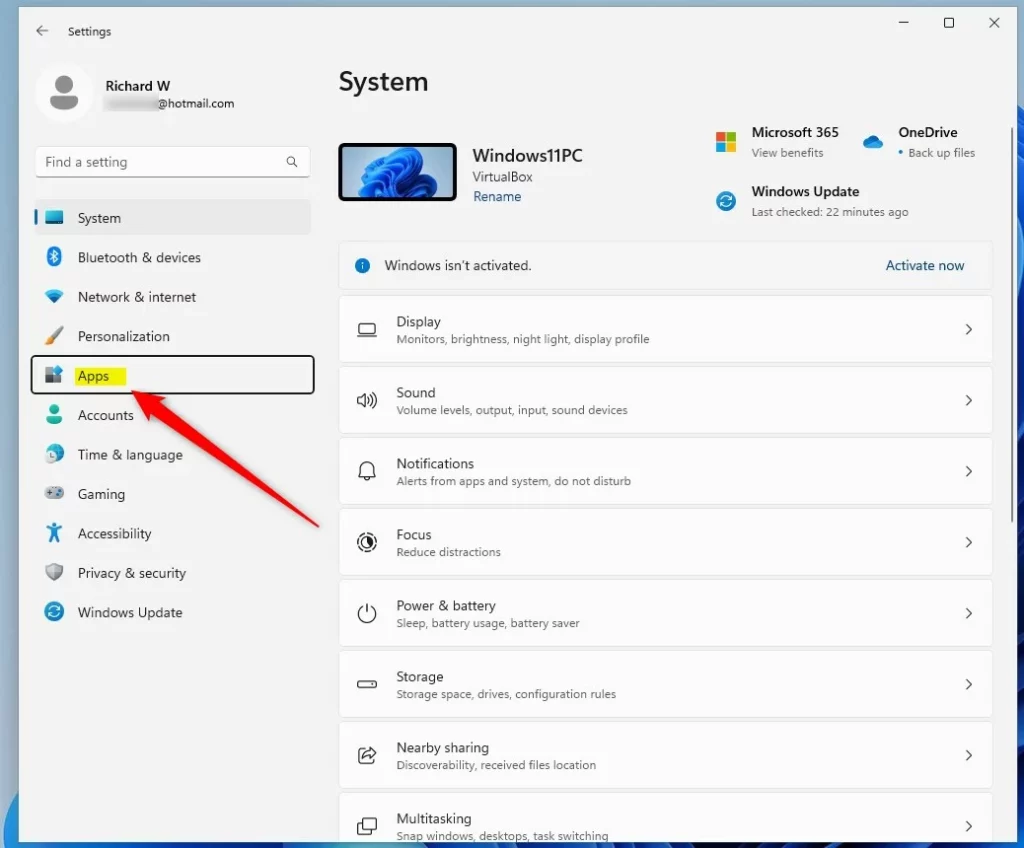
Click on Apps in the Settings menu. Click Installed apps on the right. On some builds it is labelled Apps & features. You should now see a list of every app on the PC.
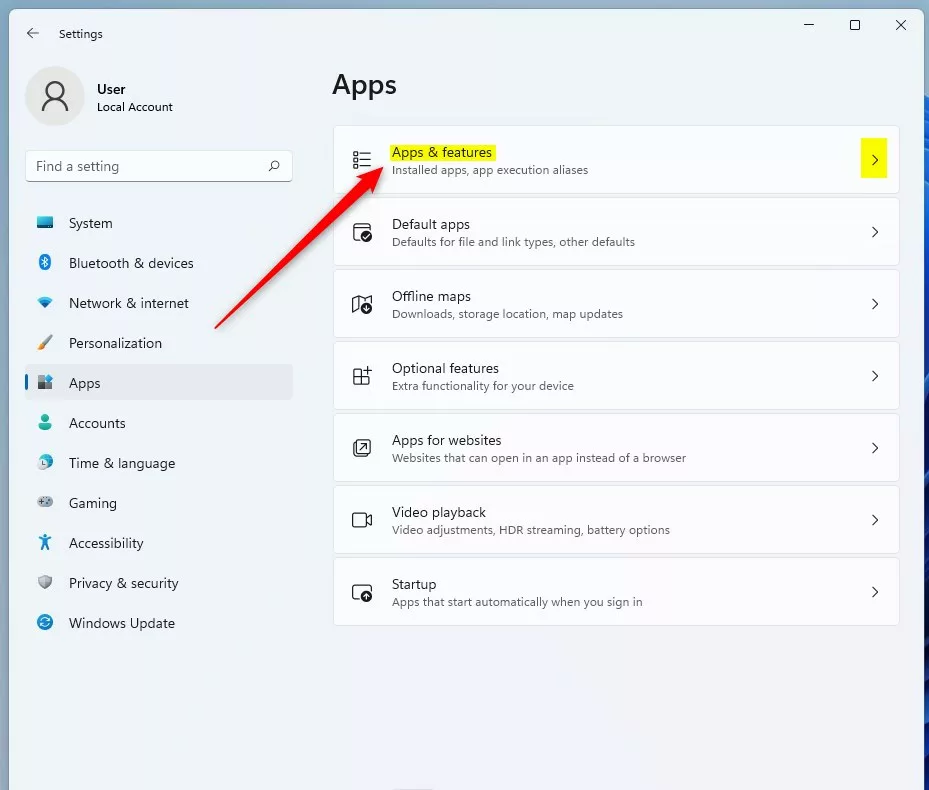
Click Installed apps or Apps & features. Find the app you want to reset. Scroll the list, or type its name in the search box at the top. Click the three dots (More options) button next to it, then click Advanced options. If that entry is missing, the app does not support resetting from Settings.
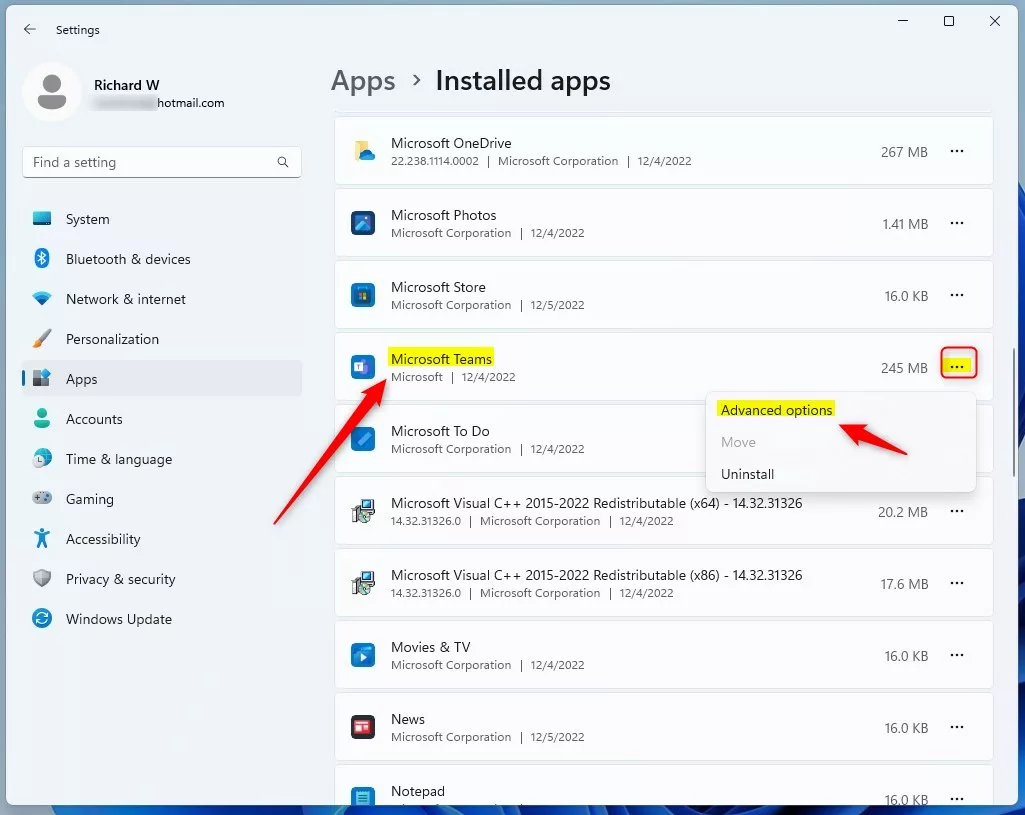
Click the three dots next to the app, then choose Advanced options. Click Terminate on the Advanced options page. This closes the app and its background processes so nothing is holding its files open. The button may be greyed out if the app is not running, which is fine.
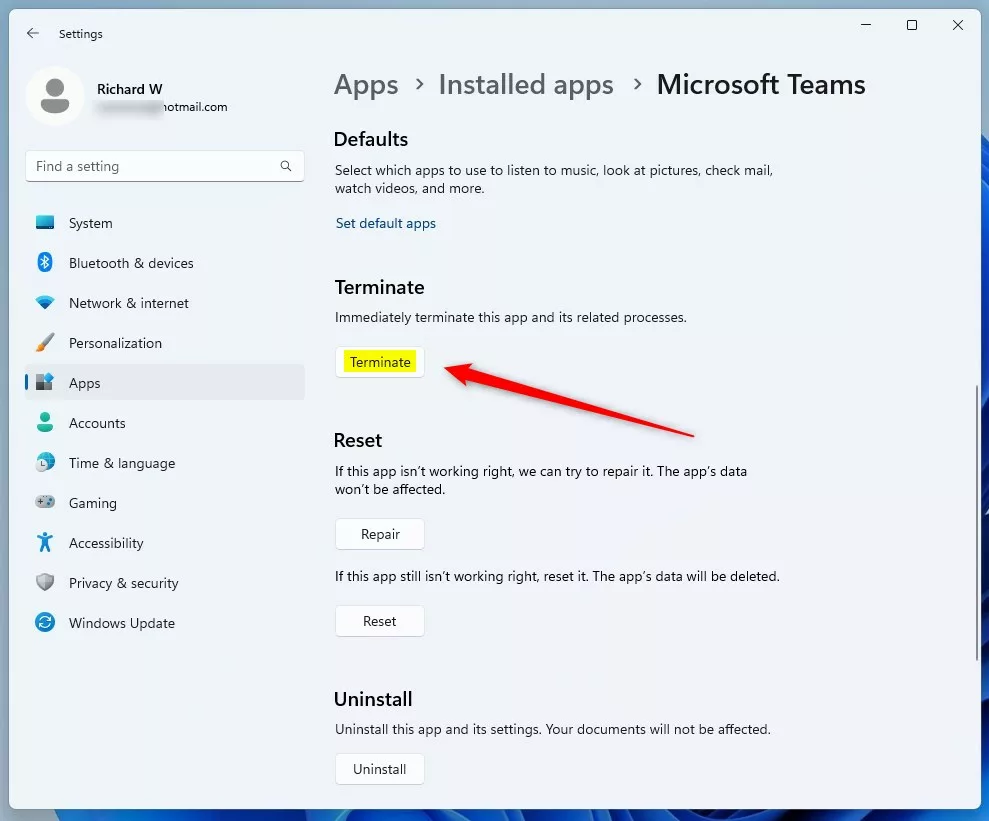
Click Terminate to stop the app and its background processes. Look for a Repair button in the Reset section. Not every app has one. If yours does, you can click Repair and test the app before going on, because repair keeps your data. If the problem is still there, or there is no Repair button, continue.
- ⚠️Warning
Click Reset. A small warning appears saying the app’s data on this device will be deleted.
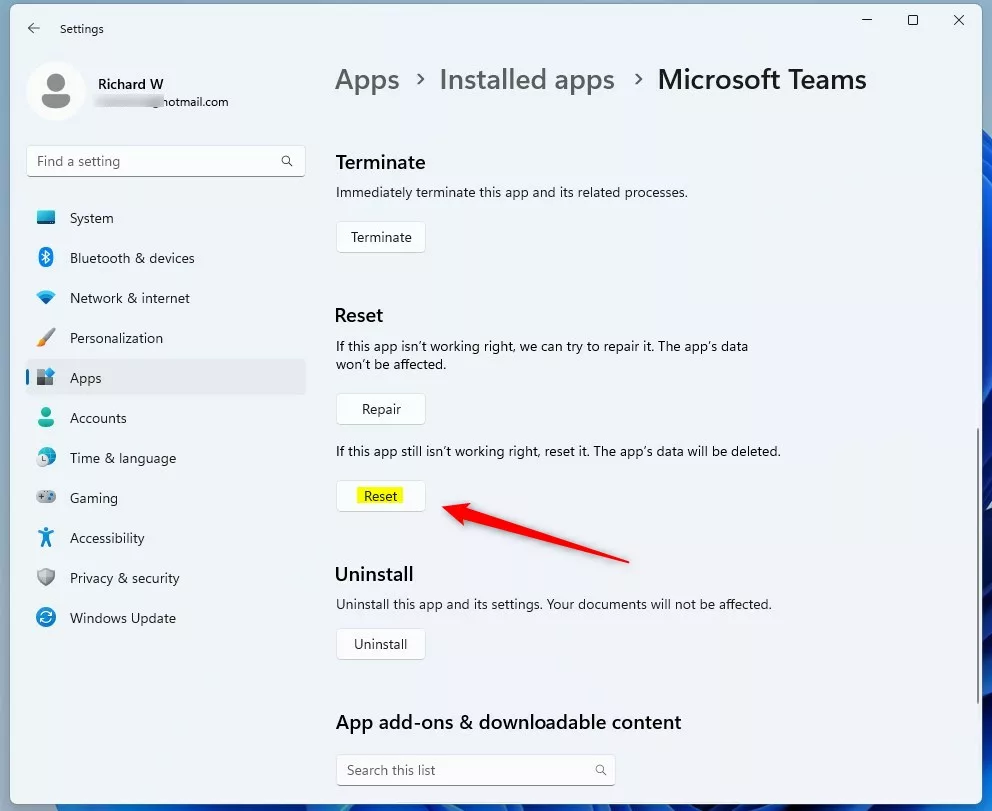
Click Reset to start resetting the app. Click Reset again to confirm.
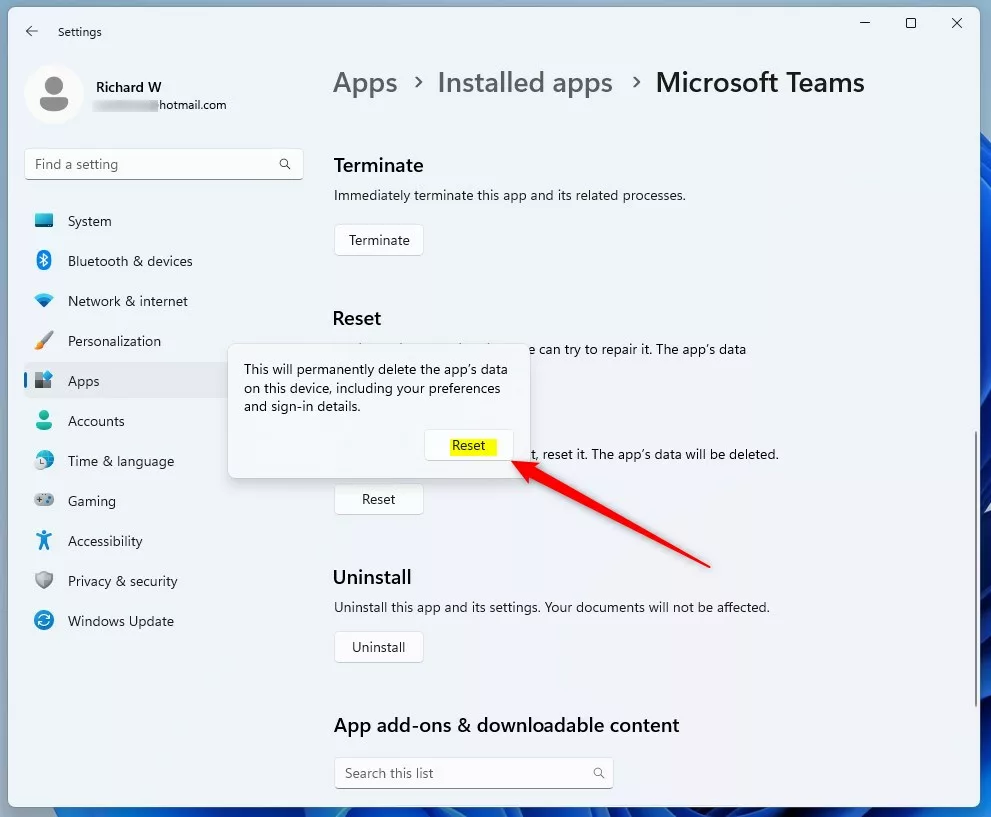
Confirm the reset by clicking Reset again. Wait a few moments. When the reset finishes, a checkmark appears next to the Reset button.
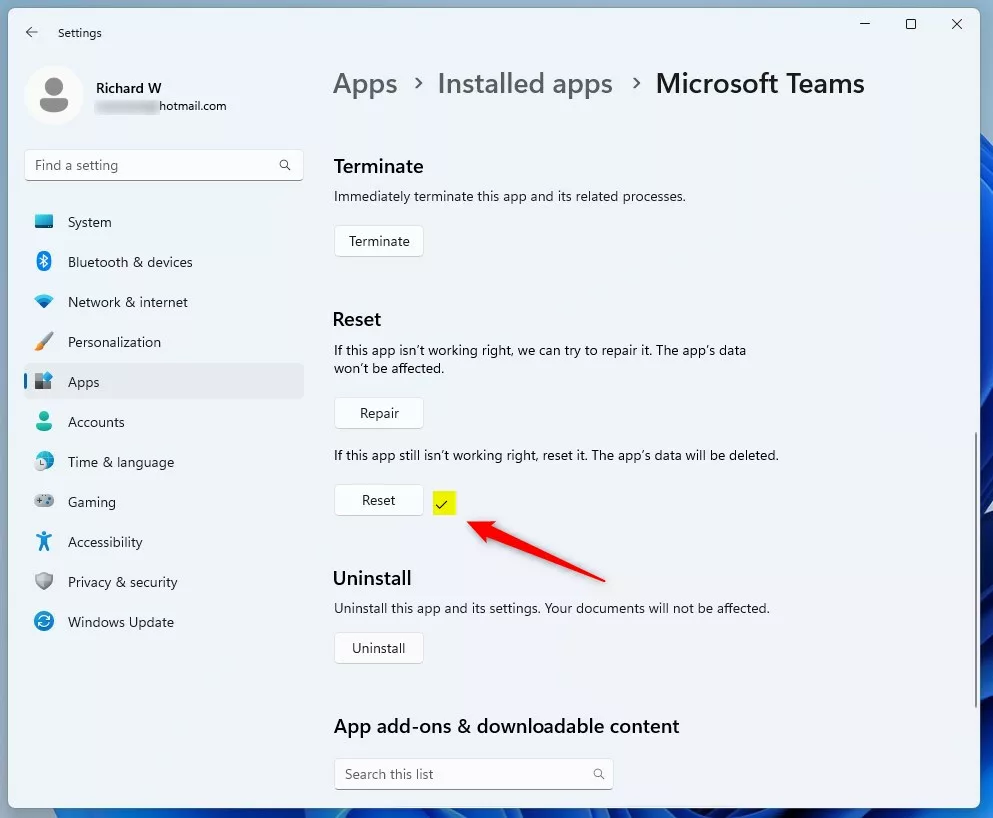
The app has been reset successfully. Open the app and test it. Expect to sign in again and set your preferences from scratch. You do not normally need to restart Windows.
How to Reset Apps Using PowerShell (Advanced Users)
Use PowerShell when the Settings page does not show the reset option, or when the app will not open normally. It is also the way to reach stubborn built-in Windows apps. You run text commands with administrator rights. The reset command used here works on Windows 11 22H2 and newer. If PowerShell does not recognize it, check your version in Settings System About and install pending updates.
- Open PowerShell as an administrator. Search for PowerShell in the Start menu , right-click the result, and select Run as administrator. Click Yes if User Account Control asks for permission. A PowerShell window opens with “Administrator” in the title bar.
- Run the command below to list all installed apps. Type it exactly, or paste it, and press Enter.
Get-AppxPackage | Select Name
The list can be long, so scroll through it to find the app you want to reset. Note its exact name as it appears in the list. A typo means the command will not find the app.
To reset the app, use the command below. Replace AppName with the name you noted.
Get-AppxPackage *AppName* | Reset-AppxPackage
Example: To reset Microsoft Teams, run:
Get-AppxPackage *MicrosoftTeams* | Reset-AppxPackage
When the command finishes, the app is back at its default settings. Open it and check that it now works. If PowerShell prints a red error, read the message. It usually means the name was typed wrong or the app is not a package that can be reset this way.
Important Things to Remember
- Resetting an app deletes all its data and settings permanently. Back up anything important before you reset. There is no undo, so restore from your backup or from the app's cloud sync if you need your data back.
- If you just want to fix small problems, try repairing the app first instead of resetting.
- Using PowerShell is more advanced and should be done carefully. Check the app name before you press Enter.
- If you run into any problems or have tips, feel free to share in the comments below!
Always try the repair option first to fix minor issues without losing your files. Back up any important documents before you run a full reset.
Have a question about this guide?
Answered by AI from this guide. Good questions may be added to this page — please don't include personal details.
Did this guide fix your problem?

About the Author
Richard
Tech Writer, IT Professional
Richard is a writer at Geek Rewind who turns complex IT tasks into clear, step-by-step guides. He draws on years of hands-on experience in system administration and enterprise IT operations, focusing on Windows, Linux and WordPress: the problems people actually run into, and the fixes that work. His server and WordPress guides come from systems he runs himself. Richard builds and maintains the platform behind Geek Rewind, from its Ubuntu servers and Nginx configuration to its custom WordPress plugins. Many new tutorials start with readers' questions, and he's always glad to answer them in the comments.
No comments yet — be the first to share your thoughts!