How to Remove Windows 11 Desktop Stickers

- 13 steps
- Needs administrator rights
- Includes a restart or sign-out
Removing Windows 11 desktop stickers clears unwanted artwork from your wallpaper. Stickers are a hidden personalization feature that Microsoft first tested in build 25151. You can remove the ones you placed from the sticker editor, or turn the feature off in the Registry Editor to get back a clean background.
Stickers were an experimental feature. They are not on by default, and you only see them if someone on your PC enabled them. If the commands below are missing on your PC, your build does not have the feature turned on, and there is nothing to remove.
Right-click a blank area of your desktop, select Add or edit stickers, hover over each sticker and click Del, then close the editor. To remove stickers permanently, open Registry Editor, navigate to 🗝️HKEY_LOCAL_MACHINE\
Remove stickers on your desktop in 🪟 Windows 11
It clears any graphics you placed on your wallpaper, and the feature stops working. Use it if you want stickers gone for good, or if the sticker editor will not open.
- Open the Start menu , search for Registry Editor and open it. Approve the User Account Control prompt. You need an administrator account to change keys under 🗝️HKEY_LOCAL_MACHINE.
- Back up the registry first. Choose File Export, pick All as the export range, name the file and save it somewhere safe. If something goes wrong, double-click that file to restore it.
- In the left pane, go to 🗝️HKEY_LOCAL_MACHINE\
SOFTWARE\ .Microsoft\ Windows\ CurrentVersion\ Stickers - Find the Stickers entry under Explorer, right-click it and select Delete. Confirm when Windows asks. The entry should disappear from the left pane.
- Close the Registry Editor and restart your PC. This makes sure Explorer reloads and the stickers no longer show.
A wrong deletion can cause problems that are hard to trace. If you are not comfortable with it, use the sticker editor methods below to remove the stickers one at a time.
If you already enabled stickers, you can remove them from the editor instead. That leaves the feature on, so you can add stickers again later.
Adding and editing stickers use the same command on the context menu. Here is how to open it:
- Right-click a blank area of your desktop. Don’t right-click an icon or a window.
- Select Add or edit stickers. On Windows 11 you may need to click Show more options first if the command is not in the short menu.
The sticker editor opens. Your wallpaper dims slightly and a stickers pane appears.
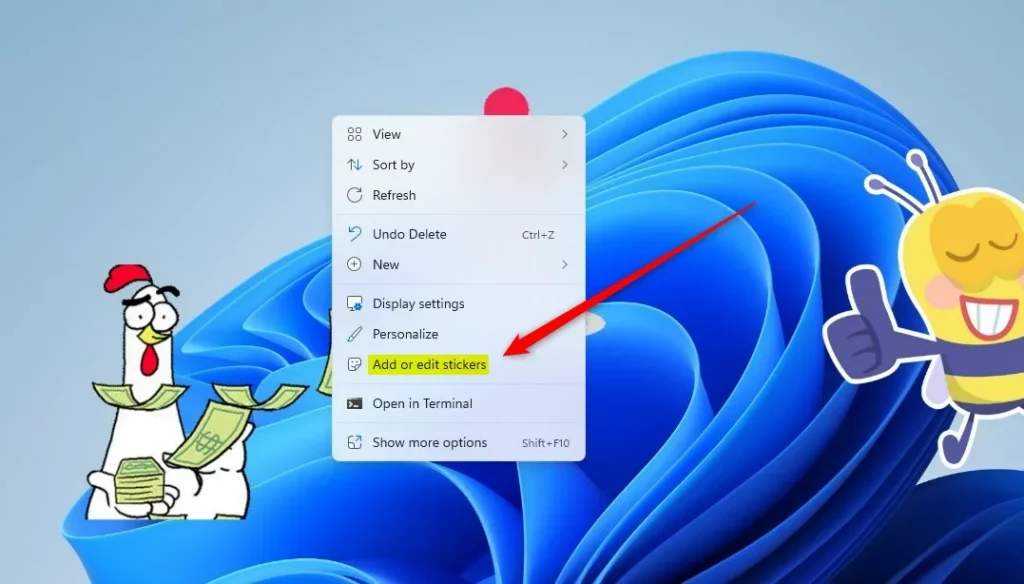
Once the editor is open, you can drop more stickers onto the workspace using the button on the stickers pane. You only need this if you want to add or change stickers rather than remove them.
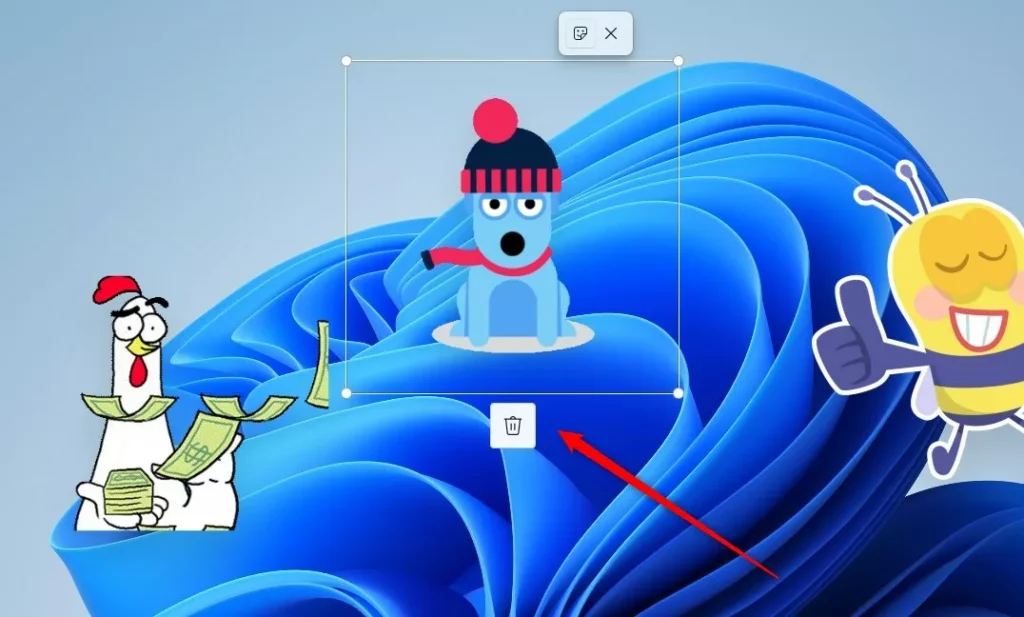
To delete a sticker, do this:
- Hover over the sticker you want to remove. A small set of controls appears around it.
- Click the Delete button. The sticker vanishes from the wallpaper right away.
- Repeat for every sticker you want gone.
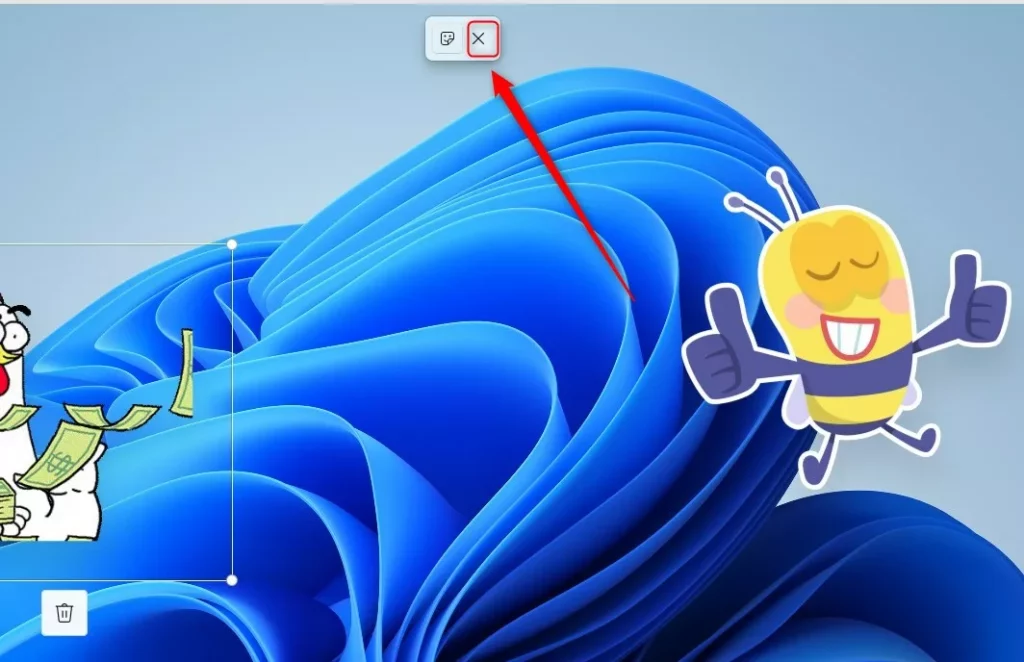
When you are finished, click the Close (X) button on the toolbar to shut the sticker editor. You should be back at your normal desktop with only the stickers you kept.
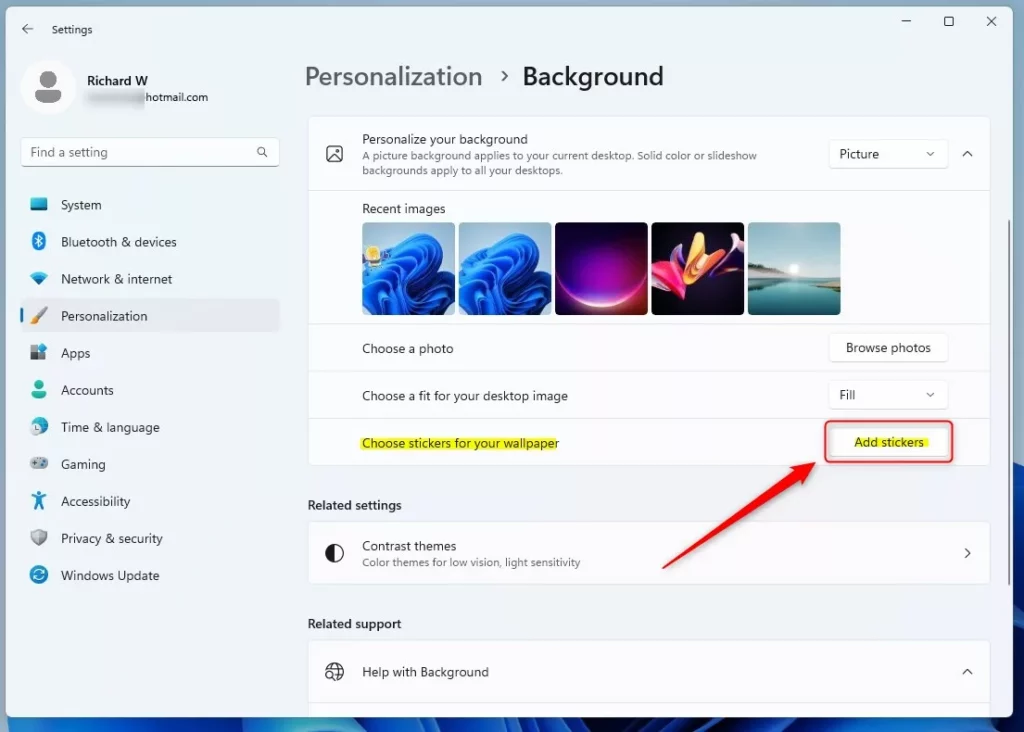
The Settings app gives you another route to the sticker editor. This helps if the context menu command does not show up.
- Go to Start Settings Personalization Background.
- Click the Choose stickers for your wallpaper tile.
- Click the Add stickers button. The sticker editor opens, and you can delete stickers the same way as above.
That wraps up the process. If any stickers remain after you close the editor, reopen it and check again. If you used the registry method, restart the PC once more.
Conclusion:
- Removing stickers from the desktop in Windows 11 can be a straightforward process, despite the feature not being readily available to users by default.
- By following the provided steps, users can easily enable, add, edit, and remove stickers from their desktop.
- Using the context menu or the Settings app is a convenient way to manage desktop stickers.
- Be careful when enabling hidden features like desktop stickers. It may require changes to the Windows registry, which is not recommended for inexperienced users. Always export a backup first.
Have a question about this guide?
Answered by AI from this guide. Good questions may be added to this page — please don't include personal details.
Did this guide fix your problem?

About the Author
Richard
Tech Writer, IT Professional
Richard is a writer at Geek Rewind who turns complex IT tasks into clear, step-by-step guides. He draws on years of hands-on experience in system administration and enterprise IT operations, focusing on Windows, Linux and WordPress: the problems people actually run into, and the fixes that work. His server and WordPress guides come from systems he runs himself. Richard builds and maintains the platform behind Geek Rewind, from its Ubuntu servers and Nginx configuration to its custom WordPress plugins. Many new tutorials start with readers' questions, and he's always glad to answer them in the comments.
No comments yet — be the first to share your thoughts!