Mount External Storage as Read-Only in Ubuntu
You can mount external storage as read-only in Ubuntu to protect your data from accidental modification or deletion.
Making an external drive read-only prevents any user from adding, deleting, or changing files on it, offering a layer of protection for critical data.
This functionality is particularly useful for shared computers or when you want to ensure the integrity of a drive’s contents, such as a drive containing important backups or installation media for Ubuntu 22.04 LTS.
By default, Ubuntu mounts external drives in read-write mode, allowing full access. This tutorial shows you how to change that behavior for specific drives or for all external storage.
Open the Terminal and run `gsettings set org.gnome.desktop.lockdown mount-removable-storage-devices-as-read-only true`. To allow writing again, use `gsettings set org.gnome.desktop.lockdown mount-removable-storage-devices-as-read-only false`.
Enable or disable mounting external storage devices as read-only
Ubuntu lets you choose if external storage devices mount as read-only, so you can see files but not change them, which helps prevent accidental edits.
To make this change, you’ll use the Terminal. You can open it by pressing the Super key and searching for ‘Terminal,’ or by using the shortcut Ctrl+Alt+T.
To make all external drives read-only, type this command and press Enter:
gsettings set org.gnome.desktop.lockdown mount-removable-storage-devices-as-read-only true
To revert this and allow writing to drives again, use this command:
gsettings set org.gnome.desktop.lockdown mount-removable-storage-devices-as-read-only false
Enable or Disable mounting storage devices as read-only devices using the Dconf Editor
You can change how external storage devices mount as read-only using Dconf Editor, a visual tool that lets you adjust system settings easily, much like the Registry Editor on Windows.
First, install the tool by running this command in your terminal:
sudo apt update && sudo apt install dconf-editor
Read more about installing software on Ubuntu here: How to add or remove software on Ubuntu Linux
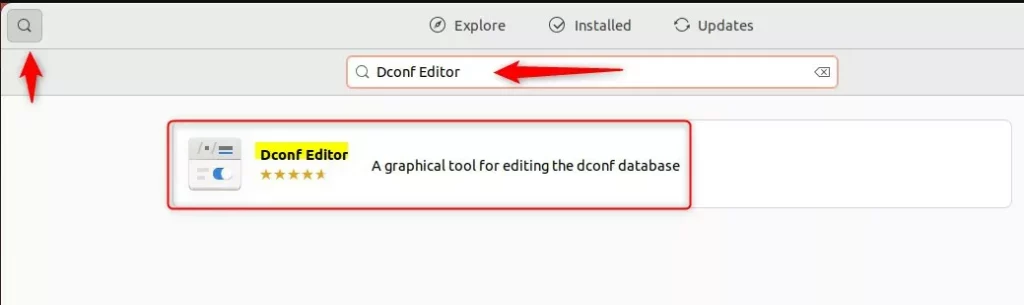
After installing, open Dconf Editor from your app menu. Navigate through these folders:
org -> gnome -> desktop -> lockdown
Find the setting labeled “mount-removable-storage-devices-as-read-only” and toggle the switch to “On.”
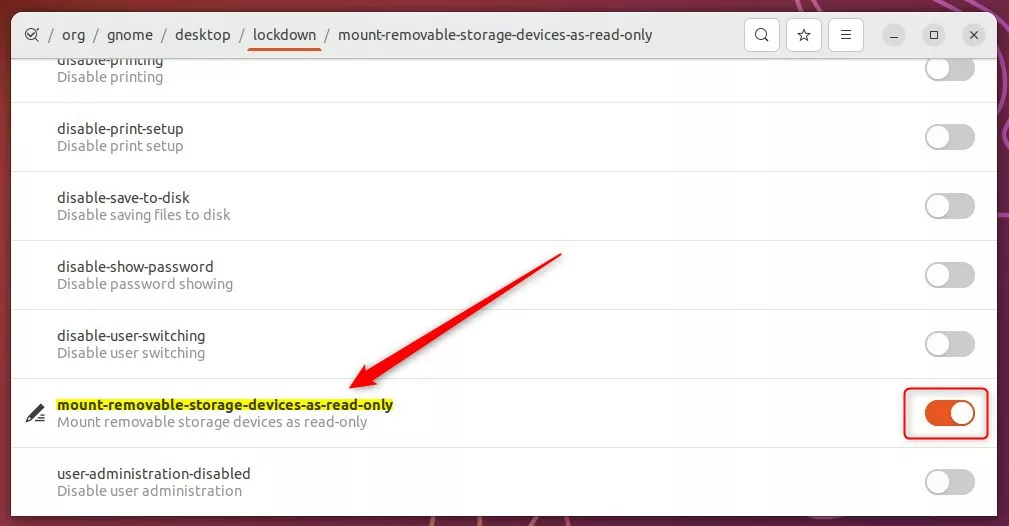
When this is on, any USB drive you plug in will be read-only. You’ll see a notification or a lock icon indicating the device can’t be written to.
Conclusion
You’ve learned how to control if external drives on your Ubuntu computer mount as read-only, which helps prevent accidental changes to your files.
If you have questions or need help, please use the comment section below.
Was this guide helpful?

About the Author
Richard
Tech Writer, IT Professional
Richard, a writer for Geek Rewind, is a tech enthusiast who loves breaking down complex IT topics into simple, easy-to-understand ideas. With years of hands-on experience in system administration and enterprise IT operations, he’s developed a knack for offering practical tips and solutions. Richard aims to make technology more accessible and actionable. He's deeply committed to the Geek Rewind community, always ready to answer questions and engage in discussions.

No comments yet — be the first to share your thoughts!