How to Make a User Administrator in Windows 11
You make a user an administrator in Windows 11 by changing their account type to “Administrator” within the user account settings.
Granting administrator privileges means that user can install software, change system settings, and manage other user accounts on your PC. This is a powerful permission that allows for significant control over your system.
For instance, you might elevate a standard user to administrator on your Windows 11 PC if they need to install a specific application that requires system-wide permissions.
Go to Settings > Accounts > Other Users. Select the user, click Change account type, and choose Administrator from the dropdown menu. This grants them full control over your PC.
What is an Administrator Account?
An administrator account in Windows 11 gives you full control over your computer, letting you change almost anything. A standard user account has limited access, meaning you can’t install programs or make big system changes.
- Standard User: Can use the computer but cannot make big changes. They cannot install software.
- Administrator: Has full access. Can change almost anything on the PC.
When you create a new user, they usually start as a Standard User. If you want to give them more control, you need to make them an Administrator. What happens when you do this? They get permission to install programs and change PC settings.
How to Change a User to Administrator
Changing a user to an administrator in Windows 11 is simple and involves opening the Settings app, going to Accounts, and then selecting Other Users.
- Open the Settings App
Click on the Start menu (the Windows icon on the bottom left) and select Settings. Or press Windows key + I on your keyboard to open Settings quickly. Learn more about Windows Settings
- Go to Accounts
In the Settings window, click on Accounts from the menu on the left side.
- Choose Other Users
On the right side, find and click the Other Users section to see the list of users.
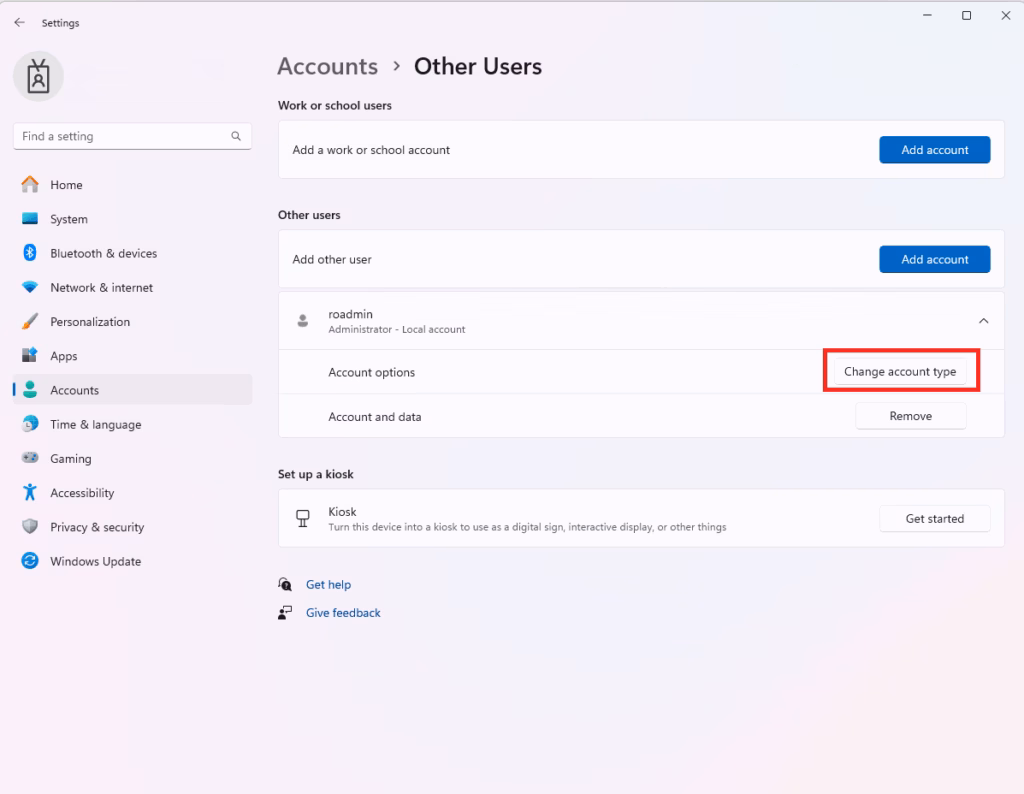
- Select the User You Want to Change
Click the user account you want to make an Administrator.
Windows Accounts Others - Change Account Type
Click the Change account type button. ⚠️ This step requires admin privileges.
Changing user account type in Windows 11 settings for permissions. - Set to Administrator
In the pop-up window, click the drop-down menu and select Administrator, then click OK.
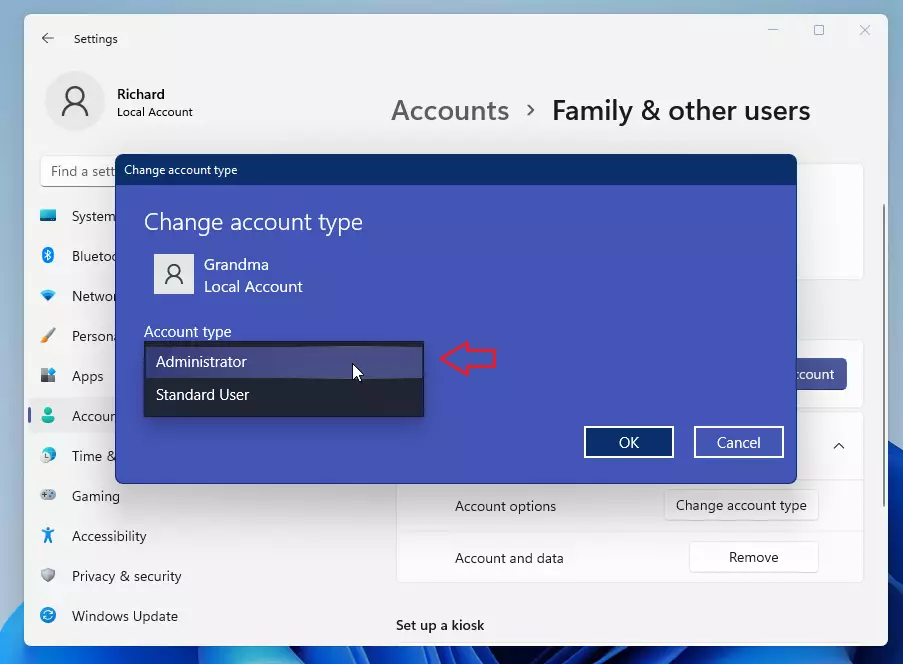
windows 11 change account type
That’s it! The user now has Administrator rights on your Windows 11 PC.
Important Tips
- Only give Administrator rights to people you trust. They can change important settings.
- If you want to change roles later, just come back to Settings > Accounts > Other Users.
- Keep an eye on user accounts and their permissions. This keeps your PC safe.
Summary
Making someone an Administrator in Windows 11 means giving them full control over your PC, which you do through Settings > Accounts > Other Users by changing their account type to Administrator.
How do I add admin privileges to a user?
I type netpl with run command. And here I have users for this computer i choose a user account to add administrator rights julia properties group membership and here I add Julia to administrator.
Was this guide helpful?

About the Author
Richard
Tech Writer, IT Professional
Richard, a writer for Geek Rewind, is a tech enthusiast who loves breaking down complex IT topics into simple, easy-to-understand ideas. With years of hands-on experience in system administration and enterprise IT operations, he’s developed a knack for offering practical tips and solutions. Richard aims to make technology more accessible and actionable. He's deeply committed to the Geek Rewind community, always ready to answer questions and engage in discussions.


[…] You must be signed in as an administrator to delete user accounts. Also, you cannot delete an account that is currently signed in — […]