How to Connect to WPA3 Wi-Fi in Windows 11

Connecting to a WPA3 Wi-Fi network in Windows 11 gives your wireless connection the strongest security standard available to protect your data from hackers. WPA3 is the newest security protocol for wireless routers and devices. It replaces the older WPA2 system with much stronger encryption.
Two things have to be true before you can join a WPA3 network. Your PC needs a Wi-Fi card or adapter that supports WPA3, and your router must broadcast a WPA3-capable signal. Most computers built in recent years already have the right hardware.
This guide covers the whole job: updating Windows, checking that your adapter supports WPA3, connecting, and confirming that the connection really uses WPA3. The steps are the same on Windows 11 Home and Pro.
Windows 11 automatically connects to WPA3 Wi-Fi networks if your PC’s adapter supports it. First, press Win+S, type cmd, and run netsh wlan show drivers to confirm WPA3-Personal appears in the authentication methods list. Then click the network icon in the taskbar , select the WPA3 network, enter the password, and verify the connection in Settings Network & Internet Wi-Fi Manage known networks
What is WPA3 and Why It Matters?
WPA3 is the newest way to keep your Wi-Fi connections safe from hackers. It works best with devices that support Wi-Fi 6, which gives you faster speeds and better coverage.
Many routers can run in a mixed WPA2/WPA3 mode so older devices can still connect. In that mode, your PC may quietly join with WPA2 even though WPA3 is available. If you manage the router, check its wireless security settings. If you don’t, ask whoever does.
Step 1Check Your 🪟 Windows 11 Is Up to Date
Updates often include newer Wi-Fi drivers, and an old driver is a common reason WPA3 doesn’t show up.
- Click the Start button (Windows icon).
- Open Settings (gear icon).
- Choose Windows Update in the left-hand list.
- Click Check for updates . Windows searches and then lists anything available.
- Install any updates it finds. If it asks you to restart, do that before moving on, because the new driver or system files don’t take effect until you do.
If your adapter still doesn’t support WPA3 after this, look under Advanced options Optional updates in Windows Update . Driver updates are sometimes listed there instead of being installed automatically.
Learn more about updating Windows 11 here: How to update Windows 11
Step 2Check if Your PC Supports WPA3
You can check whether your PC supports WPA3 Wi-Fi by running a quick command in Command Prompt. This shows the security features your wireless network adapter can handle, so you know before you try a new router. You don’t need administrator rights for this command.
- Open the Command Prompt:
- Press Windows + S to open search.
- Type
cmdand click Command Prompt. A window with a blinking cursor opens.
- Type this command and press Enter:Code
netsh wlan show drivers
- Scroll through the output until you find the line Authentication and cipher supported in infrastructure mode. Several lines are listed under it, one for each security type the adapter supports.
- Check those lines for WPA3-Personal. If you see it, your PC supports WPA3!
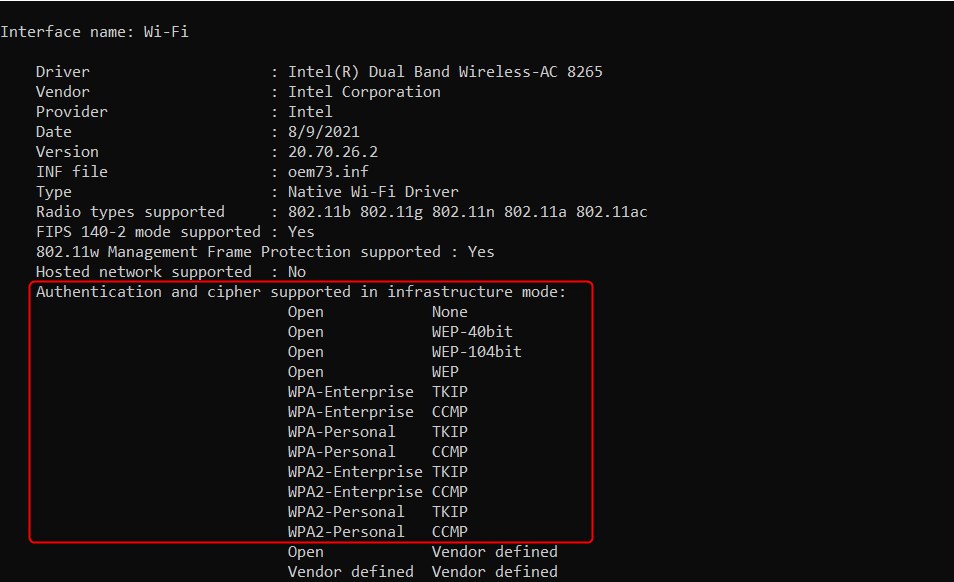
If the output says the WLAN AutoConfig service isn’t running, or the command finds no wireless interface, your PC has no active Wi-Fi adapter. This is common on desktops that connect by cable. Plug in or enable a Wi-Fi adapter and run the command again.
Step 3Connect to a WPA3 Wi-Fi Network
If WPA3-Personal is NOT listed, your PC’s Wi-Fi adapter or its driver may not support WPA3. Here is what to try, in order:
- Install all Windows updates, including optional driver updates, as described above.
- Check the manufacturer’s website for a newer Wi-Fi driver for your adapter or PC model.
- Run the command again after any update and look for WPA3-Personal.
- If it is still missing, consider replacing the adapter. A Wi-Fi 6 adapter is a good choice, since those generally support WPA3.
Until then, your PC can still connect to the same router over WPA2 if the router allows it. You just won’t get the WPA3 protection.
You can connect to a WPA3 Wi-Fi network in Windows 11 through the standard taskbar network menu, just like any other wireless connection. Once you’re connected, you can verify that WPA3 is active in the Settings app.
- Click the Wi-Fi icon on the right side of the taskbar . A list of nearby networks appears.
- Select the Wi-Fi network you want to connect to and enter the password. Windows shows Connected under the network name when it succeeds.
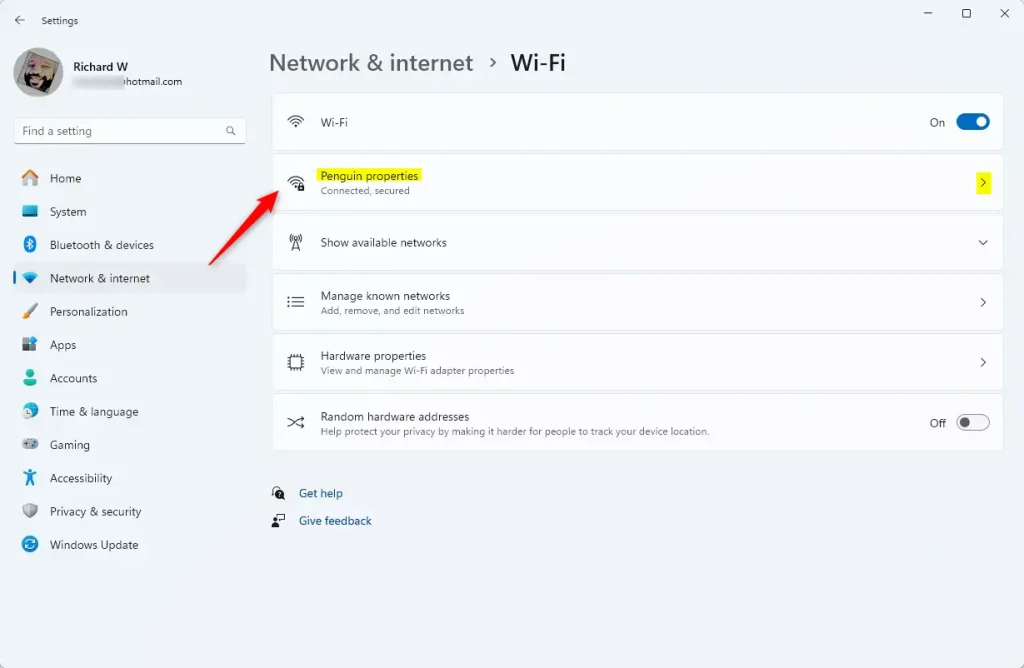
- Once connected, open Settings Network & internet Wi-Fi .
- Click Manage known networks or Manage Wi-Fi connections. The name depends on your Windows 11 version.
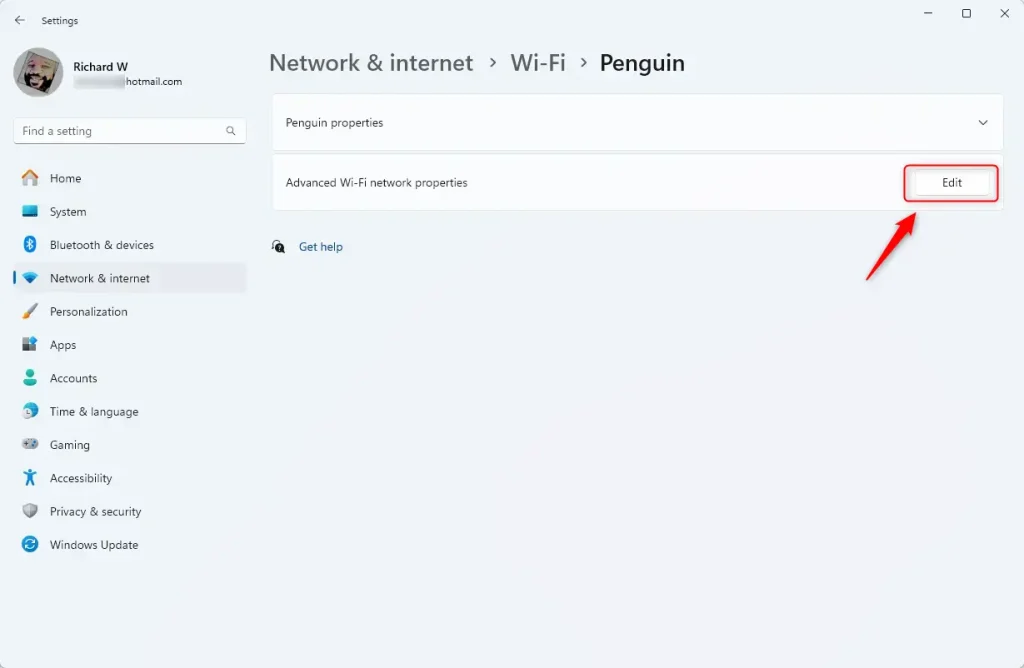
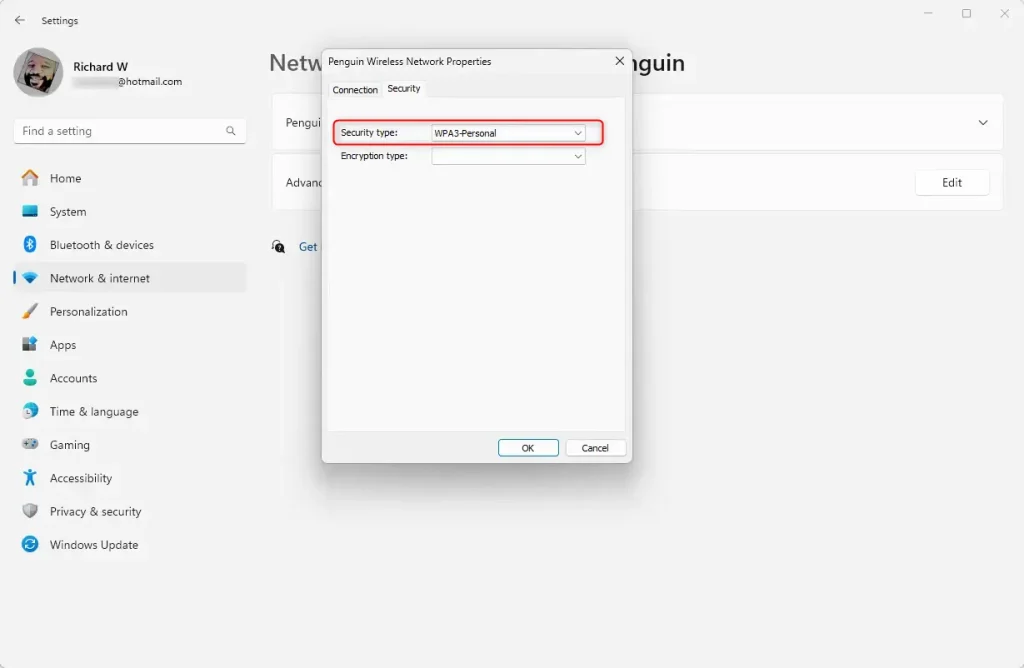
- Find your connected Wi-Fi network and click Edit next to Advanced Wi-Fi network properties.
- In the pop-up window, find the Security type field. If it shows WPA3, you are connected securely!
Menu names and layout vary a little between Windows 11 releases. If you can’t find the Security type field by these steps, open the properties page for the connected network under Settings Network & internet Wi-Fi . It lists the same field.
If it shows WPA2 instead, the router is probably in mixed mode or only offering WPA2. Check the router's security setting. To undo a connection you no longer want, select the network under Manage known networks and click Forget, then reconnect.
Why Use WPA3?
- Better Security: WPA3 helps protect your data from hackers.
- Stronger Password Protection: Even weak passwords are safer, because WPA3 makes it much harder to guess a password by trying many combinations offline.
- Supports New Devices: Works best with Wi-Fi 6 devices for faster, safer connections.
Summary
- Make sure Windows 11 is updated, and restart if Windows asks you to.
- Check that your PC's Wi-Fi adapter supports WPA3 using the Command Prompt.
- Connect to your Wi-Fi and check whether it uses WPA3 security.
- Using WPA3 keeps your Wi-Fi connection safer and more reliable.
Connecting to WPA3 Wi-Fi on Windows 11 requires checking your wireless hardware, making sure your system is up to date, and joining the secure network through your taskbar. Using this modern security standard keeps your wireless data much safer from online snoops.
Frequently asked questions
Does my laptop support wpa3?
Yes, if its Wi-Fi adapter supports WPA3. Most laptops made since about 2019 do. To check, open Command Prompt and run netsh wlan show drivers. Look for WPA3-Personal in the list of supported authentication methods. If you see it, your laptop can join WPA3 networks.
How to install wap3 Wi-Fi driver?
Get the driver from your laptop maker or the Wi-Fi adapter maker, not a third-party site. Open Device Manager, expand Network adapters, right-click your Wi-Fi adapter, and choose Update driver. Select Search automatically for drivers. If Windows finds nothing newer, download the latest driver from the manufacturer's support page and run its installer, then restart.
How to enable my hp laptop to support wap3 Wi-Fi protocol?
HP laptops have no separate WPA3 setting. Support comes from the Wi-Fi driver and your router. Open HP Support Assistant, or go to HP's support site and enter your laptop model. Install the latest Wi-Fi driver, restart, and then connect to the WPA3 network.
How to check if my laptop supports wpa3?
Open Command Prompt and run netsh wlan show drivers. Find the authentication methods listed for your adapter. If WPA3-Personal appears, the adapter supports WPA3. If only WPA2-Personal appears, update the Wi-Fi driver and check again. If it still does not appear, the adapter cannot use WPA3.
What is the wpa3 registty fix for 🪟 Windows 11?
There is no official Windows registry fix for WPA3, and editing the registry is risky and rarely needed. If you cannot join a WPA3 network, update the Wi-Fi driver first. Then install Windows updates and check that your router uses WPA2/WPA3 or WPA3 mode.
How to enable wpa3 on PC?
Windows turns on WPA3 by itself when both your adapter and router support it, so there is no switch to flip. Update Windows and your Wi-Fi driver. Then open Settings, go to Network & internet Wi-Fi, and connect to the network. If it joins with WPA2 only, change the router to WPA2/WPA3 or WPA3-only mode.
Still have a question?
Answered by AI from this guide. Good questions may be added to this page — please don't include personal details.
Did this guide fix your problem?

About the Author
Richard
Tech Writer, IT Professional
Richard is a writer at Geek Rewind who turns complex IT tasks into clear, step-by-step guides. He draws on years of hands-on experience in system administration and enterprise IT operations, focusing on Windows, Linux and WordPress: the problems people actually run into, and the fixes that work. His server and WordPress guides come from systems he runs himself. Richard builds and maintains the platform behind Geek Rewind, from its Ubuntu servers and Nginx configuration to its custom WordPress plugins. Many new tutorials start with readers' questions, and he's always glad to answer them in the comments.
No comments yet — be the first to share your thoughts!