How to Connect to Hidden WiFi in Windows 11

Connecting to a hidden WiFi network in Windows 11 requires you to manually enter the network name and password.
Hidden WiFi networks don’t broadcast their name, meaning your PC won’t see them during a normal scan. These networks are sometimes called “non-broadcast” networks.
To connect to one, you must know the exact network name, also called the SSID, and the password. Windows 11 will then remember this information so you can reconnect automatically when you’re nearby.
Manually add the hidden network by going to Settings > Network & internet > Wi-Fi > Add network. Enter the network name (SSID), security type, and password, then click Save. Ensure “Connect automatically” and “Connect even if this network is not broadcasting” are checked.
How to connect to a hidden WiFi network
Connecting to a hidden WiFi network in Windows 11 requires manually adding the network’s details, as these networks don’t appear automatically. This process involves providing your computer with the hidden WiFi network’s name and password. Following these steps will add the network so you can get online.
1. Open the Settings app. Press Windows key + I or click Start and then Settings.

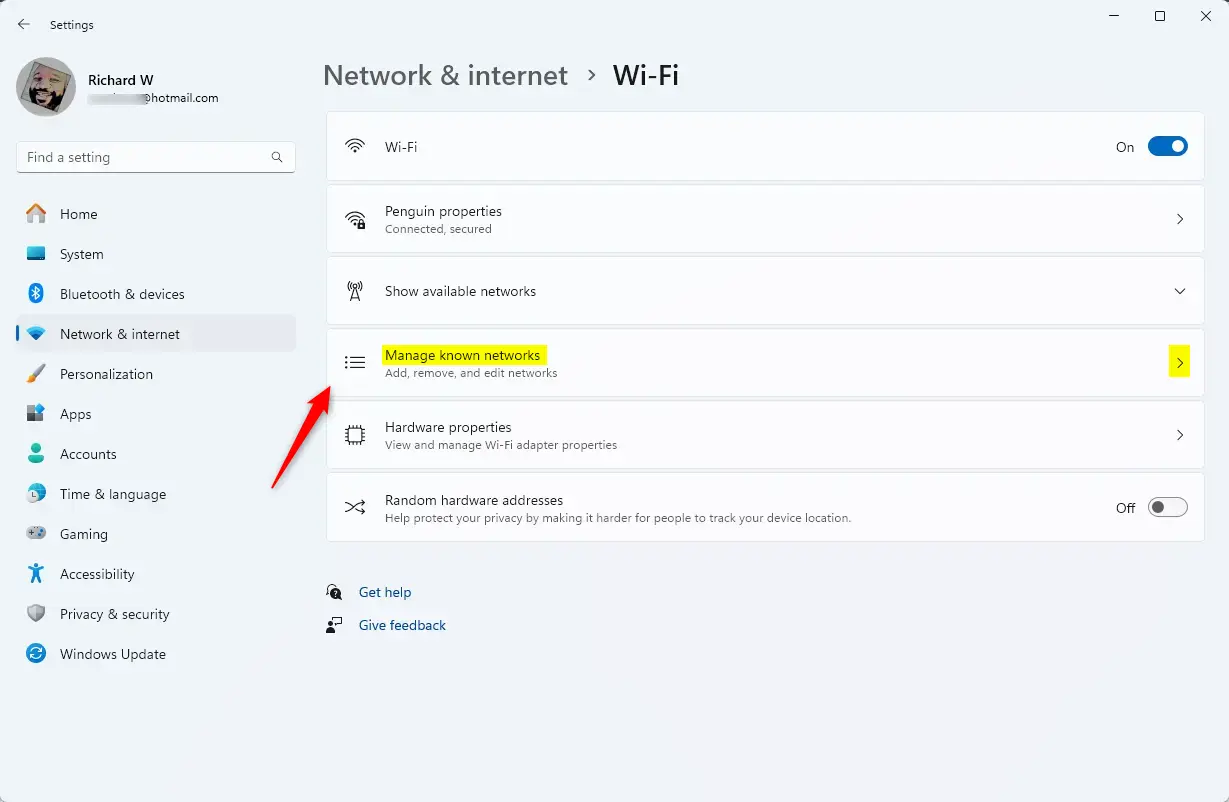
2. Click Network & internet on the left. Then, click WiFi on the right.

3. Click Manage known networks.
4. Click the Add network button.
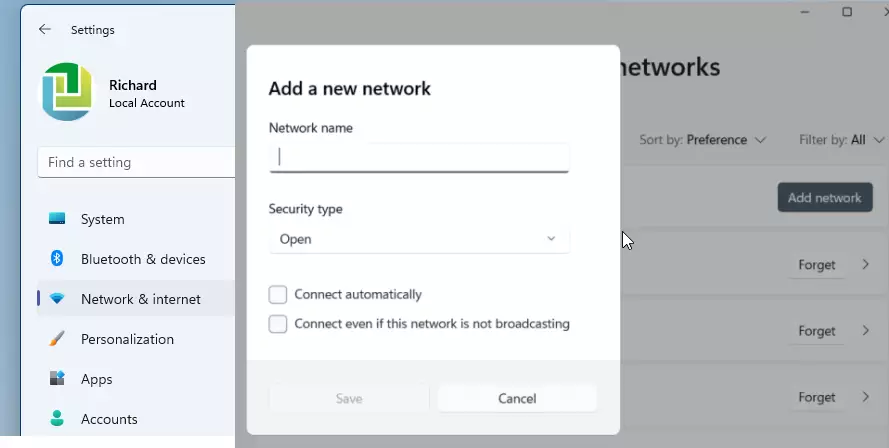
When connecting to a hidden WiFi network in Windows 11, enter the network name (SSID). Choose a security type (like WPA3-Personal or WPA2), then type the WiFi password. Next, select ‘Connect automatically’ and ‘Connect even if this network is not broadcasting.’ Finally, click ‘Save’ to store the network details.
Manually adding a network via Control Panel
Another way to add a network manually is through the Control Panel. This older method lets you input the network name and security details directly. Using the Control Panel can be more reliable for connecting to a hidden WiFi network when the network isn’t broadcasting its name.
- Press Windows key + R, type
control.exe, and press Enter. - Go to Network and Sharing Center > Set up a new connection or network.
- Select Manually connect to a wireless network and click Next.
- Enter the network details and click Next to finish.
Troubleshooting hidden network connection failures
If you are having trouble connecting to a hidden WiFi network on Windows 11, common issues like incorrect WiFi band selection or outdated network drivers can be the cause. This guide helps you troubleshoot hidden network connection failures by explaining potential problems. We’ll cover common fixes to get your connection working again.
- Frequency Mismatch: Your router might be on 5GHz while your adapter only supports 2.4GHz.
- Driver Issues: Outdated drivers can block connections. Right-click Start, select Device Manager, and update your wireless adapter under Network adapters.
- WLAN AutoConfig: Ensure the service is running. Press Windows key + R, type
services.msc, find WLAN AutoConfig, and ensure it is set to Automatic.
Summary
Connecting to a hidden WiFi network in Windows 11 involves manually adding the network details through Settings or Control Panel, and troubleshooting common issues like driver problems or frequency mismatches can help resolve connection failures.
Why does my laptop see other networks but not my hidden one?
Why does my laptop see other networks but not my hidden one?
Your laptop cannot see the network because the router is not broadcasting its name. This is a security feature. You must manually add the network profile in Windows settings using the exact SSID and security credentials to establish a connection.
Is it safer to hide my WiFi SSID?
Hiding your SSID provides very little real security. Advanced scanners can still detect the network traffic. It is much safer to use a strong password and modern encryption like WPA3-Personal rather than relying on hiding the network name to keep intruders away.
What should I do if the ‘Hidden Network’ option is missing in 🪟 Windows 11?
If the option is missing, your wireless driver might be outdated or the WLAN AutoConfig service is stopped. Try updating your network adapter drivers via Device Manager or restart the WLAN service in the Services console to restore full network management features.
Does hiding my SSID affect connection speed?
No, hiding your SSID does not affect your internet speed or connection quality. It only prevents the network name from appearing in the list of available networks for nearby devices. Your data transfer rates remain exactly the same as a visible network.
Was this guide helpful?

About the Author
Richard
Tech Writer, IT Professional
Richard, a writer for Geek Rewind, is a tech enthusiast who loves breaking down complex IT topics into simple, easy-to-understand ideas. With years of hands-on experience in system administration and enterprise IT operations, he’s developed a knack for offering practical tips and solutions. Richard aims to make technology more accessible and actionable. He's deeply committed to the Geek Rewind community, always ready to answer questions and engage in discussions.

No comments yet — be the first to share your thoughts!