How to Enable OpenSSH Server in Windows 11
You enable OpenSSH Server in Windows 11 by installing it as an optional feature.
OpenSSH Server allows you to securely connect to and manage your Windows 11 PC remotely using SSH (Secure Shell), creating an encrypted tunnel for commands and file transfers.
This feature isn’t active by default on Windows 11; you must add it manually via Windows Settings or PowerShell. Once installed, your PC becomes capable of accepting secure incoming SSH connections, making it a vital tool for remote administration and access.
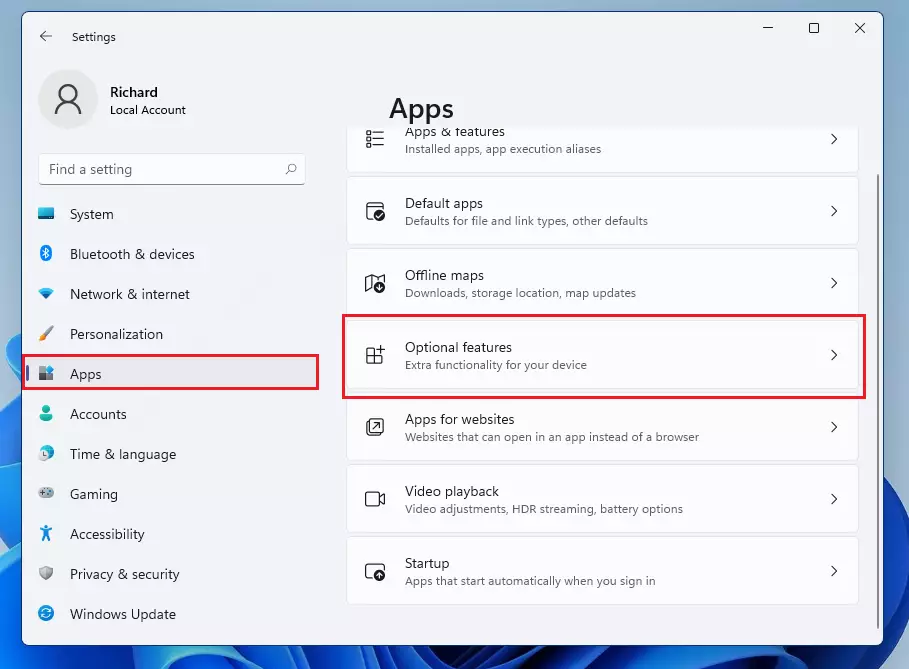
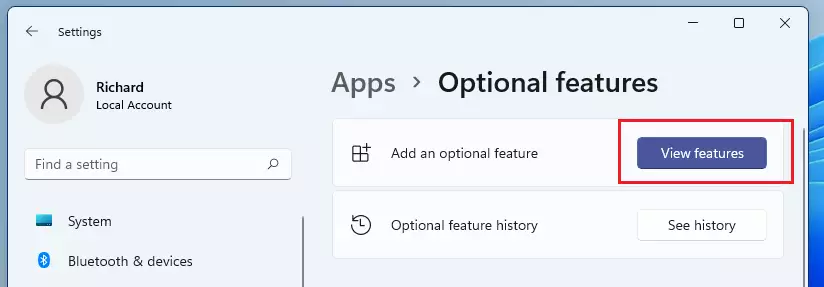
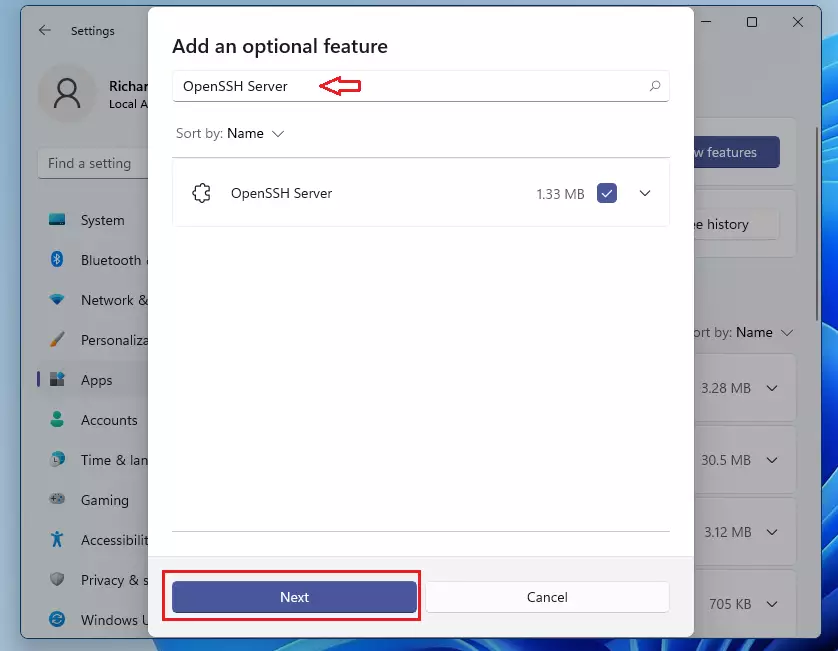
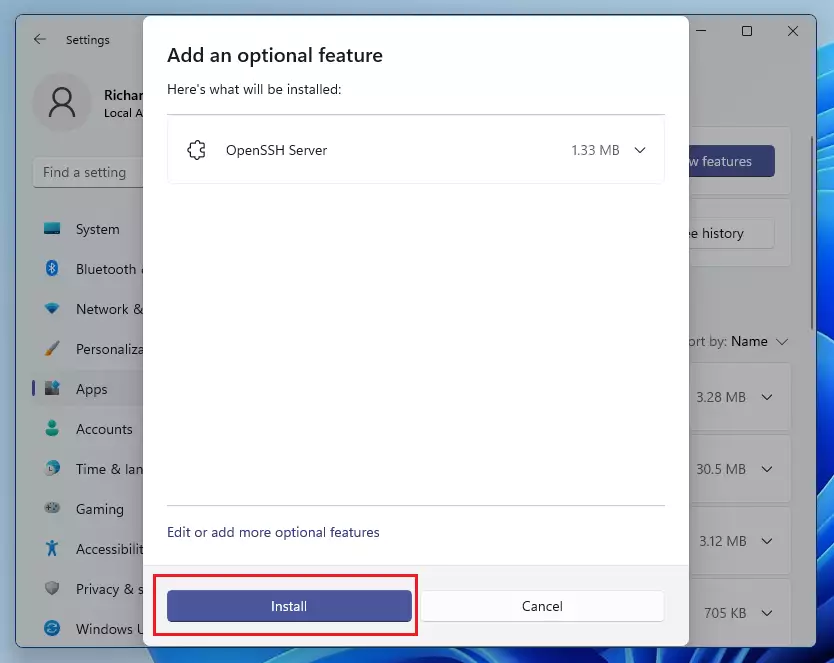
Install OpenSSH Server via Settings by going to Apps > Optional features, clicking View features, searching for OpenSSH Server, selecting it, and clicking Install. Alternatively, use PowerShell with the command Add-WindowsCapability -Online -Name OpenSSH.Server~~~~0.0.1.0.
How to Install OpenSSH Server
You can install this feature using the Settings menu or the command line. Admin privileges are required for these steps.
Method 1Using Windows Settings
1. Press Windows key + I to open Settings.
2. Go to Apps > Optional features.
3. Click View features and search for OpenSSH Server.
4. Select it and click Install.
Method 2Using PowerShell (Fastest Way)
Install the server instantly using PowerShell. Open PowerShell as an administrator and run this command:
Add-WindowsCapability -Online -Name OpenSSH.Server~~~~0.0.1.0
Starting and Managing the Service
You need to start the OpenSSH Server service in Windows 11 to let other devices connect to your PC.
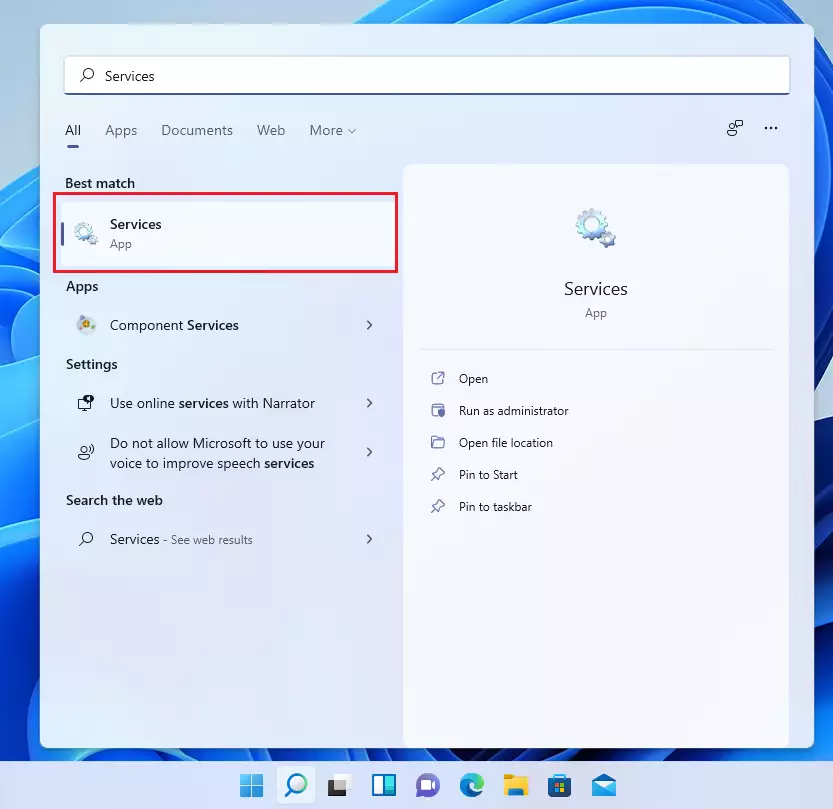
1. Open the Services app from the Start menu.
2. Find OpenSSH SSH Server in the list.
3. Right-click it and select Start.
4. To ensure it starts automatically, right-click it, select Properties, and change Startup type to Automatic.

You can verify the status anytime by running Get-Service sshd in PowerShell.
Configuration and Security
The main configuration file is usually found at C:\ProgramData\ssh\sshd_config. You can edit this file to change the default port or restrict access.
How do I change the default SSH port on 🪟 Windows 11?
To change the port, open C:\ProgramData\ssh\sshd_config in a text editor as an administrator. Find the line that says #Port 22, remove the hash (#) symbol, and change 22 to your desired port number. Save the file and restart the OpenSSH SSH Server service in the Services app.
Setting up Key-Based Authentication
Passwords can be guessed. Using an SSH key pair is much safer. You generate a public and private key, then place the public key in C:\Users\username\.ssh\authorized_keys. This allows you to log in without typing a password every time.
Troubleshooting
If you cannot connect, check your Windows Firewall. The installation usually creates a rule, but you may need to ensure port 22 (or your custom port) is open. Use the command netsh advfirewall firewall show rule name=all to verify.
How do I uninstall OpenSSH Server completely?
To uninstall, go to Settings > Apps > Optional features. Find OpenSSH Server in the list of installed features, click the arrow next to it, and select Uninstall. This will remove the service and all associated files from your system.
Summary
Setting up OpenSSH Server on Windows 11 gives you a safe way to control your PC from afar. You can install it through Settings or PowerShell, then just start the service and check your firewall. For better security, use key-based logins instead of passwords.
Was this guide helpful?

About the Author
Richard
Tech Writer, IT Professional
Richard, a writer for Geek Rewind, is a tech enthusiast who loves breaking down complex IT topics into simple, easy-to-understand ideas. With years of hands-on experience in system administration and enterprise IT operations, he’s developed a knack for offering practical tips and solutions. Richard aims to make technology more accessible and actionable. He's deeply committed to the Geek Rewind community, always ready to answer questions and engage in discussions.


how to connect ssh tunnel in cmd?
It says “Couldn’t install” 🙁 Is there a dependency? A running service maybe?
hi richard
what is the accoumd password here?
@melisa the Password is the same as you’ve set at your account on the machine to enter it locally