How to Enable or Disable Recommended Section in Windows 11
This guide explains how to show or hide the “Recommended” section in the File Explorer home screen on Windows 11.
Windows File Explorer is the file manager built into Windows. It allows you to view, copy, move, delete, and rename files your files and folders. You can organize your data in a way that makes sense to you.
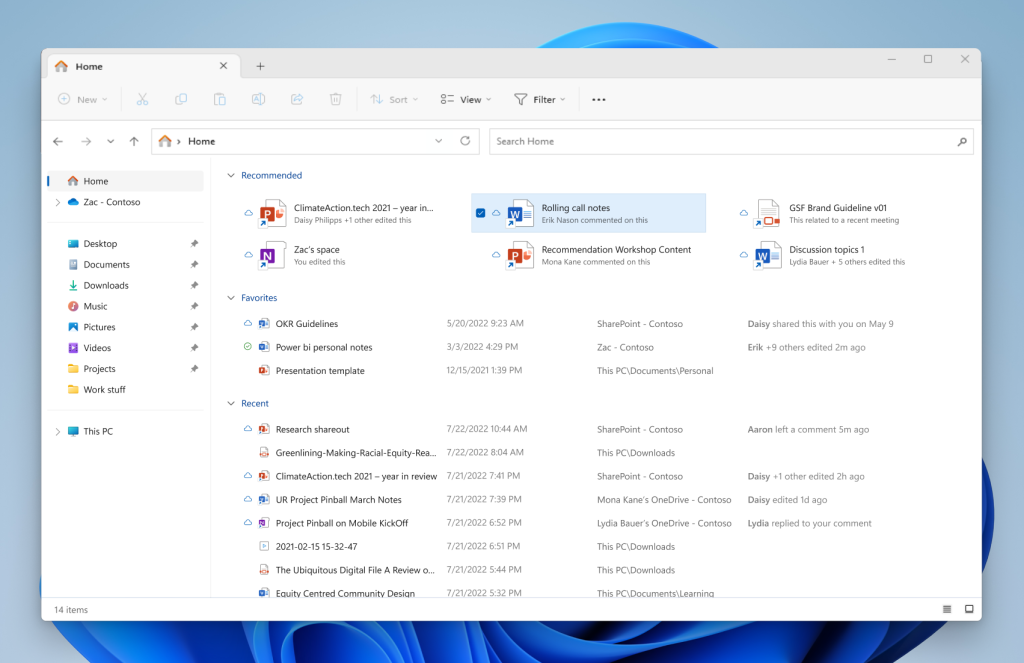
In File Explorer Home, you can see your pinned (favorites), folders you use often, and files you opened recently.
Starting with Windows 11 build 23403.1001, Windows added a “Recommended” section. This is designed to help you quickly find files you use often.
This feature works if you sign into Windows with a work or school account. The recommended files are stored in the cloud. They might be files you own or files that others shared with you.
Why turn recommendations on or off?
Some people like seeing suggested files. Others prefer a cleaner, simpler view. You can choose what works best for your workflow.
What happens when you change this setting?
When you turn recommendations on, File Explorer displays files it thinks you want to access. When you turn them off, that section is removed from your screen.
Method 1Use File Explorer Settings
This is the easiest way to change the setting.
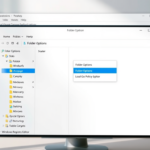
- Open File Explorer.
- Click the three-dot menu icon at the top.
- Select Options.
- Click the General tab.
- Look for the Privacy section.
- Check the boxes to turn on recommendations, or uncheck them to turn them off:
- Show recommended section
- Include account-based insights, recent, favorite, and recommended files
- Click Apply, then click OK.
Method 2Use the Registry Editor
This method is more technical and should only be used if the first method does not work.
⚠️ Admin privileges required
- Press the Windows key + R on your keyboard.
- Type
regeditand press Enter. - Click Yes when asked if you want to allow this app to make changes. ⚠️ Admin privileges required
- In the Registry Editor window, go to this location:
Computer\HKEY_CURRENT_USER\Software\Microsoft\Windows\CurrentVersion\Explorer - Look in the right pane for the item named
ShowRecommendations. - Double-click
ShowRecommendations. - Type
1to turn the section on, or type0to turn the section off. - Click OK.
If you do not see these items, right-click a blank area in the right pane. Select New, then DWORD (32-bit) Value. Name it ShowRecommendations and enter 1 or 0.
You may need to restart your computer for these changes to take effect.
Summary
You now know two ways to control the “Recommended” section in Windows 11 File Explorer. You can use the simple File Explorer settings menu or the more advanced Registry Editor. Whether you choose to keep the recommendations on or off is entirely up to your personal preference for a clean workspace.
How do I enable the Recommended section in Windows 11 File Explorer?
Can I disable the Recommended section in Windows 11 File Explorer?
What files are shown in the Recommended section of Windows 11?
Is the Recommended section available for all Windows 11 users?
How can I access the Windows Registry to modify the Recommended section settings?
Was this guide helpful?

About the Author
Richard
Tech Writer, IT Professional
Richard, a writer for Geek Rewind, is a tech enthusiast who loves breaking down complex IT topics into simple, easy-to-understand ideas. With years of hands-on experience in system administration and enterprise IT operations, he’s developed a knack for offering practical tips and solutions. Richard aims to make technology more accessible and actionable. He's deeply committed to the Geek Rewind community, always ready to answer questions and engage in discussions.


No comments yet — be the first to share your thoughts!