How to Disable Widgets Board on Hover in Windows 11
You disable the Windows 11 widgets-board-in-windows-11/" class="sal-link" rel="noopener" target="_blank" data-sal-id="12455">Widgets board on hover to stop it from opening automatically when your mouse passes over the taskbar icon.
This setting prevents the Widgets panel, which displays personalized content like news and weather, from popping up unintentionally and disrupting your workflow.
By turning off this hover-to-open behavior, you ensure the Widgets board only appears when you actively click the taskbar icon or use the Windows key + W shortcut.
This simple change, available in Windows 11, helps maintain a cleaner desktop experience and avoids accidental activations.
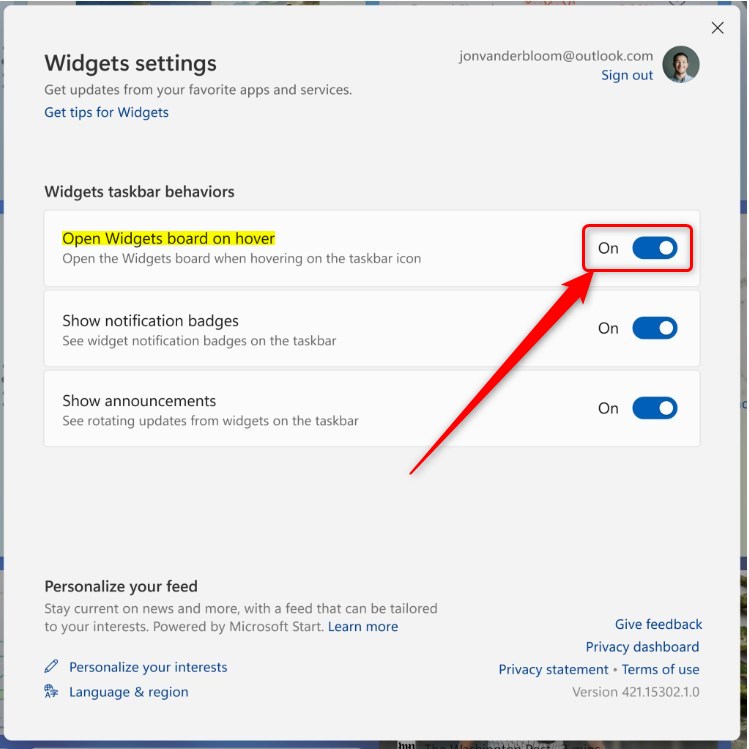
Disable Widgets on Hover
This method is the easiest way to stop the hover trigger.
- Open the Widgets board by clicking the weather icon or pressing Windows key + W.
- Click the Profile icon in the top-right corner.
- Find Widgets taskbar behavior.
- Toggle Open Widgets board on hover to Off.
Note: This process does not require admin privileges.
Registry Editor Method (Advanced)
Warning: Editing the registry can cause system issues if done incorrectly. Always back up your registry before proceeding.
Requires admin privileges.
- Press Windows key + R, type regedit, and press Enter.
- Navigate to:
HKEY_CURRENT_USER\Software\Microsoft\Windows\CurrentVersion\Explorer\Advanced - Right-click in the right pane, select New > DWORD (32-bit) Value.
- Name it TaskbarDa and set the value to 0.
Group Policy Editor (Professional/Enterprise)
If you are in an office environment, your IT team may use Group Policy to manage these settings.
Requires admin privileges.
- Press Windows key + R, type gpedit.msc, and press Enter.
- Go to Computer Configuration > Administrative Templates > Windows Components > Widgets.
- Double-click Allow widgets and select Disabled.
- Click Apply and OK.
PowerShell Method
PowerShell is a fast way for power users to change settings.
Requires admin privileges.
- Right-click the Start button and select Terminal (Admin).
- Run the following command: PowerShell
Set-ItemProperty -Path "HKCU:\\Software\\Microsoft\\Windows\\CurrentVersion\\Explorer\\Advanced" -Name "TaskbarDa" -Value 0
- Restart your computer to apply the changes.
Summary
Disabling the Widgets board in Windows 11 helps you maintain focus and prevents accidental pop-ups. Whether you use the simple settings menu, the Registry Editor, or Group Policy, you have full control over your taskbar experience. If you ever want the feature back, simply reverse the steps provided above.” }
Does disabling widgets improve system performance?
Yes, disabling the Widgets board can slightly improve system performance. Because the Widgets board runs as a background process to fetch live news and weather data, turning it off reduces the number of active background tasks, which frees up small amounts of CPU and memory for your other applications.
Why does the Widgets board keep appearing on touchscreen devices?
On touchscreen devices, the Widgets board is designed to open with a swipe gesture from the left edge of the screen. If you find it opening frequently, you may be accidentally swiping near the edge of your display. Disabling the hover feature will not stop swipe gestures, but it prevents mouse-based triggers.
Was this guide helpful?

About the Author
Richard
Tech Writer, IT Professional
Richard, a writer for Geek Rewind, is a tech enthusiast who loves breaking down complex IT topics into simple, easy-to-understand ideas. With years of hands-on experience in system administration and enterprise IT operations, he’s developed a knack for offering practical tips and solutions. Richard aims to make technology more accessible and actionable. He's deeply committed to the Geek Rewind community, always ready to answer questions and engage in discussions.

[…] the Widgets board, you can add or remove Phone Link, enable or disable the open Widgets board on hover, sign in or out of the Widgets board, reinstall Widgets features, completely uninstall Widgets, and […]
[…] In Windows, the Widget board opens automatically as you hover over the weather icon on the Taskbar. Well, you can turn that off or on anytime. […]
[…] Widgets are feeds of content such as news, weather, stocks, and traffic that are automatically updated with live information on your widgets board. It is automatically added to the Taskbar after installing Windows 11. […]
[…] Widgets are feeds of content like news, weather, stocks, and traffic that stay updated automatically. They are built into the Taskbar of Windows 11. […]
[…] Widgets are small boxes on your screen. They show you things like news, weather, stocks, and traffic. They […]