How to Enable Audio and Video in Windows 11 Sandbox
You enable audio and video access in Windows 11 Sandbox by creating and editing a custom Sandbox configuration file.
Windows Sandbox is a lightweight, isolated desktop environment where you can run untrusted software without impacting your main Windows installation. It automatically resets when you close it, making it perfect for testing potentially risky applications.
By default, Windows Sandbox does not permit access to your host PC’s microphone or camera. To allow testing applications that require these peripherals, you must explicitly grant them permission.
This is achieved by adding specific XML tags to a `.wsb` configuration file, granting your host’s audio and video devices access within the Sandbox environment.
Enable audio and video input for Windows 11 Sandbox by editing its configuration file. Add specific lines to a .wsb file to allow your host’s microphone and camera access within the Sandbox environment.
How to turn on or off audio and video input between host and Sandbox in 🪟 Windows 11
You can easily turn audio and video input on or off for the Windows 11 Sandbox if you need your microphone or camera to work inside it.
Here’s how to enable or disable these features in Windows 11.
First, open the Local Group Policy Editor. Click on the Start Menu and search for Edit group policy, as shown below.
Under Best match, select Edit group policy to launch the Local Group Policy Editor.
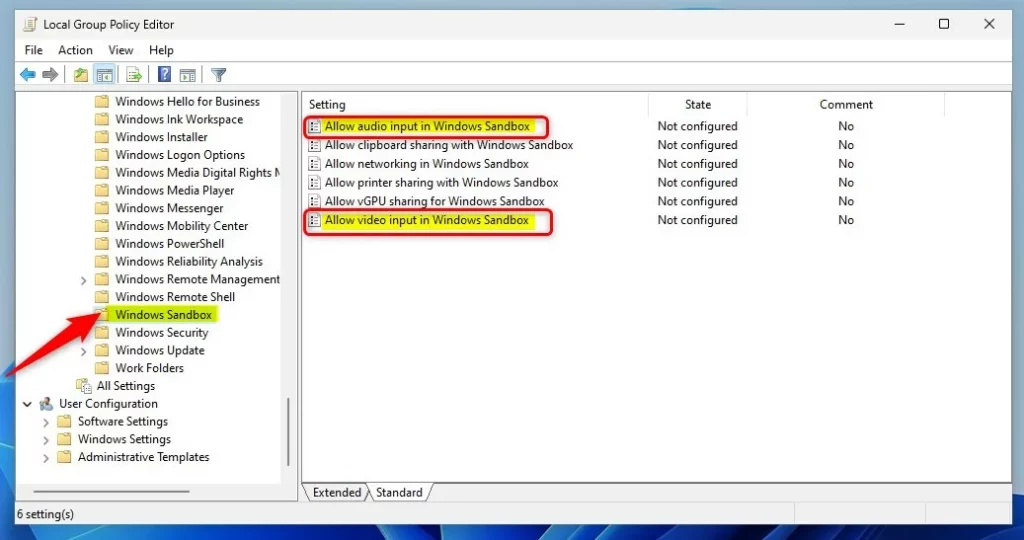
In the left pane of the Local Group Policy Editor, expand the tree:
Computer Configuration > Administrative Templates > Windows Components > Windows Sandbox
Then, in the Windows Sandbox details pane on the right, double-click the settings named “Allow audio input Windows Sandbox” and “Allow video input in Windows Sandbox.”
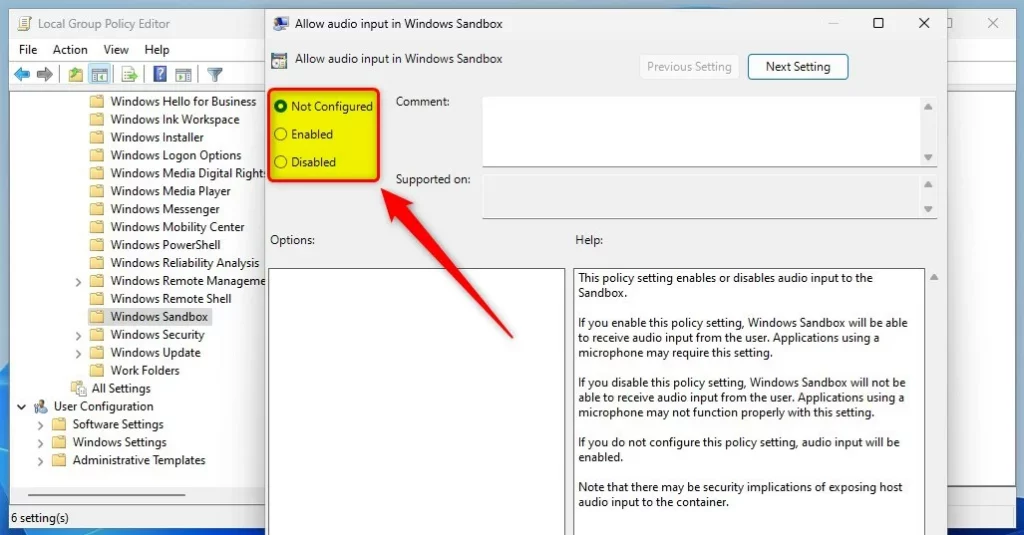
In the ‘Allow audio input in Windows Sandbox’ and ‘Allow video input in Windows Sandbox’ windows, choose ‘Not Configured,’ ‘Enabled,’ or ‘Disabled.’
- Not Configured (default)
- Enabled – Windows Sandbox will receive audio and video input from the user on the host.
- Disabled – Windows Sandbox will not be able to receive audio and video input from the host.
Enable or disable audio and video input with Sandbox via Windows Registry
If you can’t access the Group Policy Editor, you can still turn audio and video input on or off for the Windows 11 Sandbox by using the Windows Registry.
Open the Windows Registry and navigate to the folder key path listed below.
HKEY_LOCAL_MACHINE\SOFTWARE\Policies\Microsoft\Windows\Sandbox
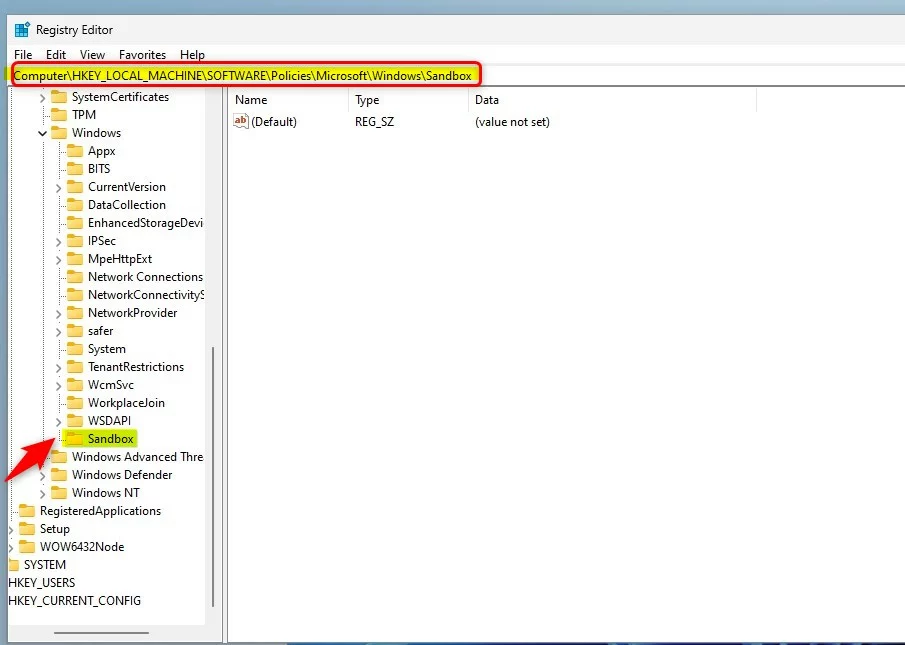
If you don’t see the Sandbox folder key, right-click the Windows key, then create a new subfolder key named Sandbox.
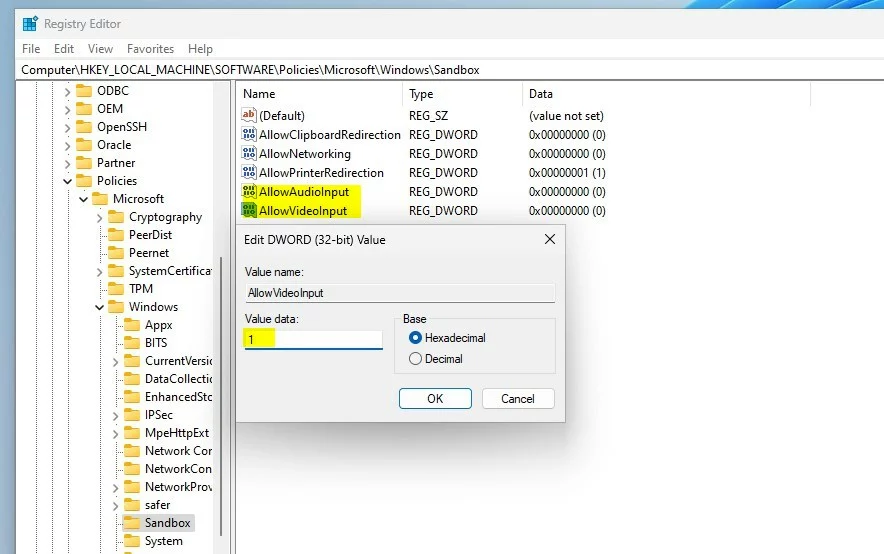
Right-click in the Sandbox folder’s right pane and select ‘New’ then ‘DWORD (32-bit) Value.’ Then, type a new key name: AllowAudioInput and AllowVideoInput.
Double-click the new keys and enter the Value data as 1 to enable audio and video between your host system and the sandbox environment.
Setting the value to 0, or deleting the key entirely, will disable audio and video input between your host system and the sandbox.
That should do it!
Reference:
Conclusion:
- Enabling audio and video input from the host to the sandbox environment in Windows 11 allows for a more versatile and comprehensive user experience within the isolated environment.
- The process involves utilizing the Local Group Policy Editor or the Windows Registry to configure the settings based on specific requirements.
- Following the outlined steps, users can seamlessly activate or deactivate audio and video input between the host and the Windows Sandbox in Windows 11, thus enhancing their sandbox experience.
How safe is 🪟 Windows 11 sandbox?
Pristine: Every time Windows Sandbox runs, it's as clean as a brand-new installation of Windows. Secure: Uses hardware-based virtualization for kernel isolation. It relies on the Microsoft hypervisor to run a separate kernel that isolates Windows Sandbox from the host.
Was this guide helpful?

About the Author
Richard
Tech Writer, IT Professional
Richard, a writer for Geek Rewind, is a tech enthusiast who loves breaking down complex IT topics into simple, easy-to-understand ideas. With years of hands-on experience in system administration and enterprise IT operations, he’s developed a knack for offering practical tips and solutions. Richard aims to make technology more accessible and actionable. He's deeply committed to the Geek Rewind community, always ready to answer questions and engage in discussions.


No comments yet — be the first to share your thoughts!