How to Create Your Own High Contrast Theme in Windows 11

You create a custom high contrast theme in Windows 11 to make your screen easier to view by adjusting specific color combinations.
High contrast themes use a limited palette of colors with maximum difference between foreground and background elements, significantly improving readability for users with visual impairments or those who simply prefer stronger color definitions.
Windows 11 offers several pre-set high contrast themes, but you can go further and build your own unique theme, selecting precise colors for text, background, buttons, and more.
This tutorial shows you exactly how to design and apply your personalized high contrast theme, giving you complete control over your Windows 11 visual experience.
Getting to the Contrast Theme Settings
First, you need to find the right settings in Windows. You’ll find it within the settings.
- Open Settings: Click the Start button. It’s usually in the bottom-left corner. Then, click the gear icon to open the Settings app.
- Go to Accessibility: In the Settings window, look for “Accessibility.” Click on it.
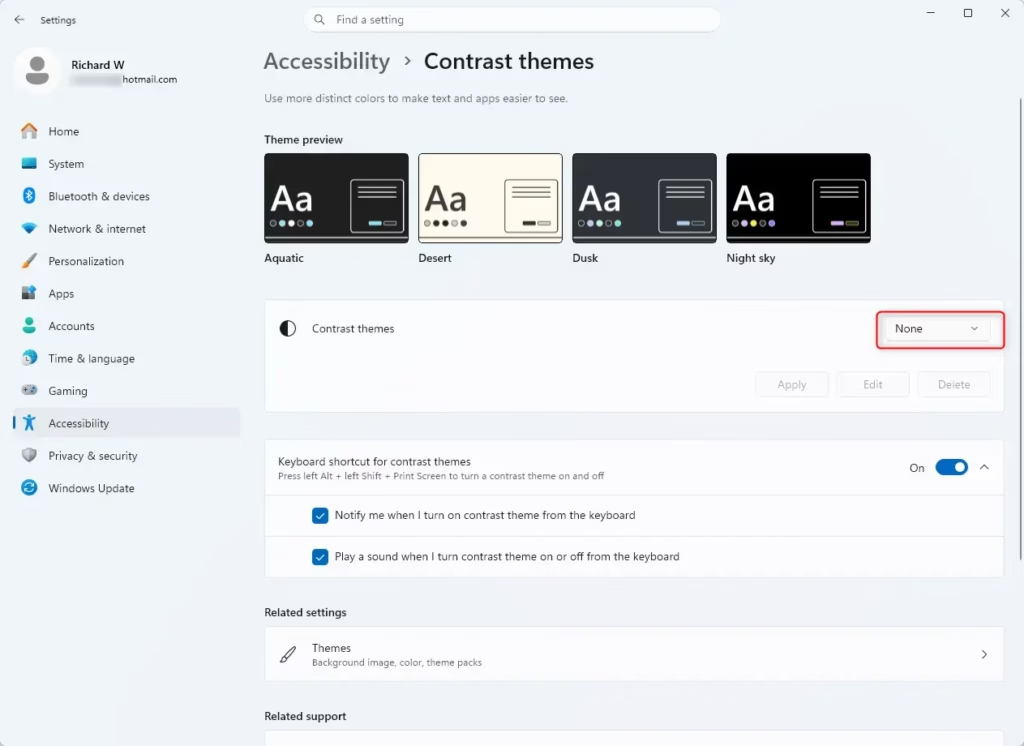
- Find Contrast Themes: In the Accessibility section, you’ll see “Contrast themes.” Click this.
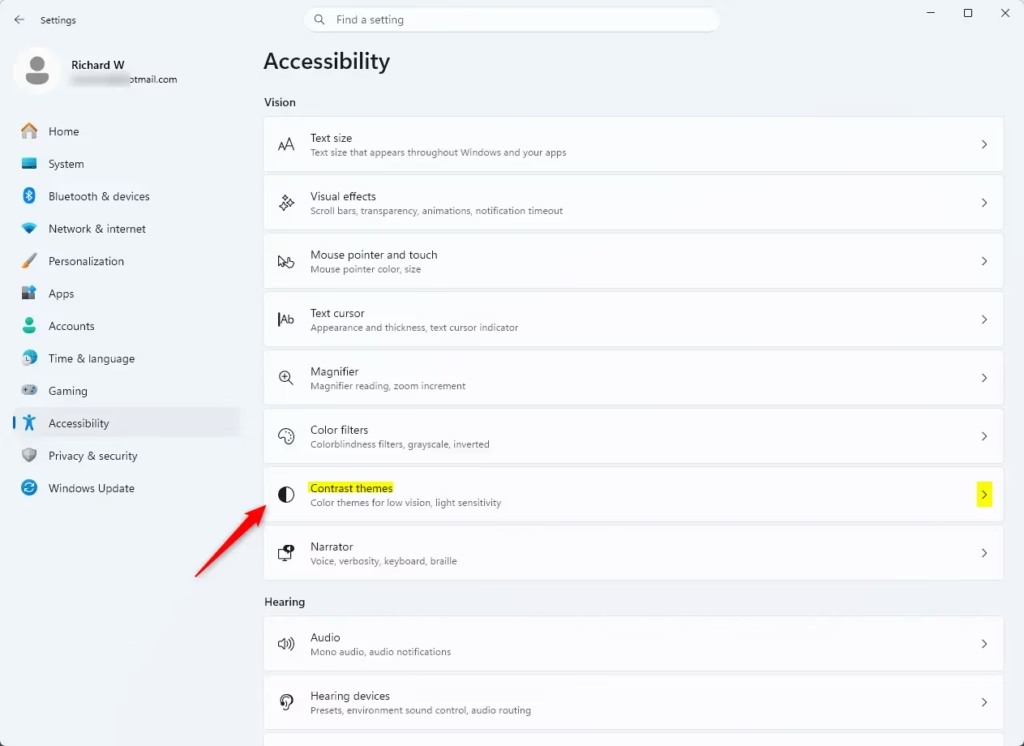
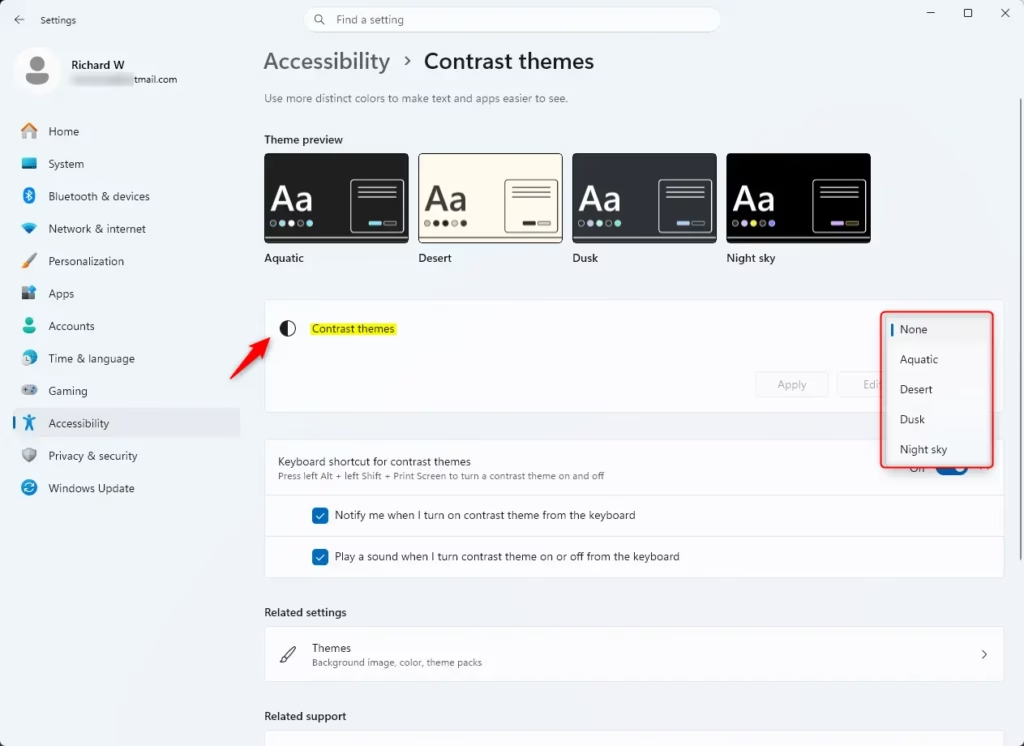
This is where you can change the colors. You’ll see some pre-made themes. You can also turn them on or off here.
Quick Tip: Want to turn high contrast mode on and off really fast? Use a keyboard shortcut. Hold down the left Alt key, the left Shift key, and press the Print Screen key (the key might be labeled “PrtScn” or “Print Scrn”). This is useful if you need a quick change.
Customizing Your Own High Contrast Theme
Now, you become the designer. If the default themes aren’t quite right, you can change them. This is especially helpful if you have trouble seeing certain colors.
- Choose a Starting Theme: You start customizing from one of the existing themes. Pick one from the dropdown that is closest to what you want, or just pick any theme to start editing.
- Enter Editing Mode: After picking a theme, click the “Edit” button below the dropdown menu. This opens the color editing panel.
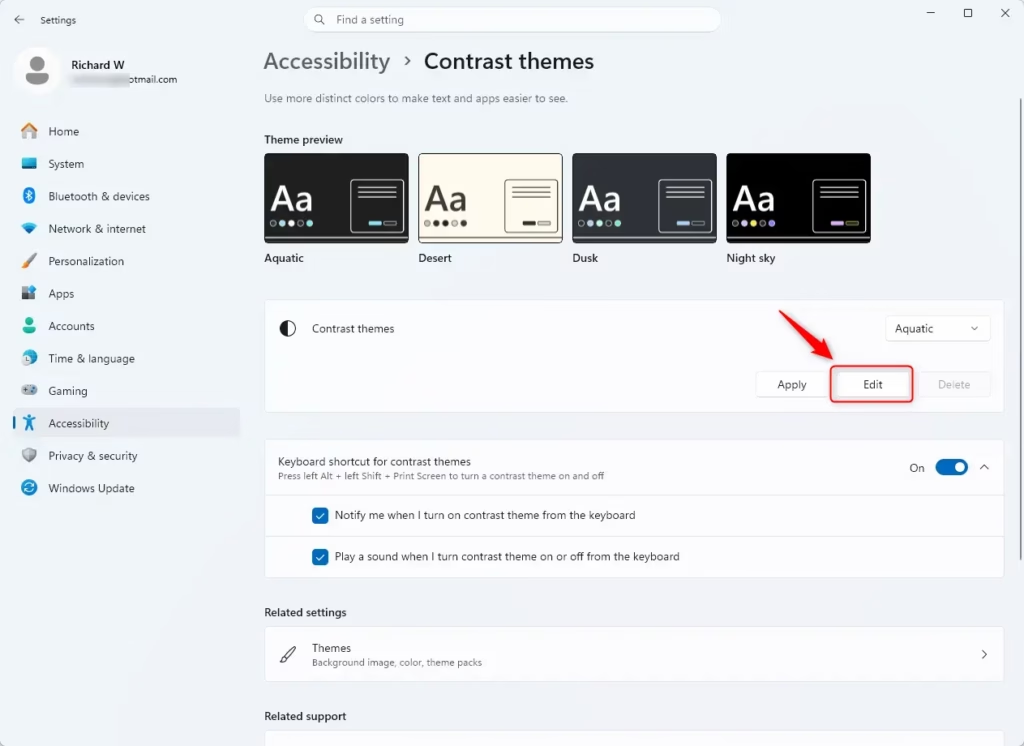
See the Screen Elements: You’ll see a list of different parts of Windows that you can change the color for. These include:
- Background: The color of most windows and the desktop.
- Text: The color of normal text you see, like in documents or on websites.
- Hyperlinks: The color of links on the web.
- Inactive Text: The color for text that is not active or is grayed out.
- Selected Text: The color when you highlight text or choose an item in a list. For example, if you select text in a Word document, this is the background color of that selection.
- Button Text: The color of the text on buttons.
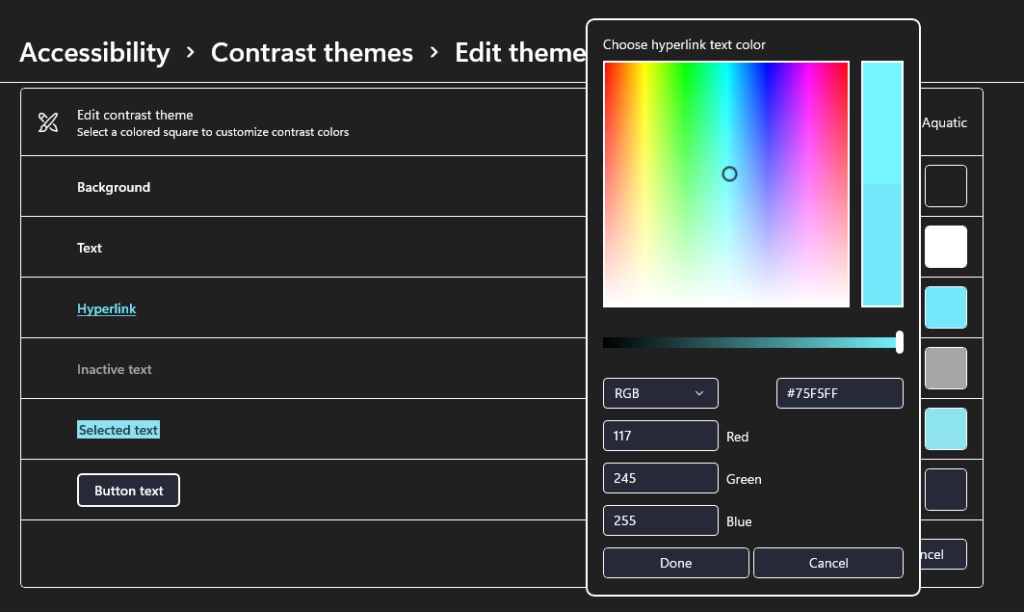
Pick Your Colors: For each part you want to change, click the colored box next to its name. A color palette will show up.
- Click a color in the palette to choose it.
- Below the palette, there’s a slider. Use this to make the color brighter or less bright.
When you like the color for a part, click “Done.” Do this for all the parts you want to change. Think about how the colors work together. You want text to stand out from the background. For example, bright yellow text on a black background is a common high-contrast choice.
Practical Tip: Test as you go. You don’t have to change everything at once. You can pick a color for one part, click “Done,” and then click “Apply” to see how it looks. This lets you make small changes and see the results right away.
Saving Your Custom Theme
Once you’ve changed all the colors how you like them, you should save your theme. This way, you won’t lose your work and can easily switch back to it later.
- Name Your Theme: A box will appear asking for a name for your new theme. Give it a clear name, like “My Bright Text Theme” or “Easy Reader.”
- Save Your Custom Theme: After you finish editing colors and click “Done” for the last part, you’ll be back on the main Contrast themes screen. Look for a button that says “Save as.” Click it.
- Finish and Apply: After typing the name, click “Save.” Then, make sure your new theme is selected in the “Contrast themes” dropdown menu. Click “Apply” one last time.
Your personalized high contrast theme is now active! You can switch between this theme and others anytime from the same settings menu.
Important Note: Save often! If you’re making many changes, it’s a good idea to save your work regularly. Click “Save as” and give it a slightly different name each time (like “My Theme v2”). This way, if something goes wrong or you like an older version better, you won’t lose all your progress.
Turning Off High Contrast Mode
When you’re done using Windows for the day, or if you just want to go back to the normal look, turning off high contrast mode is manageable.
- Go Back to Settings: Open Settings (Start button > Gear icon).
- Go to Accessibility: Click “Accessibility.”
- Select Contrast Themes: Click “Contrast themes.”
- Choose “None”: In the “Contrast themes” dropdown menu, select the option that says “None.”
- Apply the Changes: Click the “Apply” button.
Just as when you turned it on, Windows will display a “Please wait” screen for a moment while it restores your default colors. You’re back to normal!
Remember the Shortcut: Don’t forget the quick keyboard shortcut: left Alt+← Shift + Print Screen. It works just as well for turning high contrast mode off as it does for turning it on. It’s quite handy!
Reference:
https://support.microsoft.com/en-us/accessibility/windows/change-color-contrast-in-windows
Summary
Creating your own high contrast theme might seem like a small change, but it can make a big difference in how you use your computer every day. By changing the colors to fit your needs, you make your Windows experience more comfortable, easier to use, and more accessible. Whether you want to reduce eye strain or help with vision problems, Windows lets you change your digital world. So, go ahead and try different colors. Save your favorite ones. Enjoy a more comfortable PC!
Was this guide helpful?

About the Author
Richard
Tech Writer, IT Professional
Richard, a writer for Geek Rewind, is a tech enthusiast who loves breaking down complex IT topics into simple, easy-to-understand ideas. With years of hands-on experience in system administration and enterprise IT operations, he’s developed a knack for offering practical tips and solutions. Richard aims to make technology more accessible and actionable. He's deeply committed to the Geek Rewind community, always ready to answer questions and engage in discussions.
No comments yet — be the first to share your thoughts!