How to Change Time Server in Windows 11
You change your time server in Windows 11 to ensure your PC’s clock remains accurate by synchronizing it with external time sources.
The Internet Time Server is a service your computer uses to keep its internal clock aligned with global atomic clocks, a process typically managed by the Network Time Protocol (NTP).
Windows 11 typically defaults to time.windows.com, but you can manually switch to alternative servers such as time.nist.gov or pool.ntp.org for improved accuracy or reliability.
This tutorial shows you the straightforward methods to update your chosen time server so you can maintain precise timekeeping on your system.
Open Settings, navigate to Time & language > Date & time, and click Change next to your current time server. You can also use the Control Panel by going to Clock and Region > Set the time and date, then selecting the Internet Time tab and clicking Change settings.
Change Time Server Using the Settings App
You can change your time server in Windows 11 easily using the Settings app by going to Time & language, then Date & time, and clicking the Change button next to your current server.
- Open the Settings app. Click the Start menu and select Settings, or press Windows key + I on your keyboard.
- Click Time & language on the left side.
- Click Date & time on the right side to see more options.
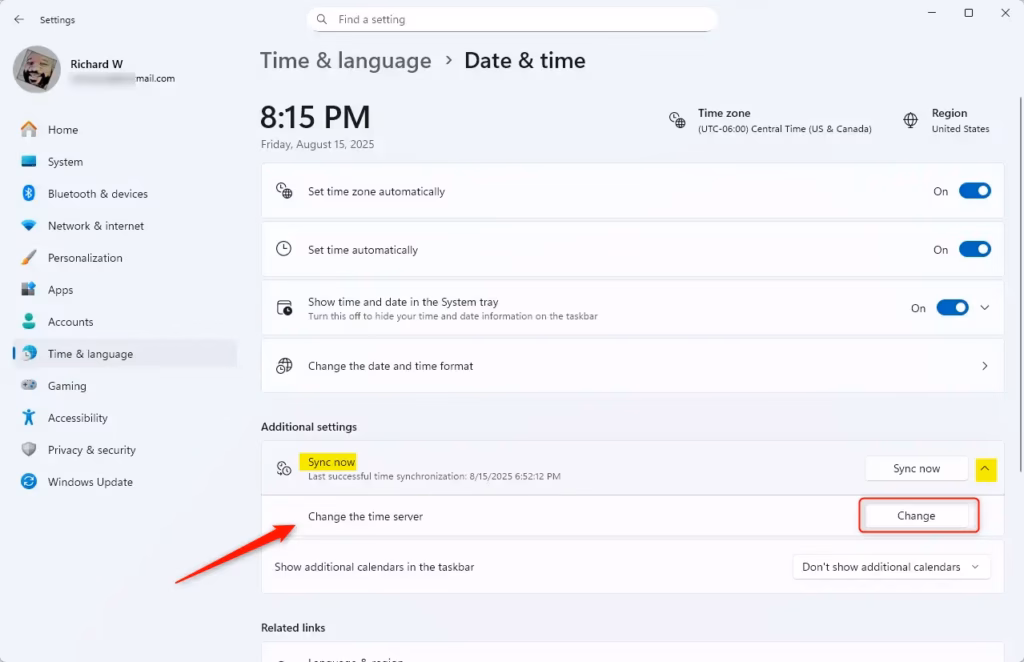
- Scroll down and click the Sync now tile to expand it.
- Click the Change button next to where it shows your current time server.
- Type the address of the new time server you want to use. For example, type
time.nist.govand click OK.
Why change the time server? Changing your time server ensures your computer syncs with a reliable clock. What happens? Your computer will now get its time from the new server you chose.
Change Time Server Using Control Panel
Changing your time server in Windows 11 using the Control Panel is a simple way to keep your computer’s clock accurate.
- Open the Control Panel.
- Go to Clock and Region.
- Click Set the time and date.
- In the pop-up window, select the Internet Time tab.
- Click Change settings. ⚠️ This step requires admin privileges.
- Choose a time server from the list or type your own.
- Click Update now and then OK.
Why choose the Control Panel? The Control Panel gives you direct control over your time settings. What happens? Your computer tests the new server and updates your system time right away.


Add or Change Time Servers Using the Registry Editor (Advanced)
Advanced users can change the time server in Windows 11 by using the Registry Editor to add new server addresses.
- Open the Registry Editor by typing
regeditin the Start menu search and pressing Enter. ⚠️ This step requires admin privileges. - Navigate to this folder:
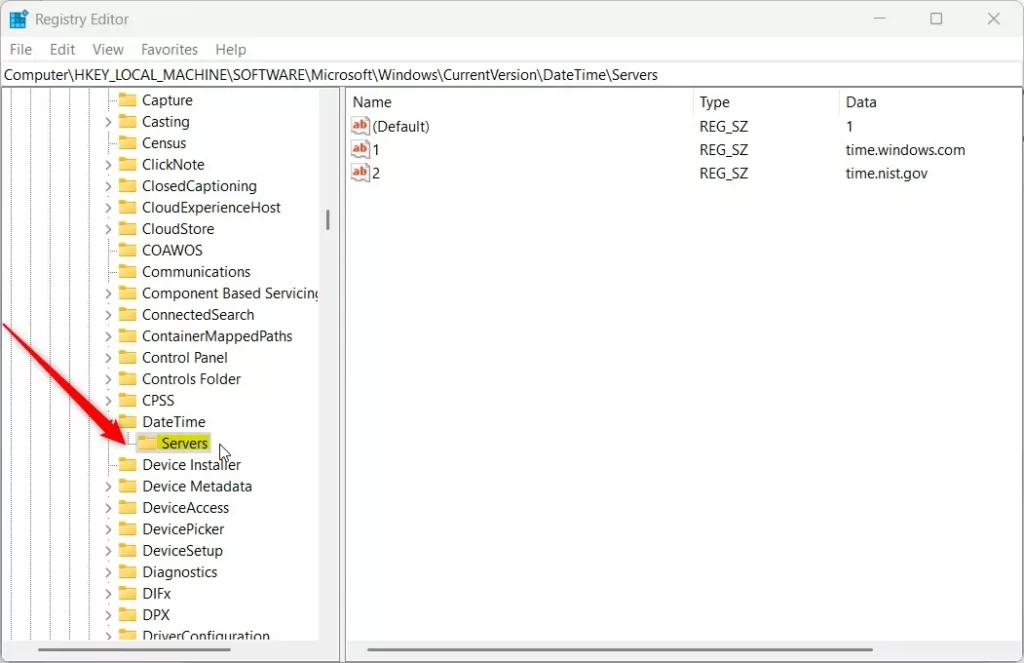
HKEY_LOCAL_MACHINE\SOFTWARE\Microsoft\Windows\CurrentVersion\DateTime\Servers - If the Servers folder doesn’t exist, right-click on DateTime, select New > Key, and name it Servers.
- In the right pane, you will see servers listed as numbers (0, 1, 2, etc.). Each number represents a time server address.
- To add a new server, right-click in the right pane. Choose New > String Value. Name it the next number, like 3. Then double-click it and enter the server address, such as
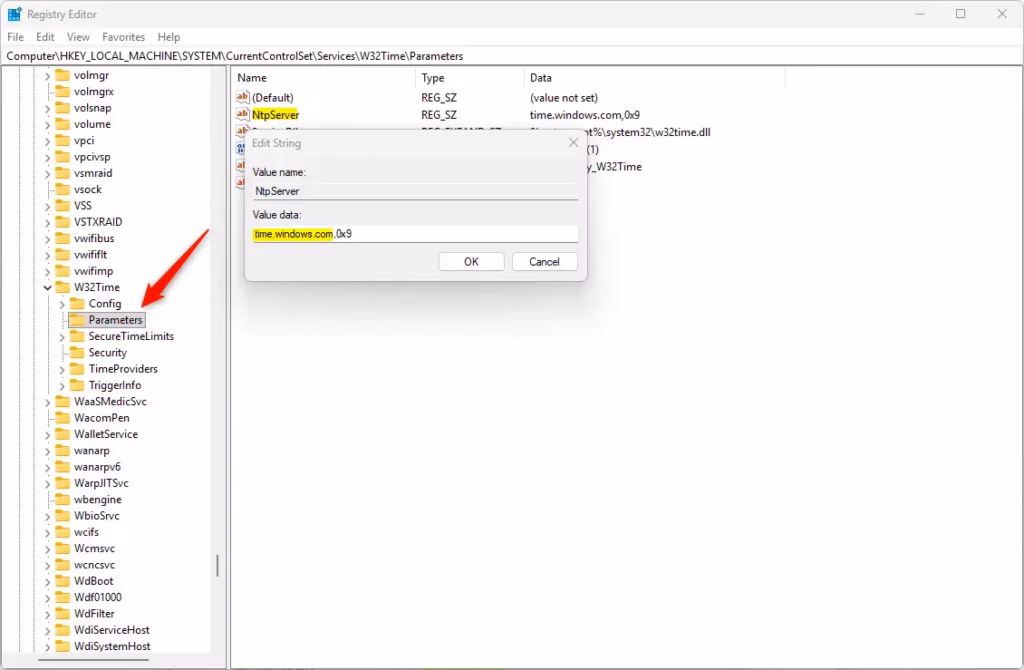
time.google.com. - Next, go to:
HKEY_LOCAL_MACHINE\SYSTEM\CurrentControlSet\Services\w32time\Parameters - Double-click the NtpServer entry and replace the value with the server you want to use. For example, type:
time.google.com,0x9 - Save and close the Registry Editor.
- Restart your computer to apply the changes. ⚠️ A restart requires admin privileges.
Why edit the registry? This method lets you set up custom time servers or manage multiple servers. What happens? Your computer uses the new servers you added for time syncing.
Summary
You can change your time server in Windows 11 using the Settings app, the Control Panel, or the Registry Editor if you’re comfortable with advanced settings.- You can change the Internet Time Server in Windows 11 using the Settings app, Control Panel, or Registry Editor.
- The default server is
time.windows.com. Other reliable options includetime.nist.govandpool.ntp.org. - Pick a reliable time server to keep your clock accurate.
- After changing the server, restart your PC to make sure the change takes effect.
- Regular syncing helps keep your computer’s time correct for apps and services.
- If you want to learn more about keeping your Windows 11 PC running smoothly, check out Geek Rewind for helpful guides and tips!
How do I change the time server in 🪟 Windows 11?
To change your Windows machine to use the time server, open the Control Panel, select Date and Time, go to the Internet Time tab, click Change Settings, and then select your desired server from the dropdown list, ensuring "Synchronize with an internet time server" is checked.
Was this guide helpful?

About the Author
Richard
Tech Writer, IT Professional
Richard, a writer for Geek Rewind, is a tech enthusiast who loves breaking down complex IT topics into simple, easy-to-understand ideas. With years of hands-on experience in system administration and enterprise IT operations, he’s developed a knack for offering practical tips and solutions. Richard aims to make technology more accessible and actionable. He's deeply committed to the Geek Rewind community, always ready to answer questions and engage in discussions.


No comments yet — be the first to share your thoughts!