Easy Guide: Change Mouse Pointer Style & Size in Windows 11
You change your mouse pointer style, color, and size in Windows 11 through the Settings app. Your mouse pointer, often called a cursor, is that little arrow or symbol on your screen that shows where your mouse is pointing.
Windows 11 offers several built-in pointer schemes, but you can customize them to improve visibility and personal preference. This is especially helpful if you have a high-resolution display or visual impairments.
You can pick from pre-made themes, make your pointer up to 150% bigger, or even choose a custom color. These changes can make your computer experience more comfortable and efficient.
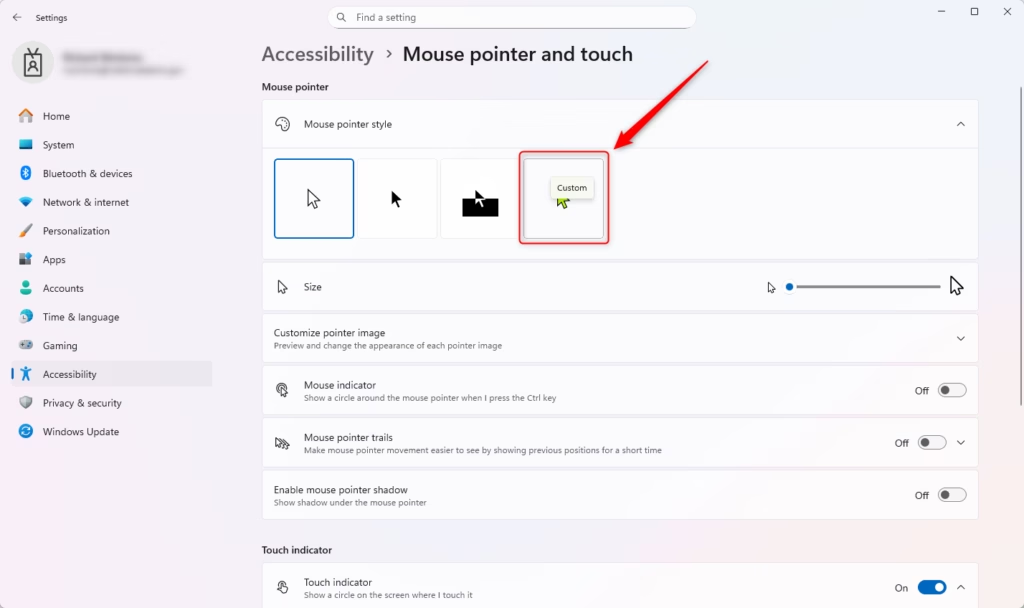
Open Settings (⊞ Win+I), navigate to Accessibility, then Mouse pointer and touch. Select a style like White, Black, Inverted, or Custom, and adjust the size from 1 to 15. You can also pick a custom color for the pointer.
Why Change Your Mouse Pointer?
If the default pointer is hard to see, changing it can really help. You can make it bigger, change its color, or pick a different style that suits you better.
What Happens When You Change Your Pointer?
When you pick a custom style or color, Windows will note that you’re using custom settings rather than a saved scheme, showing ‘(None)’. This just means your preferences are unique!
Where are these settings saved?
HKEY_CURRENT_USER\Control Panel\Cursors
HKEY_CURRENT_USER\Software\Microsoft\Accessibility
How to Change Your Mouse Pointer
Here’s how to change your Windows 11 mouse pointer: First, open Settings by pressing ⊞ Win+I on your keyboard. Then, go to Accessibility, followed by Mouse pointer and touch. You’ll see four built-in styles: White, Black, Inverted, or Custom. You can also adjust the size from 1 to 15 pixels. Your changes save automatically, so no restart is needed.
- Open Settings by pressing
Win+Ion your keyboard. - Click on Accessibility on the left side. Then click on Mouse pointer and touch on the right side.
- Under Mouse pointer, choose the style you want: White (default), Black, Inverted, or Custom.
- Select the Size you want. You can choose from 1 to 15. The default size is 1.
- If you chose the Custom style, follow one of the steps below to pick a color.

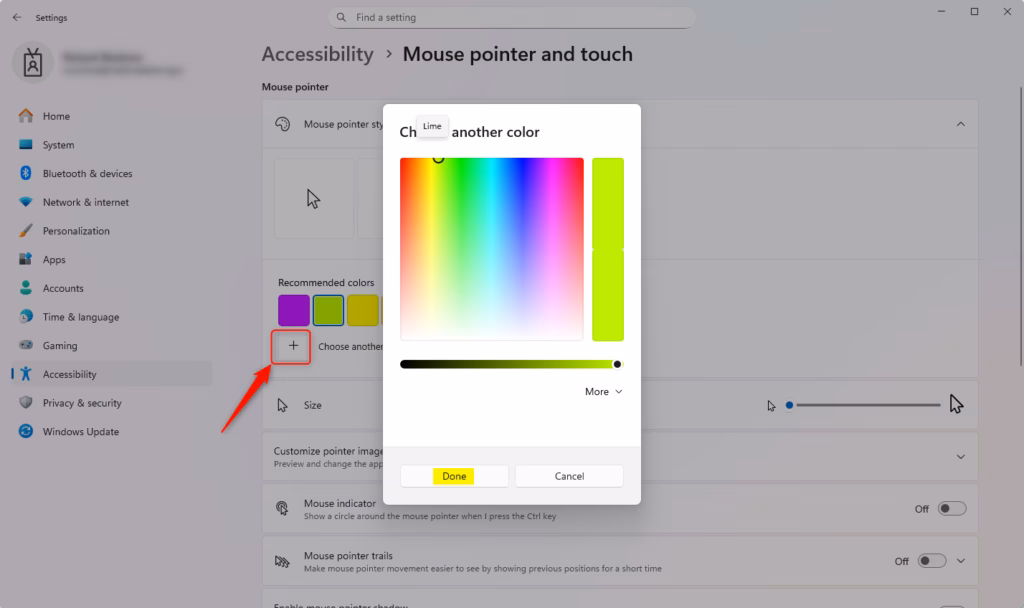
Option A: Select Color from “Recommended colors”
- Look for the Recommended colors section.
- Click on the color you want.
Option B: Choose Another Color
- Click on Choose another color.
- Select a base color from the left side.
- Use the slider to adjust and customize the color.
- The color shown on the right side is your current selection.
- Click on Done when you’re finished.
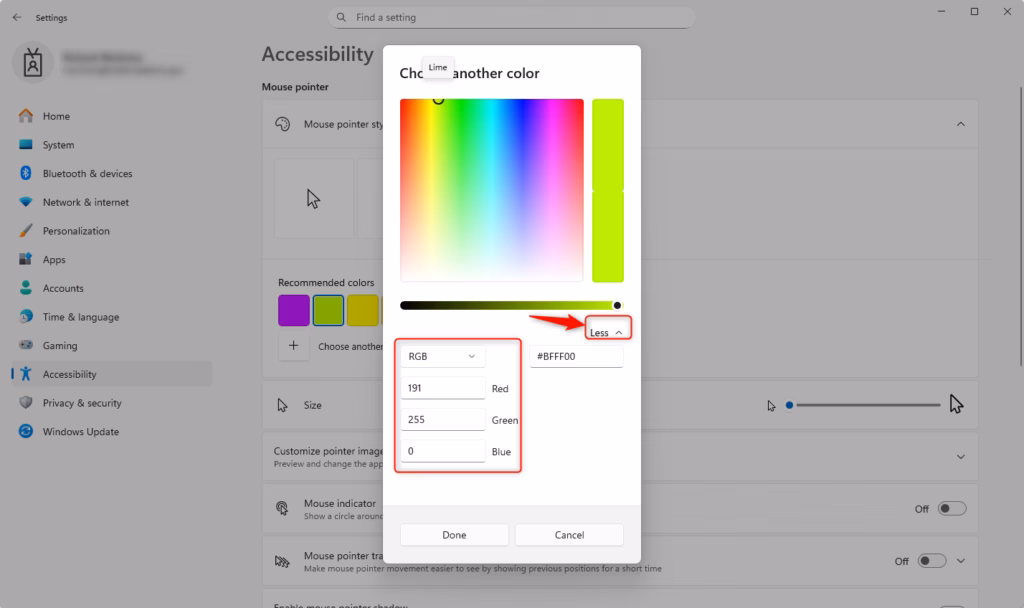
Option C: Specify Custom RGB or HSV Color
- Click on Choose another color.
- Click on More.
- Click on Done when you’re finished.
Summary
Changing your mouse pointer in Windows 11 is a quick way to improve how you see your cursor. You have four styles to choose from – White, Black, Inverted, or Custom – and you can adjust the size anywhere from 1 to 15. Picking a custom color is also an option. Just open Settings, head to Accessibility, then Mouse pointer and touch, and tweak it to your liking. Your changes save automatically, and you can always switch things up later if you feel like a different look.
How do I get my mouse pointer back in 🪟 Windows 11?
If your mouse pointer has disappeared, try pressing the Windows key + I to open Settings, then navigate to Accessibility > Mouse pointer and touch. Ensure your pointer size is set above one. If it remains missing, restart your computer or check your mouse hardware connection to resolve potential driver issues.
Can you change the mouse pointer on 🪟 Windows 11?
Yes, you can easily change your mouse pointer in Windows 11. Navigate to Settings by pressing ⊞ Win+I, then go to Accessibility > Mouse pointer and touch. From there, you can select from four built-in styles, including white, black, inverted, or custom colors, and adjust the pointer size to your preference.
How do I return the cursor back to normal?
To return your cursor to the default Windows settings, open Settings (⊞ Win+I) and go to Accessibility > Mouse pointer and touch. Select the standard white pointer style and set the size slider back to the smallest level. This will reset your cursor to the original Windows default appearance and configuration.
How do I customize my mouse pointer?
Customize your mouse pointer by opening Windows Settings with ⊞ Win+I and selecting Accessibility > Mouse pointer and touch. You can choose from four predefined styles, including a custom color option. Use the size slider to adjust the pointer scale from 1 to 15 to improve visibility and match your personal preference.
Was this guide helpful?

About the Author
Richard
Tech Writer, IT Professional
Richard, a writer for Geek Rewind, is a tech enthusiast who loves breaking down complex IT topics into simple, easy-to-understand ideas. With years of hands-on experience in system administration and enterprise IT operations, he’s developed a knack for offering practical tips and solutions. Richard aims to make technology more accessible and actionable. He's deeply committed to the Geek Rewind community, always ready to answer questions and engage in discussions.


No comments yet — be the first to share your thoughts!