
This article explains adding extra fingers to Windows fingerprint recognition sign-in with Windows 11.
When you set up a Windows Hello Fingerprint recognition sign-in, you can register and authenticate with more fingers.
Adding more fingers to authenticate is similar to setting up a fingerprint recognition sign-in for the first time. You can use as many fingers as you want to create a fingerprint profile. Only fingers that are added and registered will be used to sign in to Windows.
The Windows Hello Fingerprint feature provides a more personal and secure way to sign into Windows. One can use a PIN, facial recognition, or fingerprint to sign into their Windows devices.
In addition, the Windows Hello feature offers several ways to ditch passwords in favor of a more secure and personal authentication method.
Below is how to add additional fingers with Windows 11 finger recognition sign-in.
How to add additional fingers to Windows Hello Finger recognition sign-in with Windows 11
As mentioned above, the Hello Finger recognition feature allows users to sign in to Windows 11 using multiple Fingers. Once Hello Finger recognition is set up, adding additional fingers is easy.
Below is how to do that.
Windows 11 has a centralized location for the majority of its settings. As a result, everything can be done from the Settings pane, from system configurations to creating new users and updating Windows.
To get to System Settings, you can use the Windows key + I shortcut or click on Start ==> Settings, as shown in the image below:

Alternatively, you can use the search box on the taskbar to search for Settings. Then select to open it.
In Windows Settings, click Accounts, and select the Sign-in options tile on the right to expand the tile.

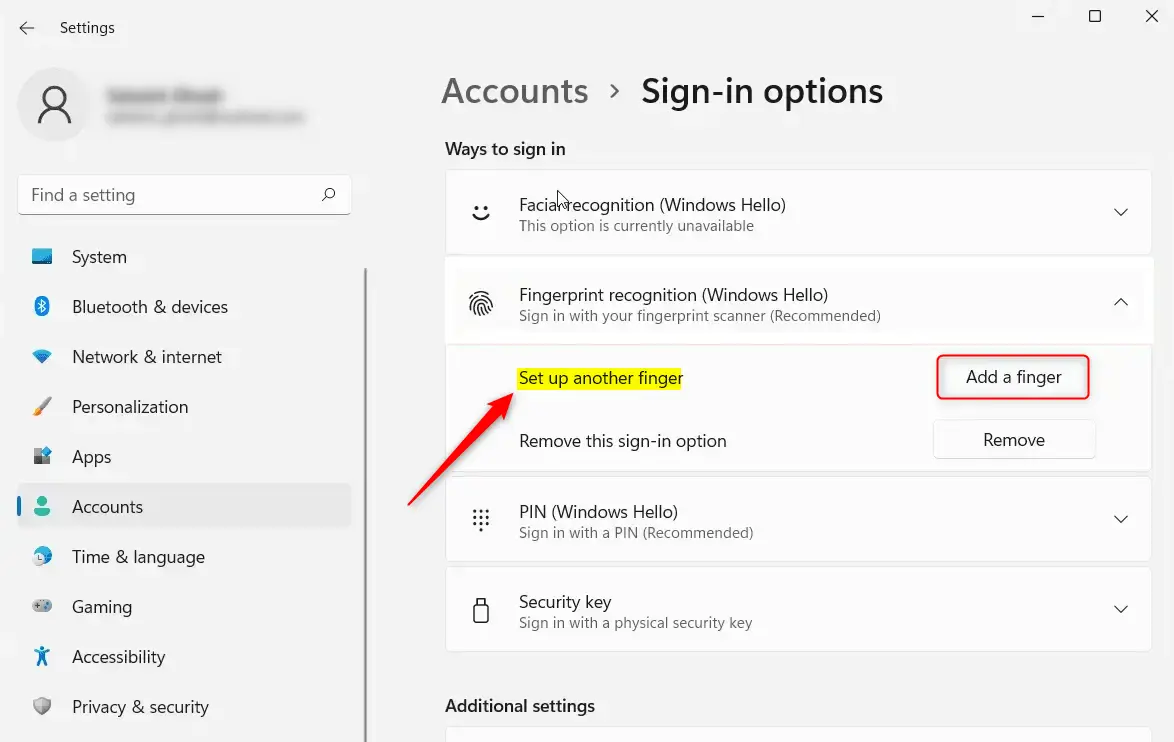
On the Sign-in options settings pane, select the Fingerprint recognition (Windows Hello) tile to expand it, and click Set up another finger if you already have a fingerprint added.
Type your account’s PIN to verify it’s you.
On the next screen, Windows will ask you to start swiping the finger you want to use to log in on the fingerprint reader or sensor until Windows can get a complete reading of your print.

Once Windows has successfully read the print on the first finger, you’ll see an all set message with an option to add prints from other fingers if you wish to add more.
That should do it!
Conclusion:
- Windows Hello Fingerprint recognition allows for a secure and personalized sign-in experience.
- Users can register multiple fingers for added convenience and flexibility.
- The process to add additional fingerprints is straightforward and can be done via the System Settings.
- Utilizing fingerprint authentication enhances protection against unauthorized access.
- Users can choose the method that best suits their preferences and security needs by enabling various sign-in options, such as PINs and facial recognition.
Leave a Reply