Allow Websites to Access your Language Preferences in Windows 11

Windows 11 lets you allow websites to access your preferred language settings directly, making your browsing experience more seamless.
This feature leverages the language preferences you’ve set on your PC to automatically display websites in a language you understand without requiring manual selection.
Starting with Windows 11, this built-in functionality ensures that sites like news portals or e-commerce platforms can detect your linguistic choice, often saving you the step of navigating a site’s language options.
You can control this setting easily, ensuring you share only the languages you want websites to know.
How Windows Shares Your Language List
Think of it like this: You tell Windows 11 what languages you speak. Then, Windows can tell websites you visit. Most websites offer content in many languages. By sharing your language list, Windows gives these websites a hint. They can then use this hint to show you the right language version of their site right away. This means less clicking around. You can spend more time enjoying the content.
This feature is meant to be helpful. But like all privacy settings, you should know how it works. You should also be able to turn it off if you want. Microsoft wants you to control what information is shared. So, if you want websites to find your language preferences automatically, here’s how.
Steps to Let Websites See Your Language
Ready to manage this setting? You’ll find it in your Windows 11 privacy and security options. Here’s how:
Open Windows Settings
First, open the Settings app. Click the Start button (it looks like the Windows logo and is usually in the middle of your taskbar). You’ll see a list of options; look for the Settings icon, which often looks like a gear, and click it to open the Settings window.Tip: Press the Windows key + I on your keyboard together. This also opens Settings.
Go to Privacy & Security
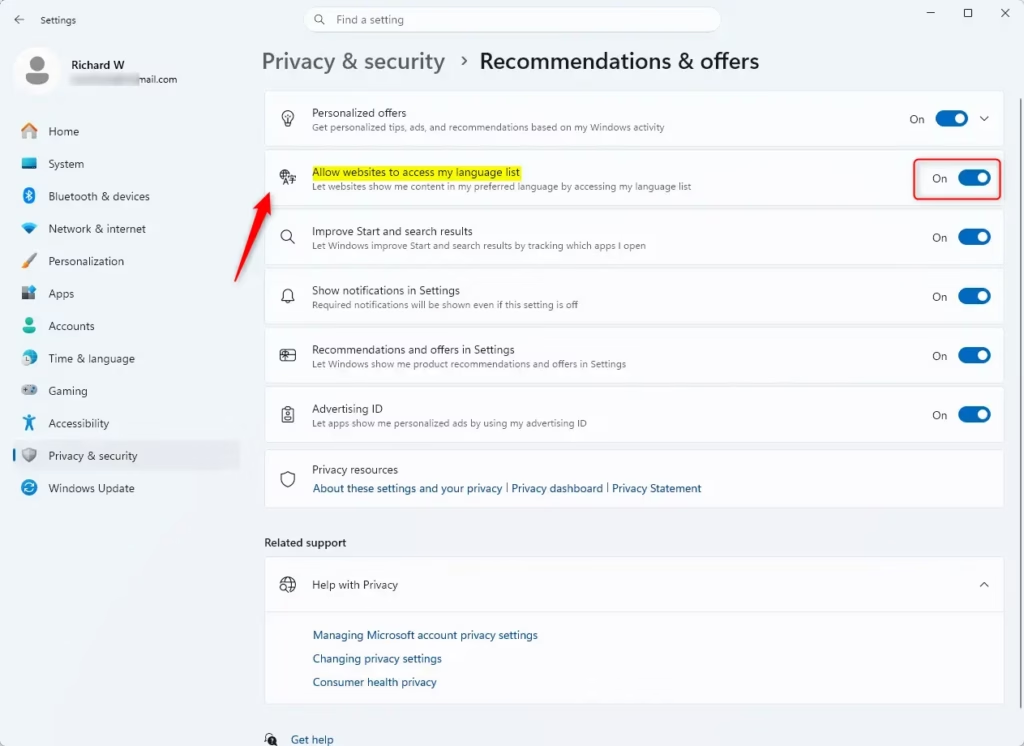
In the Settings window, look at the left side. You’ll see a list of categories. Click on Privacy & security. This is where you control how Windows handles your data and privacy.Find Recommendations & offers Settings
In the Privacy & security section, scroll down. Find Recommendations & offers. Click it. This section contains some of the main privacy settings for Windows 11.Warning: Look at the other settings in the Recommendations & offers section. They control things like advertising IDs, app permissions, and diagnostic data. Knowing these helps you manage your Windows privacy.
Find the Language List Setting
You are in the right place! Look for a setting about websites and your language. Look for a setting that says something like, “Let websites show me locally relevant content by accessing my language list.” You will see a switch next to it.Adjust the Toggle Switch
To turn this on, make sure the switch next to the language list setting is On. If it’s Off, click the switch to turn it On. If it’s already On and you want to turn it off, click it to make it Off.Tip: Keep this setting On if you often visit websites in other languages. If you are worried about websites seeing this information, or you like to choose the language yourself on each site, you can turn it Off.


Summary
This guide shows you how to let Windows 11 share your preferred language list with websites. This helps websites automatically show you content in your language. You can find this setting in Windows Settings under Privacy & security > General. Turning it on means websites can detect your language for a more relevant experience. Turning it off means you keep this information private. We covered the steps to enable or disable this feature, explained what “locally relevant content” means, and discussed why this setting is important for user control and privacy.
Was this guide helpful?

About the Author
Richard
Tech Writer, IT Professional
Richard, a writer for Geek Rewind, is a tech enthusiast who loves breaking down complex IT topics into simple, easy-to-understand ideas. With years of hands-on experience in system administration and enterprise IT operations, he’s developed a knack for offering practical tips and solutions. Richard aims to make technology more accessible and actionable. He's deeply committed to the Geek Rewind community, always ready to answer questions and engage in discussions.
No comments yet — be the first to share your thoughts!