How to Set Up Environment Variables in Windows 11
Windows 11 environment variables provide custom settings for your computer. This guide explains how to create and use these variables in 3 simple steps, allowing applications to access specific paths or configurations without needing manual input each time.
Set environment variables through System Properties by navigating to Advanced system settings, clicking Environment Variables, and then clicking New. You can also use the setx command in Command Prompt or PowerShell, specifying “User” or “Machine” scope.
What Are Environment Variables?
Environment variables are special settings your computer uses to remember important information, like where to find files or how programs should run.
For example, if you want a program to always know where your downloads folder is, you can set an environment variable for that.
Ways to Set Environment Variables in 🪟 Windows 11
You can create environment variables using:
- System Properties (a simple Windows settings screen)
- Command Prompt (a text-based way to give commands)
- PowerShell (a more advanced command tool)
1Using System Properties (Easy Way)
The easiest way to set environment variables in Windows 11 is by using the System Properties window, which gives you direct access to manage these important computer settings.
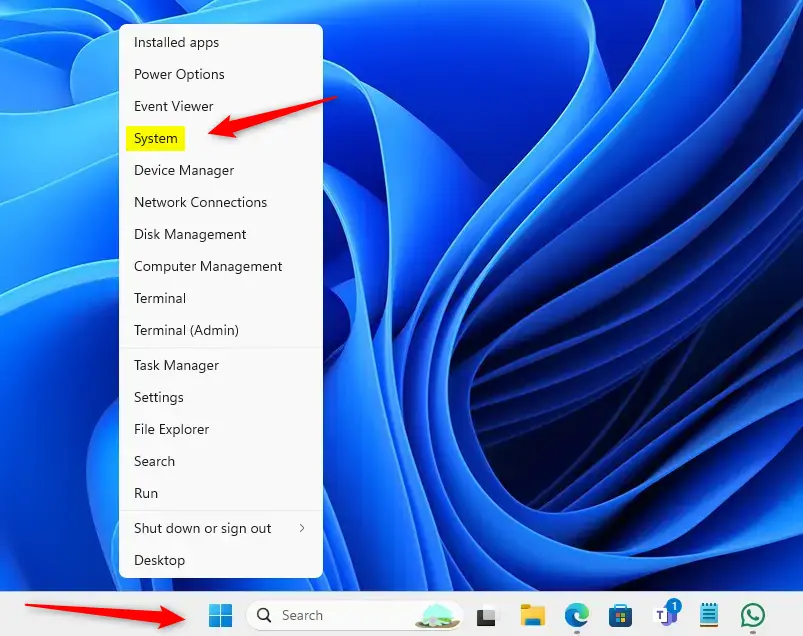
- Right-click the Start button at the bottom-left of your screen.
- Select System from the menu.
- On the right side, click Advanced system settings.
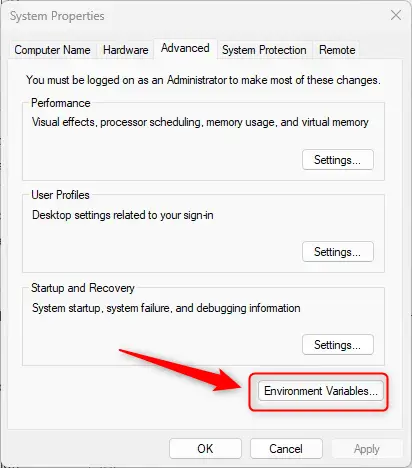
This will open the System Properties window.
- Click the Environment Variables… button near the bottom.
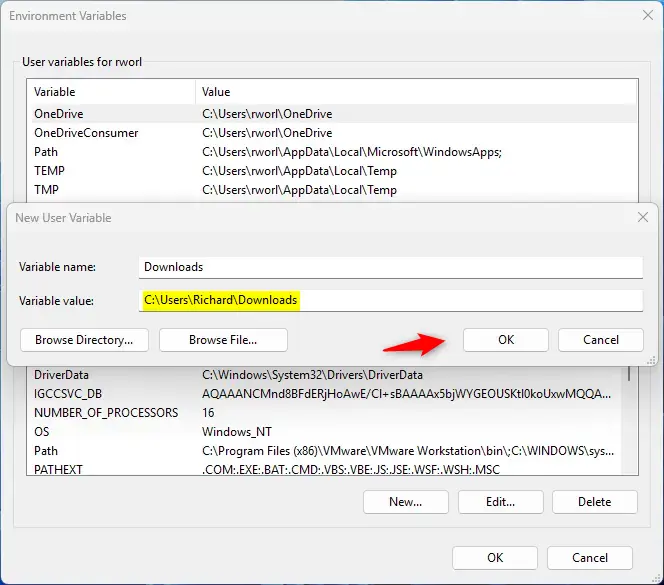
Now you will see two sections:
- User variables – These only affect your user account.
- System variables – These affect all users on the computer.
To add a new variable:
- Click New… under the section you want (User or System). ⚠️ Admin privileges required for System variables.
- Type a name for the variable (like MY_FOLDER).
- Type the value (like 📁C:\Users\UserName\Documents).
- Click OK to save.
2Using Command Prompt
Adding environment variables in Windows 11 using the Command Prompt is a fast method for setting these important computer settings with simple text commands.
- Right-click the Start button and select Windows Terminal (Admin) to open a command window with administrator rights. ⚠️ Admin privileges required.
- Click the down arrow next to the “+” tab and choose Command Prompt.
To create a user variable, type this command and press Enter:
setx VARIABLE_NAME "VARIABLE_VALUE"Replace VARIABLE_NAME with your variable’s name and VARIABLE_VALUE with the value you want.
Example:
setx Downloads "C:\Users\UserName\Downloads"To create a system-wide variable (for all users), type:
setx /M VARIABLE_NAME "VARIABLE_VALUE"⚠️ Admin privileges required for /M flag.
Example:
setx /M Downloads "C:\Users\UserName\Downloads"3Using Windows PowerShell
Windows PowerShell offers a command-line method to set environment variables in Windows 11. This method allows users to manage system settings, such as the PATH variable which tells Windows where to find executable programs, efficiently. Using PowerShell for this task provides an alternative to graphical interface options, empowering users with direct control over system configurations.
- Open Windows Terminal (Admin) as shown above. ⚠️ Admin privileges required.
- Make sure you’re in a PowerShell tab (it opens by default).
To create a user variable, type this command and press Enter:
[Environment]::SetEnvironmentVariable("VARIABLE_NAME", "VARIABLE_VALUE", "User")Example:
[Environment]::SetEnvironmentVariable("Downloads","C:\Users\UserName\Downloads","User")To create a system-wide variable, type:
[Environment]::SetEnvironmentVariable("VARIABLE_NAME", "VARIABLE_VALUE", "Machine")⚠️ Admin privileges required for Machine scope.
Example:
[Environment]::SetEnvironmentVariable("Downloads","C:\Users\UserName\Downloads","Machine")This change will be ready for new PowerShell or Command Prompt windows. Restart programs or your computer to fully apply the changes.
How to Check if Your Variable Was Created
You can check if your environment variable is working:
- In Command Prompt: Type
echo %VARIABLE_NAME%and press Enter. - In PowerShell: Type
$env:VARIABLE_NAMEand press Enter.
If everything worked, you should see the value you set.
Summary
- Environment variables help your computer and programs know important settings. Why? Because programs need to find files and folders quickly without having long file paths typed in every time.
- You can create them through Windows settings, Command Prompt, or PowerShell. What happens? Your computer remembers the setting and uses it when programs ask for it.
- Remember to restart your computer or log out and back in after creating new variables. Why? Because some programs check for environment variables when they start up.
- Check your variables by echoing them in Command Prompt or PowerShell. What happens? The value displays on your screen so you can confirm it was set correctly.
Environment variables are like helpful notes for your computer and programs, telling them where to find important files and settings.
How do I see all environment variables in 🪟 Windows 11?
Press ⊞ Win+R to open the Run dialog box. Type cmd and click Enter to open the Command Prompt. To view all current environment variables: Type set and press Enter. To view a specific variable: Type echo 📂%VARIABLE_NAME% and press Enter.
How do I fix environment variables in 🪟 Windows 11?
To configure your environment variables, click the Start button, then type environment properties into the search bar and hit Enter. In the System Properties window, click "Environment Variables." Click on the variable you'd like to change, click "Edit."
Was this guide helpful?

About the Author
Richard
Tech Writer, IT Professional
Richard, a writer for Geek Rewind, is a tech enthusiast who loves breaking down complex IT topics into simple, easy-to-understand ideas. With years of hands-on experience in system administration and enterprise IT operations, he’s developed a knack for offering practical tips and solutions. Richard aims to make technology more accessible and actionable. He's deeply committed to the Geek Rewind community, always ready to answer questions and engage in discussions.


No comments yet — be the first to share your thoughts!