How to Clean Up Your Windows Clipboard History, One Item at a Time
Windows 11 clipboard history saves items you copy, letting you paste them again. Sometimes, you only want to remove one specific thing from this list, not everything.
The clipboard history feature keeps a record of text, pictures, and files you’ve copied. While you can clear the entire history, deleting individual entries is also possible.
This is handy if you copy something sensitive, like a password, and want it gone from the list. It helps keep your copied items tidy and protects your private information.
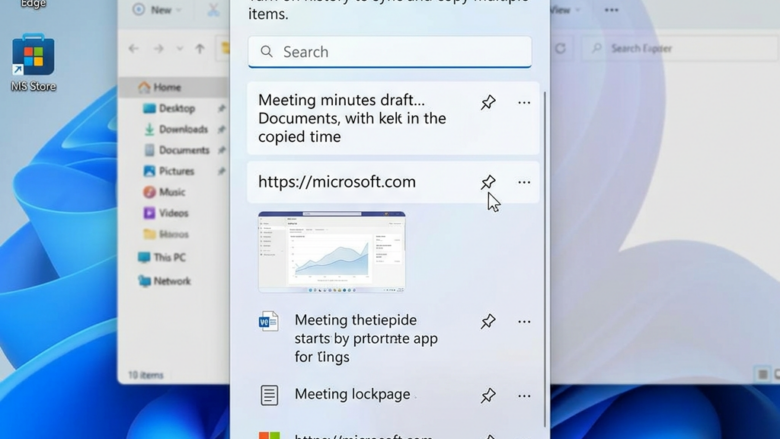
Press Windows key + V to open clipboard history. Click the three dots next to the item you wish to remove, then select “Delete” from the pop-up menu.
What is Windows Clipboard History?
Windows clipboard history acts like a temporary notepad that saves everything you copy, from text and pictures to files.
How to Remove One Item from Clipboard History
Ready to clean up? Follow these steps to remove unwanted items from your clipboard history.
Step 1Open Clipboard Viewer
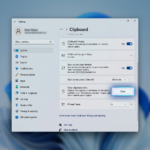
To see your clipboard history, press the Windows key + V on your keyboard together.

Tip: If you’ve never used clipboard history before, pressing Windows key + V will prompt you to turn it on. Click “Turn on ” to start managing your copied items.
Step 2Find the Item to Delete
When the clipboard history window appears, a list of your recent copies will be displayed. Scroll through and find the item you want to remove. Items are usually listed chronologically, with the most recent at the top.
Step 3Access Options for the Item
Look for the three dots (an ellipsis) next to the item you want to delete, and click on them. This action reveals the options available for that specific clipboard entry.

Warning: Double-check that you have selected the correct item. Once deleted, it is permanently removed from your history (unless you copy it again).
Step 4Choose \\\”Delete\\\”
A small menu appears after clicking the three dots. Select the “Delete” option. And just like that, the item is removed from your clipboard history.

Reference:
https://support.microsoft.com/en-us/windows/using-the-clipboard-30375039-ce71-9fe4-5b30-21b7aab6b13f
Summary
Why clear individual items? This practice helps keep your computer tidy and protects sensitive information by removing unwanted copied items.
What happens when done? When you delete an item from your clipboard history using these steps, it is permanently removed from the list that appears when you press Windows key + V. You will no longer be able to paste that specific item from the history.
Was this guide helpful?

About the Author
Richard
Tech Writer, IT Professional
Richard, a writer for Geek Rewind, is a tech enthusiast who loves breaking down complex IT topics into simple, easy-to-understand ideas. With years of hands-on experience in system administration and enterprise IT operations, he’s developed a knack for offering practical tips and solutions. Richard aims to make technology more accessible and actionable. He's deeply committed to the Geek Rewind community, always ready to answer questions and engage in discussions.
No comments yet — be the first to share your thoughts!