How to Enable or Disable Changing Desktop Themes in Windows 11
You can enable or disable the ability to change desktop themes in Windows 11 by adjusting specific Group Policy Editor settings.
Desktop themes in Windows 11 are pre-designed combinations of background images, accent colors, sounds, and mouse cursors that let you customize your PC’s appearance.
This control is particularly useful for system administrators managing multiple user accounts on Windows 11 Pro, Enterprise, or Education editions, preventing unauthorized visual modifications.
By following this guide, you will learn two straightforward methods to manage this setting, ensuring your desktop environment remains consistent.
To prevent users from changing desktop themes in Windows 11, edit the Group Policy Editor or Registry Editor. Navigate to User Configuration > Administrative Templates > Control Panel > Personalization, and enable “Prevent changing theme” in Group Policy. Alternatively, create a DWORD value named NoThemesTab and set it to 1 in the Registry.
What Are Desktop Themes?
Desktop themes let you quickly change how your Windows 11 computer looks. They can change your wallpaper, window colors, sounds, and even your mouse pointer all at once.
- Background wallpaper
- Window colors
- Sounds
- Mouse pointer style
You can pick from preset themes or install new ones. But sometimes, especially on shared computers, you might want to stop others from switching the look around.
Why Stop Users from Changing Themes?
You might want to prevent theme changes on a shared computer to keep things consistent. This helps everyone have the same look and feel. It also stops accidental changes that might confuse other users.
How to Stop Users from Changing Themes Using Local Group Policy Editor
You can stop people from changing desktop themes in Windows 11 using the Local Group Policy Editor. This method works if you have Windows 11 Pro, Enterprise, or Education versions.
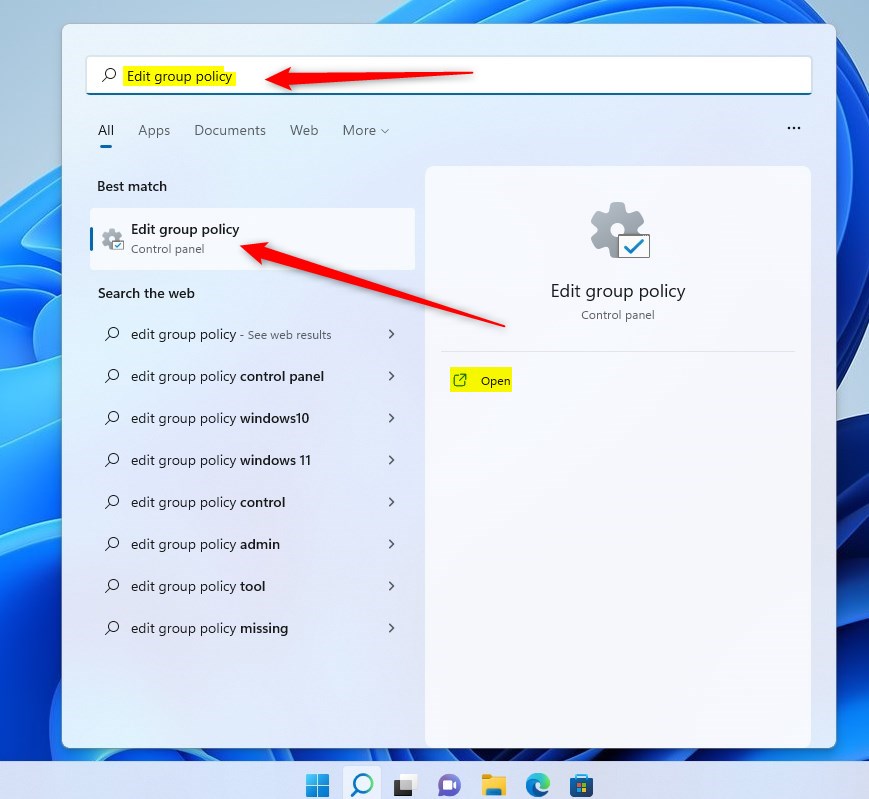
- Click the Start button (the Windows icon on the taskbar).
- Type
Edit group policyin the search box and press Enter. - When the Local Group Policy Editor window opens, look at the left side.
- Click the arrows to open folders in this order: User Configuration > Administrative Templates > Control Panel > Personalization
- On the right side, find the setting called Prevent changing theme and double-click it.
- In the new window, select Enabled to stop users from changing themes.
- Click OK to save.
- [ADMIN REQUIRED] Close the editor and restart your computer for the changes to work.
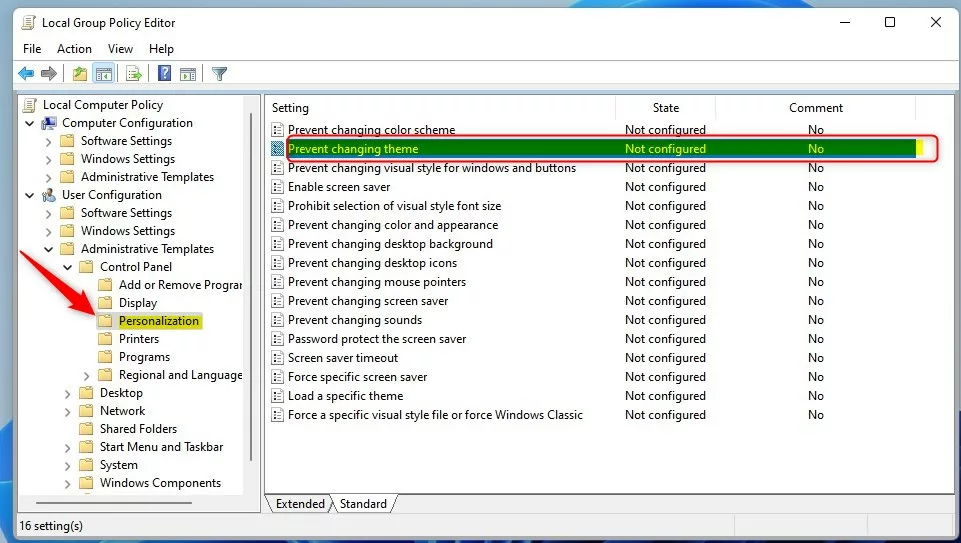
What do the options mean?
- Not Configured: Users can change themes (default setting).
- Enabled: Users cannot change or save themes.
- Disabled: Users can change themes (same as Not Configured).
How to Stop Users from Changing Themes Using Windows Registry (If Group Policy Editor isn’t available)
If your Windows 11 version doesn’t have the Group Policy Editor (like Windows Home), you can use this method. It involves editing the Windows Registry, so be careful and follow these steps exactly.
Step 1Open the Registry Editor
- Press Windows key + R on your keyboard.
- Type
regeditand press Enter. - [ADMIN REQUIRED] If asked by User Account Control, click Yes.
Step 2Navigate to this folder
HKEY_CURRENT_USER\Software\Microsoft\Windows\CurrentVersion\Policies\ExplorerIf the Explorer folder doesn’t exist:
- Right-click on the Policies folder.
- Choose New > Key.
- Name the new key Explorer.
Step 3Create a new setting
- Click on the Explorer folder.
- Right-click in the right pane, select New > DWORD (32-bit) Value.
- Name it NoThemesTab.
- Double-click on NoThemesTab and set its value to 1.
- Click OK.
Step 4Close and restart
- [ADMIN REQUIRED] Close the Registry Editor and restart your PC.

What does the value mean?
- 1 = Prevent users from changing desktop themes.
- 0 = Allow users to change desktop themes.
Summary
You can disable changing themes in Windows 11 using either the Local Group Policy Editor or the Registry Editor, depending on your Windows version. Remember to restart your computer after making these changes.
Need more help? Check out this article on resetting Group Policy settings: Reset Group Policy Settings in Windows 11
Was this guide helpful?

About the Author
Richard
Tech Writer, IT Professional
Richard, a writer for Geek Rewind, is a tech enthusiast who loves breaking down complex IT topics into simple, easy-to-understand ideas. With years of hands-on experience in system administration and enterprise IT operations, he’s developed a knack for offering practical tips and solutions. Richard aims to make technology more accessible and actionable. He's deeply committed to the Geek Rewind community, always ready to answer questions and engage in discussions.


No comments yet — be the first to share your thoughts!