How to Select Accessibility Tools to Automatically Start At or After Sign-in on Windows 11
This guide will help you set up accessibility tools to start automatically when you sign into your Windows 11 computer. Why would you want this? Because these tools help make your computer easier to use if you need extra help.
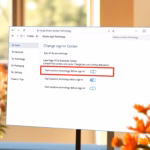
Open Control Panel, then Ease of Access Center. Click Change sign-in settings and select “At sign-in” or “After sign-in” for desired assistive technologies. Save your choices by clicking OK.
You can choose to turn on these helpful tools when you sign in, right after signing in, or both. Here are some of the tools you can set up:
- On-Screen Keyboard: Type without a physical keyboard by using a keyboard on your screen.
- Sticky Keys: Press keyboard shortcuts one key at a time instead of all at once.
- Filter Keys: Ignore repeated or accidental key presses.
- Mouse Keys: Use the number pad to move your mouse pointer around the screen.
- Toggle Keys: Hear a sound when you press Caps⇩, Num Lock, or Scroll Lock.
- Color Filters: Change screen colors for better visibility.
- Cursor Indicator: Highlight the mouse pointer to find it easily.
- Live Captions: Show captions for audio and video.
- Voice Access: A newer way to control your PC with your voice.
⚠️ Admin Required: You need to be signed in as an administrator to change these settings.
How to Set Accessibility Tools to Start Automatically
- Open the Control Panel. Click the Start button (the Windows icon). Type
Control Paneland press Enter. - Switch the view to Small icons or Large icons. Do not use Category view. Then click on Ease of Access Center.
- On the left side, click Change sign-in settings.
You can set Windows 11 accessibility tools to start automatically when you sign in or right after you sign in by using the Control Panel.
- Under Assistive Technology, check or uncheck the boxes. Choose At sign-in and/or After sign-in next to the tools you want to start automatically. Then click OK to save your settings.

You can set Windows 11 accessibility tools to start automatically when you sign in or right after you sign in by using the Control Panel.
Summary
Changing your Windows 11 accessibility tools settings makes your computer easier for everyone to use, no matter their needs.
- Turn on or off different accessibility tools for everyone who uses the computer.
- Make it easier for people with different needs to use Windows 11.
- Keep your settings up to date if needs change over time.
Making these changes helps create a computer environment that works well for everyone.
For more about Windows accessibility features, visit Microsoft Accessibility Features.
Was this guide helpful?
100% of readers found this helpful (1 votes)

About the Author
Richard
Tech Writer, IT Professional
Richard, a writer for Geek Rewind, is a tech enthusiast who loves breaking down complex IT topics into simple, easy-to-understand ideas. With years of hands-on experience in system administration and enterprise IT operations, he’s developed a knack for offering practical tips and solutions. Richard aims to make technology more accessible and actionable. He's deeply committed to the Geek Rewind community, always ready to answer questions and engage in discussions.


No comments yet — be the first to share your thoughts!