How to Use the Print Screen Key to Open Screen Snipping in Windows 11
You can set your Print Screen key to open Screen Snipping in Windows 11, letting you capture your screen with a single key press.
Screen Snipping is a handy tool that takes over from the older Snipping Tool. It lets you capture your whole screen, a single window, or a custom-sized rectangle.
Usually, pressing Print Screen in Windows 11 captures your whole screen to the clipboard. However, you can change this so it opens the Screen Snipping tool instead.
This small change really speeds things up. You can instantly pick the exact part of your screen you want to capture, without digging through menus.
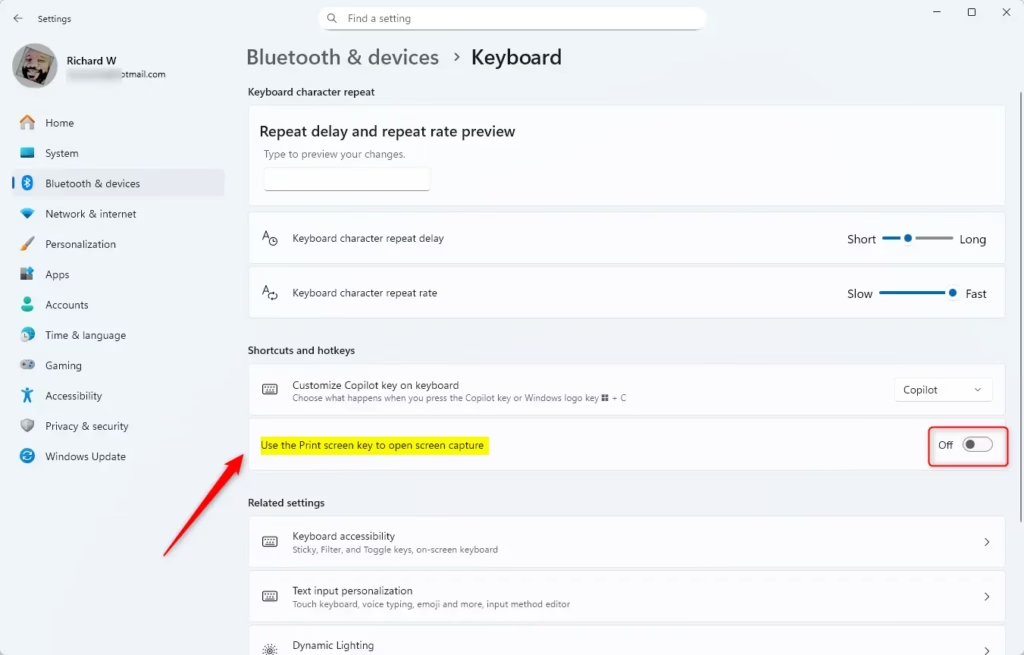
Press Windows key + I to open Settings, navigate to Bluetooth & devices, then Keyboard, and toggle “Use the Print screen key to open screen snipping” to On. This change allows your Print Screen key to directly launch the screen snipping tool.
What Happens When You Turn This On or Off?
When you change the setting for the Print Screen key in Windows 11, you’re deciding whether it opens the Snipping Tool or just takes a regular screenshot.
When it’s On: Pressing your Print Screen key will bring up the Snipping Tool, letting you capture your screen immediately.
When it’s Off: Your Print Screen key will go back to its original function: taking a full screenshot and saving it to your clipboard.
Tip: Starting with Windows 11 build 22621.1928, the Print Screen key opens the Snipping Tool by default.
If you have another screenshot app installed, it might change how your Print Screen key works. You might need to restart your PC after changing this setting for it to take effect.
How to Turn On or Off Print Screen for Screen Snipping
Option 1Using Windows Settings
- Click on Bluetooth & devices on the left menu.
- Click Keyboard on the right side.
- Look for “Use the Print screen key to open screen snipping” under Shortcuts and hotkeys.
- Turn it On or Off depending on what you want.
You can easily turn the Print Screen key into a shortcut for the Snipping Tool by using the Windows Settings menu.
Open Keyboard Settings in Windows 11
Turn On or Off the Print Screen Key for Screen Snipping
After you change the setting, you can close Settings.
Option 2Using a Registry File (For Advanced Users)
If you’re comfortable making advanced changes, you can use a registry file to control whether your Print Screen key opens the Snipping Tool.
To turn ON Print Screen for Snipping:
reg add "HKEY_CURRENT_USER\Control Panel\Keyboard" /v PrintScreenKeyForSnippingEnabled /t REG_DWORD /d 1 /fTo turn OFF Print Screen for Snipping:
reg add "HKEY_CURRENT_USER\Control Panel\Keyboard" /v PrintScreenKeyForSnippingEnabled /t REG_DWORD /d 0 /fNote: Editing the Registry can be risky. Make sure to back up your Registry before making changes. Or stick to Option 1 if you’re unsure.
Summary
- Quick Access: Press Print Screen to open Snipping Tool instantly.
- Easy to Change: Turn this feature on or off anytime in Settings.
- Default in New Windows 11: The Snipping Tool opens by default with Print Screen in recent Windows 11 versions.
- May Need Restart: Restart your PC if changes don’t take effect right away.
- More than Screenshots: Snipping Tool lets you draw, save, and share your screen captures easily.
Using your Print Screen key to open the Snipping Tool gives you quick access to capture parts of your screen easily.
How to make Print Screen use Snipping Tool?
You can press the Windows key, Shift, and S all at once. This three-key combo brings up a small toolbar for taking screenshots.
How do you snip with the Print Screen key?
To snip with the Print Screen key, you’ll typically press Ctrl + PrtSc, which makes your screen go gray and lets you choose what to capture.
Was this guide helpful?

About the Author
Richard
Tech Writer, IT Professional
Richard, a writer for Geek Rewind, is a tech enthusiast who loves breaking down complex IT topics into simple, easy-to-understand ideas. With years of hands-on experience in system administration and enterprise IT operations, he’s developed a knack for offering practical tips and solutions. Richard aims to make technology more accessible and actionable. He's deeply committed to the Geek Rewind community, always ready to answer questions and engage in discussions.


No comments yet — be the first to share your thoughts!