How to Enable Presence Sensing in Windows 11
Presence sensing in Windows 11 allows your PC to detect if you are nearby using built-in sensors, automatically adjusting settings for convenience and power saving.
This intelligent feature leverages your computer’s sensors to know when you’re looking at the screen or have stepped away, enabling smart actions like waking your display upon approach or locking your PC when you leave.
For example, Windows 11’s Presence sensing can automatically wake your laptop from sleep when you approach, or securely lock it when you walk away.
Enabling this feature gives you direct control over how your PC and specific applications interact with your presence, enhancing both security and energy efficiency on compatible devices.
How to enable or disable Presence sensing
You can manage these settings through the Windows Settings app. These steps do not require admin privileges.
- Open the Windows Settings app. You can find this in your Start menu or by pressing the Windows key + I on your keyboard.
- Click on Privacy & security on the left-hand menu.
- Click the Presence sensing tile on the right side of the screen.
- Use the toggle switch to turn Presence sensing to the On or Off position.
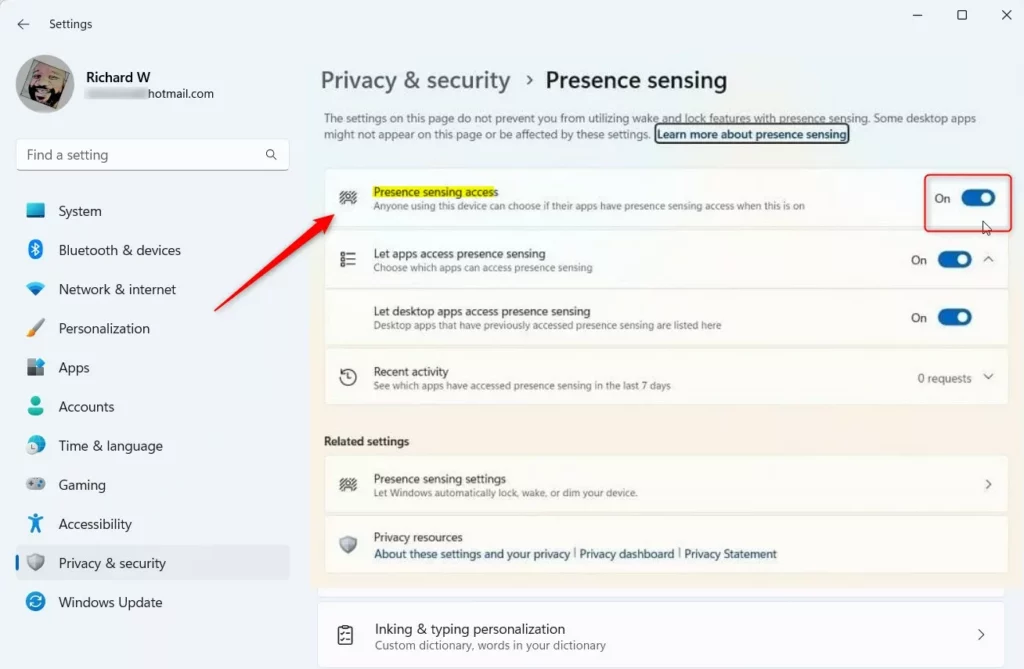
- To give your apps permission to use this data, toggle the Let apps access presence sensing switch to On.
That is all there is to it. Your computer will now respect your privacy choices regarding these sensors.
For more technical details, check this Microsoft.com.
Summary
Presence sensing is a privacy tool for Windows 11 that detects your physical presence. You can enable or disable this feature and control app permissions through the Privacy & security section of your Windows Settings. This feature requires specific hardware to function.
Was this guide helpful?

About the Author
Richard
Tech Writer, IT Professional
Richard, a writer for Geek Rewind, is a tech enthusiast who loves breaking down complex IT topics into simple, easy-to-understand ideas. With years of hands-on experience in system administration and enterprise IT operations, he’s developed a knack for offering practical tips and solutions. Richard aims to make technology more accessible and actionable. He's deeply committed to the Geek Rewind community, always ready to answer questions and engage in discussions.


No comments yet — be the first to share your thoughts!