How to Turn On or Off Auto Unlock When Windows Recognizes Your Face in Windows 11
This guide will help you easily turn on or off the feature that automatically unlocks your PC when Windows Hello recognizes your face on the lock screen in Windows 11.
What is Windows Hello?
Windows Hello is a secure and easy way to sign into your Windows 11 PC. You can use a PIN, your face, or your fingerprint. Setting up a PIN is required before you can use facial recognition or fingerprint sign-in, but you can always sign in using just your PIN.
Using Windows Hello makes signing in faster and safer because your PIN works only on your device and is backed up by your Microsoft account.
You can set up face sign-in using your PC’s built-in infrared camera or an external one.
Once you’ve set up facial recognition, you can decide if you want your PC’s lock screen to unlock automatically when it sees your face.
How to Turn On or Off Auto Unlock with Face Recognition
Option 1: Use Windows 11 Settings (Easy Way)
- Press Windows key + I to open Settings.
- Click Accounts on the left side.
- Click Sign-in options on the right.
- Under Ways to sign in, find and click the arrow next to Facial recognition (Windows Hello) to open more options.
- Check the box for “Automatically dismiss the lock screen if Windows Hello recognizes your face” to turn it on, or uncheck it to turn it off.
- Close the Settings window when done.
Here’s how it looks in Settings:
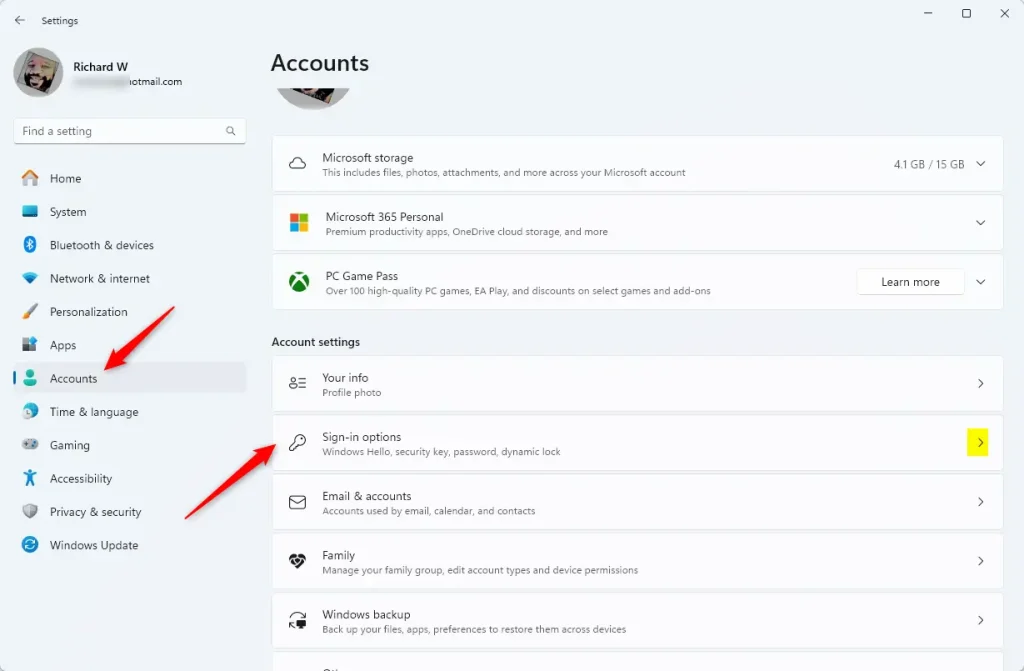
Open Sign-in options and expand Facial recognition settings

Toggle auto dismiss lock screen option
Option 2: Use Registry Editor (For Advanced Users)
Note: You need to be signed in as an administrator to do this. %%SC0%%
- Open Windows Terminal, and choose Windows PowerShell.
- Type this command and press Enter to see all user accounts and their IDs (called SIDs):
Get-WmiObject win32_useraccount | Select name,sid - Find the SID for the user you want to change. It looks like this: S-1-5-21-xxxxxxxxxx-xxxxxxxxxx-xxxxxxxxxx-xxxx.
- Open Registry Editor by typing
regeditin the Start menu and pressing Enter. - In Registry Editor, go to:
HKEY_LOCAL_MACHINE\SOFTWARE\Microsoft\Windows\CurrentVersion\Authentication\Logon UI\FaceLogon - Look for a folder (called a key) named with the SID you found earlier and click on it.
- On the right side, double-click
AutoDismissOn. - Change the value to 1 to turn on auto unlock, or 0 to turn it off, then click OK.
- Close Registry Editor and Windows Terminal when done.
Here’s the command showing user accounts and SIDs:
Here’s how the registry folder looks:

Registry key where face recognition settings are stored
Helpful Links
- Windows Hello Face Authentication
- Windows Hello Biometric Requirements
- Windows Hello Biometrics in Enterprises
- Troubleshoot Windows Hello Problems
Summary
Windows Hello facial recognition makes unlocking your PC faster and more secure. You can control whether your PC automatically unlocks when it recognizes your face. The easiest way is to use Windows Settings and check or uncheck the auto dismiss option. If you prefer using advanced tools, you can use Registry Editor to change the AutoDismissOn value. Both methods give you full control over this feature so your PC works the way you want it to.
Was this guide helpful?

About the Author
Richard
Tech Writer, IT Professional
Richard, a writer for Geek Rewind, is a tech enthusiast who loves breaking down complex IT topics into simple, easy-to-understand ideas. With years of hands-on experience in system administration and enterprise IT operations, he’s developed a knack for offering practical tips and solutions. Richard aims to make technology more accessible and actionable. He's deeply committed to the Geek Rewind community, always ready to answer questions and engage in discussions.


No comments yet — be the first to share your thoughts!