
If you want to delete a language you no longer use on your Windows 11 computer, this simple guide will help you remove it completely along with any extra features it has.
What Does Adding a Language Do?
When you add a language in Windows 11, you can get things like:
- Language pack: Changes Windows menus and messages to that language.
- Windows Display Language: Makes Windows apps and settings show in that language.
- Text-to-speech: Lets your PC read text out loud.
- Speech recognition: Lets you use your voice to control your PC.
- Handwriting: Recognizes your handwriting on touch devices.
- Keyboard: Adds the keyboard for that language.
- Basic typing: Includes spell check and dictionaries.
- Optical character recognition (OCR): Lets you select text from images.
How to Remove a Language Using Settings
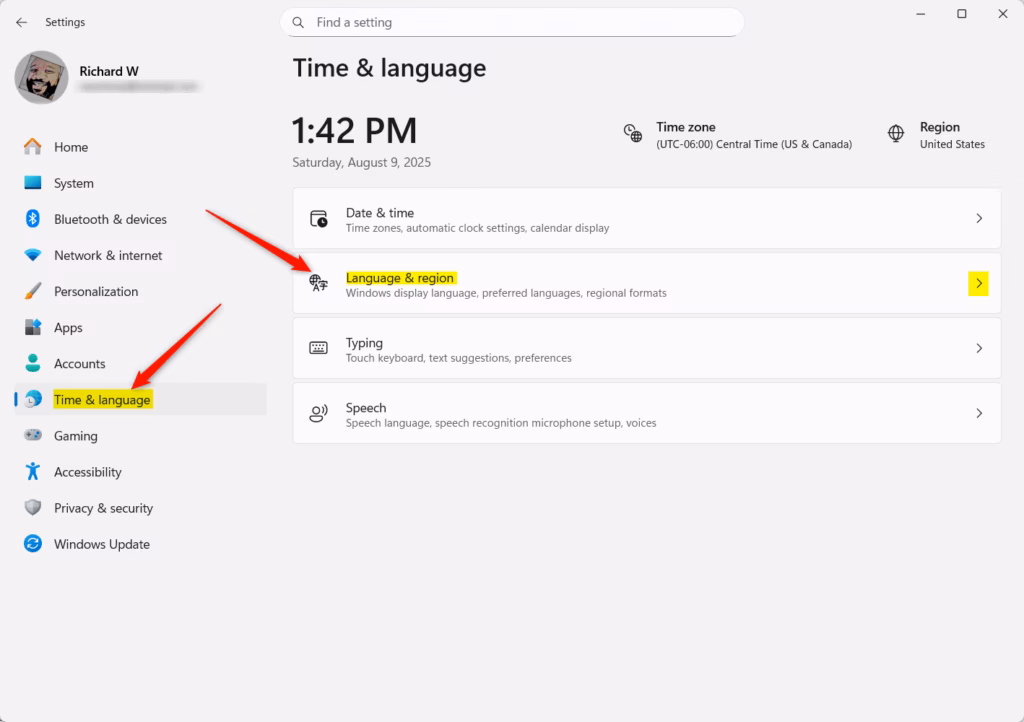
- Open Settings: Press Windows key + I on your keyboard.
- On the left side, click Time & language. Then click Language & region on the right.
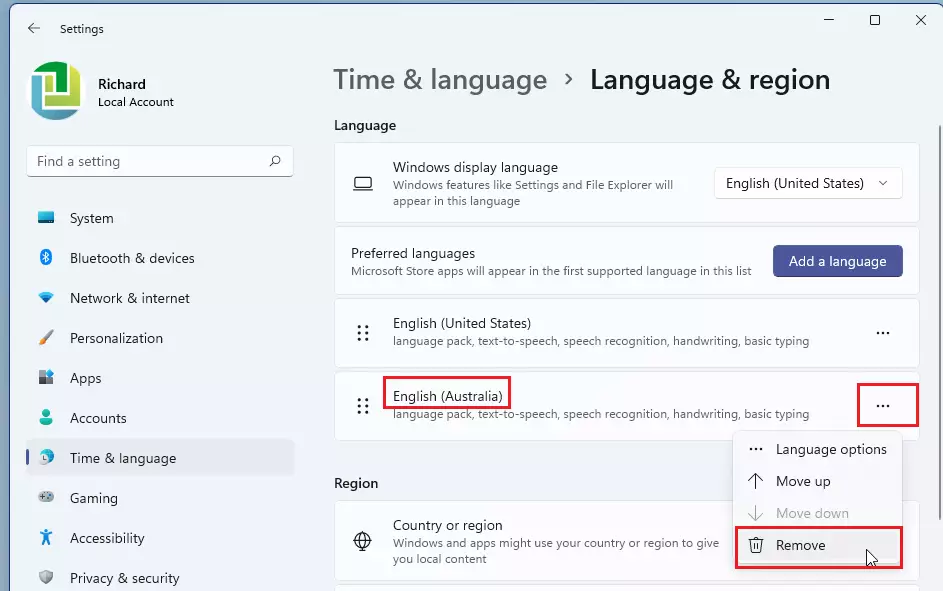
- Under Preferred languages, find the language you want to remove.
- Click the three dots (…) next to the language and select Remove.
- If the language is your current display language, you won’t be able to remove it. Change your display language first.
- Confirm by clicking Yes when asked.
- Close Settings when done.
How to Remove a Language Using PowerShell
If you are comfortable using commands, PowerShell is another way to remove a language.
- Open Windows Terminal by right-clicking the Start button and choosing it. Select Windows PowerShell as the tab.
- Type
Get-WinUserLanguageListand press Enter. This shows all languages installed on your account. - Find the LanguageTag for the language you want to remove. For example, “en-GB” is English (United Kingdom).
- Type
$LangList = Get-WinUserLanguageListand press Enter. - Type this command, replacing LanguageTag with the tag you found:
$MarkedLang = $LangList | Where LanguageTag -eq "LanguageTag"
- Type
$LangList.Remove($MarkedLang)and press Enter. - Finally, type
Set-WinUserLanguageList $LangList -Forceand press Enter. - You can now close PowerShell.
Things to Remember
- You can remove languages either through Settings or PowerShell.
- You cannot remove a language that is currently your Windows display language. Change your display language first.
- Removing a language also deletes its extra features like text-to-speech and handwriting.
- Always confirm the removal when prompted to avoid mistakes.
Need More Help?
Check out these official Microsoft guides:
- Manage language and keyboard settings in Windows 11
- Remove unwanted keyboard or language from Windows 11
- PowerShell command for managing language list
By following these easy steps, you can keep your Windows 11 language settings clean and just how you want them!
“`
Leave a Reply Cancel reply