How to Reinstall Windows 11 Using Your Recovery Drive
You can reinstall Windows 11 using your recovery drive when your system has critical errors or won’t boot.
A Windows recovery drive is a bootable USB flash drive containing system files and recovery tools, allowing you to troubleshoot or reinstall Windows 11 even if the operating system is unbootable.
This process essentially creates a fresh installation of Windows 11 on your PC, removing problematic software and settings. For instance, if you’re encountering frequent blue screen errors or performance issues, a recovery drive offers a robust solution.
Using your pre-made recovery drive, typically created with a minimum 16GB USB stick, lets you restore your computer to a working state without needing an external Windows installation disc or media.
Start your PC from the USB recovery drive by restarting your computer and pressing a key like F2, F10, F12, Delete, or Esc to access the boot menu. Select the USB drive as your boot device. Then, choose Troubleshoot > Recover from a drive in the Windows Recovery Environment to reinstall Windows.
Before You Start: Get Ready
Before you reinstall Windows, there are important things to do. If you skip these, you could lose data or the installation might fail. Let’s make sure you are ready.
1Save Your Important Files
Before you reinstall Windows 11, saving your important files is the most crucial step because the process will likely erase everything on your main drive.
- Where to save: Use an external hard drive, a cloud service like OneDrive or Google Drive, or another USB flash drive if it has enough space.
- What to save: Save your documents, pictures, videos, music, and any other important files you created. Also, save any app settings or game saves you want to keep.
2Make Sure Your Recovery Drive Works
To reinstall Windows 11, you’ll need the recovery drive you previously created; if you don’t have one, you must make it now using a USB drive that’s at least 16GB, and the process will erase anything already on it.
- Requirement: The USB drive should be at least 16GB. For newer Windows versions, 32GB is often better. Make sure the drive is empty because the process will erase anything on it.
3Find Your PC’s Power Cord
This process can take a long time, sometimes hours. You don’t want your laptop to run out of battery during the reinstallation. Always plug in your laptop or make sure your desktop PC has a stable power source.
How to Reinstall Windows Using Your Recovery Drive
After you’ve done the preparations, you can start the reinstallation. Follow these steps carefully.
Step 1Start Your PC from the Recovery Drive
To begin reinstalling Windows 11, you need to start your PC from the recovery drive by plugging it into a USB port and restarting your computer to access the Boot Menu or BIOS/UEFI settings.
- Insert the recovery drive: Plug your USB recovery drive into a USB port on your computer.
- Restart your PC: Turn off your computer completely, then turn it back on.
- Open the Boot Menu or BIOS/UEFI (Basic Input/Output System/Unified Extensible Firmware Interface): Right when your computer starts to turn on , before the Windows logo shows up, you need to press a special key. This key lets you enter your computer’s boot menu or BIOS/UEFI settings. The key is different for each computer brand. Common keys are F2, F10, F12, Delete, or Esc. You might see a message on the screen like “Press F12 for Boot Options.”
- Choose the USB drive: In the boot menu or BIOS/UEFI settings, look for an option to choose your boot device. Select your USB drive. It might show its brand name or say “USB HDD” or “Removable Device.”
- Confirm: After you pick the USB drive, your computer should restart and start loading files from the recovery drive. You might see a message asking you to “Press any key to boot from USB.” If you see this, press any key.
Step 2Use the Windows Recovery Environment (Windows RE)
Once your PC starts from the recovery drive, you’ll enter the Windows Recovery Environment (Windows RE), where you’ll first select your language and keyboard layout before choosing the ‘Troubleshoot’ option to proceed with reinstalling Windows 11.
- Language and Keyboard: First, you’ll choose your language and keyboard layout. Pick the ones that are right for you and click “Next.”
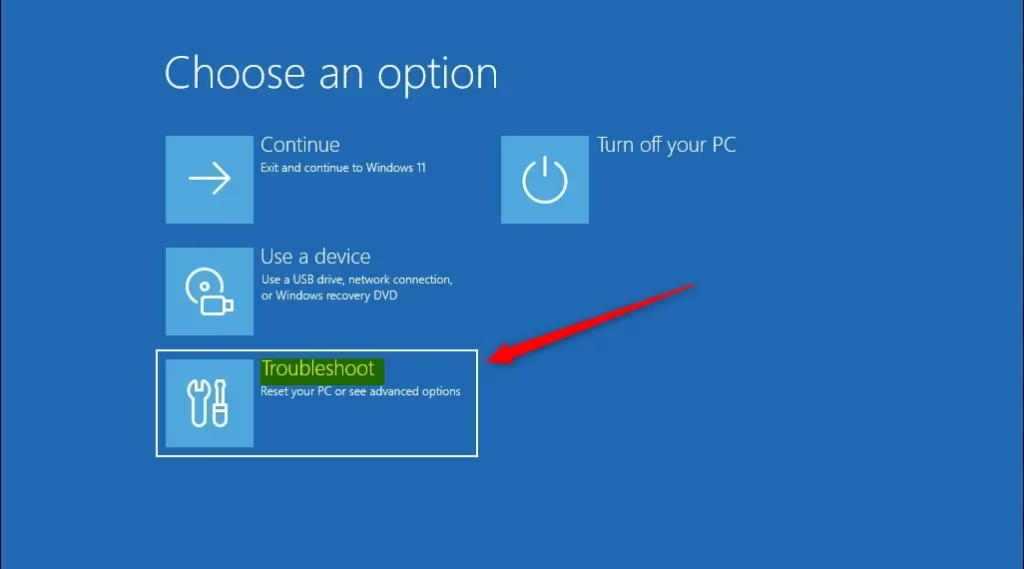
- Troubleshoot: On the “Choose an option” screen, select “Troubleshoot.”
- Recover from a drive: On the next screen, you’ll see more options. Select “Recover from a drive.” This is the option to reinstall Windows.
Step 3Pick How to Reinstall Windows
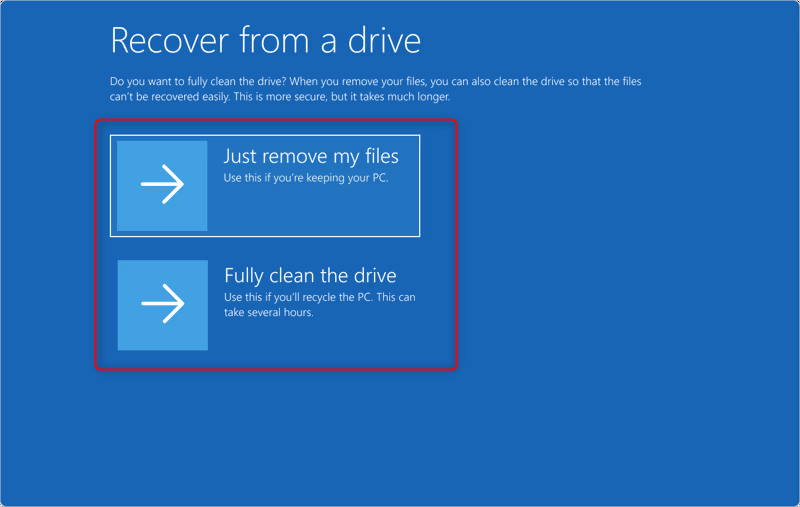
In the Windows Recovery Environment, you can choose how to reinstall Windows 11 by picking between ‘Just remove my files,’ which is faster and good for a fresh start, or a more thorough option that completely erases the drive.
- Just remove my files: This is faster. It removes your personal files, accounts, and apps. It doesn’t completely erase the drive. This is good if you are keeping the PC and just want a fresh start, or if you are giving it to a family member. However, people with technical skills might still be able to recover some data.
- Fully clean the drive: This is more thorough. It’s best if you are selling your PC, giving it away, or giving it to someone you don’t know well. It removes your personal files, accounts, and apps. Then, it overwrites the drive many times to make it very hard to recover data. This takes much longer than “Just remove my files.”
Step 4Check and Start the Recovery
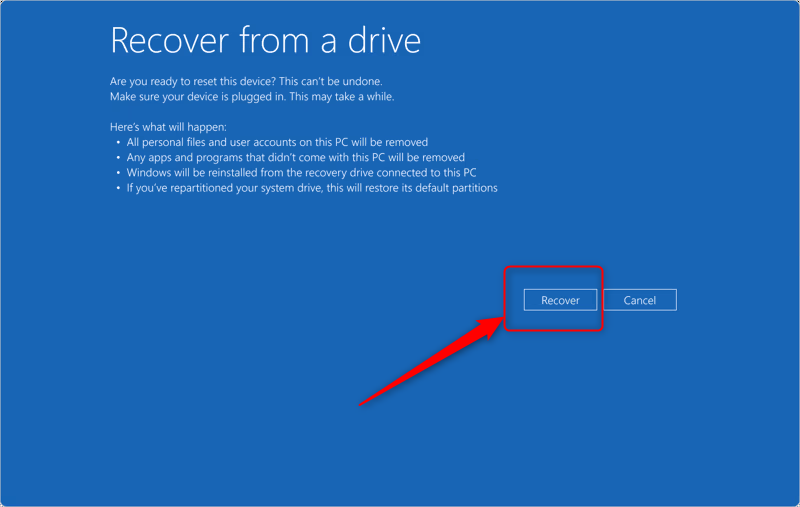
After selecting your preferred reinstallation method, Windows will show a summary of what will happen, and you can start the Windows 11 recovery process by clicking ‘Recover’ and waiting patiently for it to complete, which may take several hours.
- Review the summary: Read the information carefully. Make sure you understand that your files and apps will be removed.
- Confirm: If you want to continue, click the “Recover” button.
- Wait patiently: The reinstallation will start. This can take a long time, from 30 minutes to several hours. It depends on how fast your PC is and which cleaning option you chose. Your computer might restart several times.
Step 5Start Setting Up Windows
After the Windows 11 reinstallation is finished, your PC will restart, and you’ll begin the setup process by choosing your region, keyboard, connecting to the internet, creating a user account, and selecting your privacy settings.
- Follow the steps: Go through each part of the setup.
- Connect to the internet: It’s a good idea to connect to the internet during setup. Windows can then download the latest updates and drivers. This saves you time later.
- Create your account: You’ll probably be asked to sign in with a Microsoft account or create a local account.
Reinstalling Windows might seem scary. But with a recovery drive and these steps, it’s a manageable process. It can bring your PC back to life. It’s a powerful way to fix deep issues and make sure your system runs smoothly again.
Reference:
https://support.microsoft.com/en-us/windows/recovery-drive-abb4691b-5324-6d4a-8766-73fab304c246
Summary
This guide explains how to reinstall Windows 11 using a recovery drive, covering essential steps like backing up files, preparing the drive, booting from it, choosing your reinstallation method, and completing the setup to fix problems or get a fresh start.
Was this guide helpful?

About the Author
Richard
Tech Writer, IT Professional
Richard, a writer for Geek Rewind, is a tech enthusiast who loves breaking down complex IT topics into simple, easy-to-understand ideas. With years of hands-on experience in system administration and enterprise IT operations, he’s developed a knack for offering practical tips and solutions. Richard aims to make technology more accessible and actionable. He's deeply committed to the Geek Rewind community, always ready to answer questions and engage in discussions.


No comments yet — be the first to share your thoughts!