How to use Startup Repair to fix issues with Windows 11
Startup Repair is a Windows 11 tool designed to automatically fix problems preventing your PC from starting correctly.
This built-in diagnostic and repair utility scans your system for issues, such as corrupted system files or driver conflicts, and attempts to resolve them without you needing to manually intervene.
If your Windows 11 PC won’t boot up properly, Startup Repair can often resolve common startup errors, including those caused by recent software installations or hardware changes.
To use Startup Repair, access the Windows Recovery Environment (WinRE) by restarting your PC and forcing shutdowns until it appears, or by navigating to Settings > Update & Security > Recovery > Advanced startup in Windows. Then, select Troubleshoot, followed by Advanced options, and finally Startup Repair.
Getting Your PC to Start Again: Using Startup Repair
Startup Repair is a Windows tool that helps fix problems stopping your PC from starting up correctly.
Startup Repair works from a special area called the Windows Recovery Environment, or WinRE. This is a special area that starts before Windows and gives you access to tools for fixing problems. If your computer can’t start, it might try to open WinRE by itself. If it doesn’t, we’ll show you how to get there.
Step 1Getting to the Windows Recovery Environment (WinRE)
The Windows Recovery Environment, or WinRE, is where you’ll find Startup Repair and other tools to fix your PC.
Method 1Getting to WinRE from inside Windows
If your computer is starting but you’re having problems, you can get to WinRE from your Settings. This is usually the quickest way.
- Open Settings. You can click the Start button and then the gear icon, or press the
Windows key + Ion your keyboard. - Go to Update & Security. In the Settings window, click on “Update & Security.”
- Choose Recovery. On the left side menu, click on “Recovery.”
- Select Advanced startup. Under “Advanced startup,” click the “Restart now” button.
Method 2Getting to WinRE when Windows Won’t Start
This is the situation where Startup Repair is most often needed. If your PC fails to start Windows correctly a few times, Windows will typically try to open the recovery environment on its own. But if it doesn’t, or if you want to make it happen, you can do this:
- Turn on your PC. Wait until you see the Windows logo or your computer maker’s logo.
- Force a shutdown. As soon as you see the logo, press and hold the power button on your PC until it turns off completely. This stops the startup process.
- Do it again. Turn your PC back on and repeat the process of waiting for the logo and then forcing a shutdown two more times. This means you do it a total of three times.
- Enter WinRE. The fourth time you turn on your PC, Windows should see that it didn’t start correctly and will automatically show “Preparing Automatic Repair,” then the Windows Recovery Environment.
Method 3Using Windows Installation Media or a Recovery Drive
If your PC is badly damaged or you can’t use the other methods, you can start your PC from a Windows installation USB drive or a recovery drive you made before.
- Put in your installation media or recovery drive. Make sure it’s plugged into your PC.
- Restart your PC. You might need to change your computer’s settings (BIOS or UEFI) to start from USB first. This usually means pressing a key like
F12,F10,ESC, orDELright after you turn on your computer to open the boot menu. - Choose the right starting device. Pick your USB drive or recovery drive from the boot menu.
- Follow the instructions. When the Windows Setup screen shows up, choose your language, time, and keyboard settings, then click “Next.”
- Go to repair options. On the next screen, look for a link that says “Repair your computer” in the bottom-left corner. Click it.
Step 2Finding Startup Repair
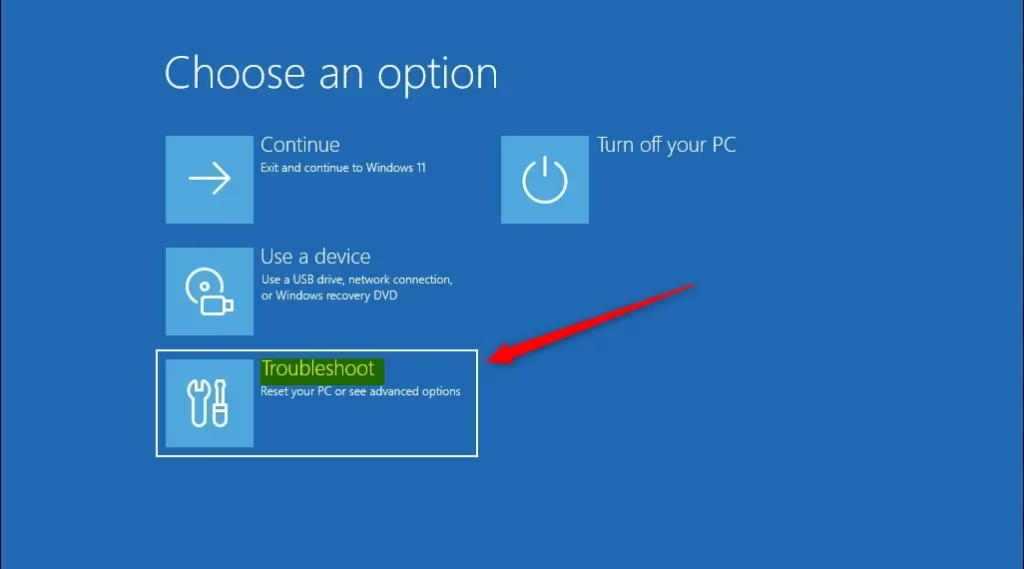
Once you’re in the Windows Recovery Environment, you need to select ‘Troubleshoot’ and then ‘Advanced options’ to find Startup Repair.
- Choose Troubleshoot. From the “Choose an option” screen, select “Troubleshoot.” This is where all the advanced fixing tools are.
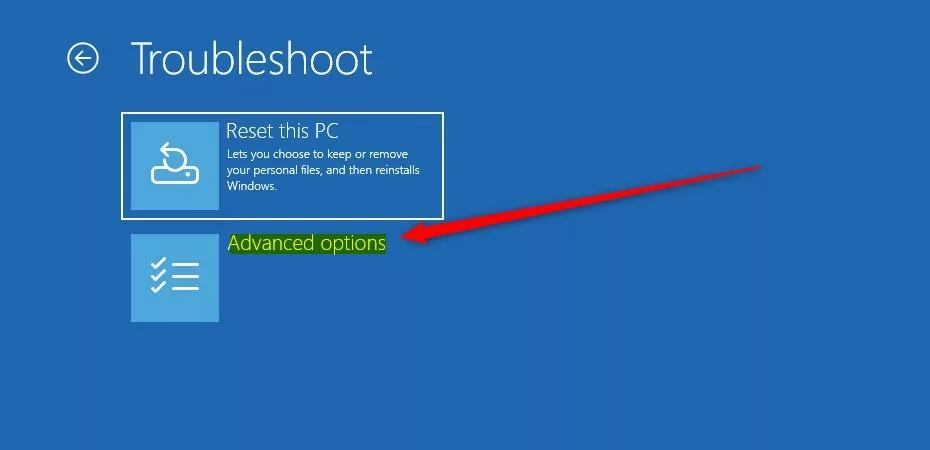
- Select Advanced options. On the “Troubleshoot” screen, you’ll see a list of more specific tools. Click on “Advanced options.”
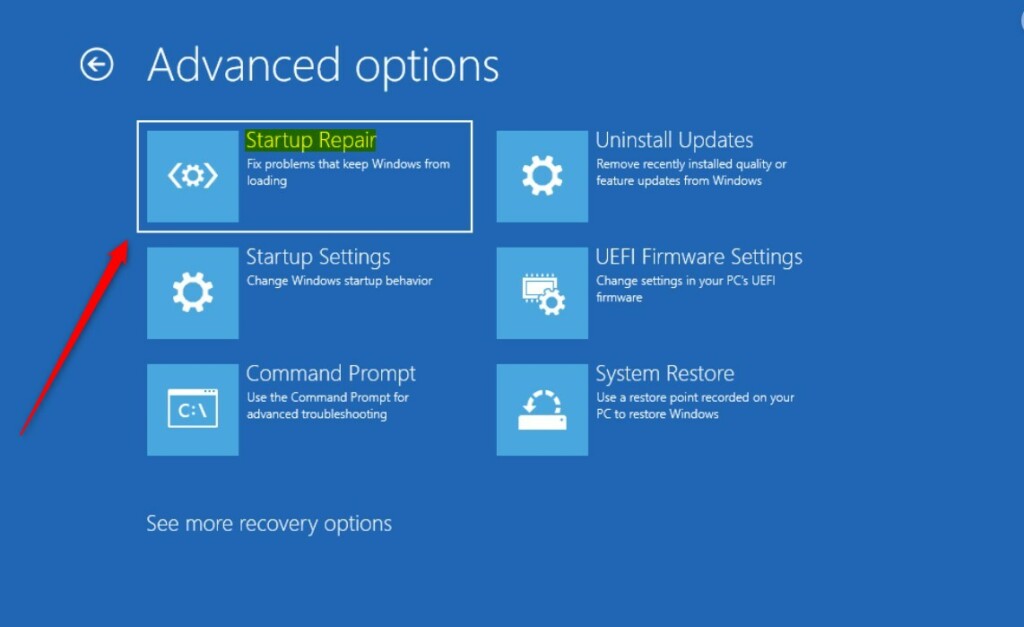
- Choose Startup Repair. Here you will find “Startup Repair.” Select it. This is the tool that will check your computer for startup problems and try to fix them automatically.
- Choose your operating system. If asked, pick the operating system you want to fix (usually, there will only be one option for your current Windows).
- Let Startup Repair work. Your computer will restart, and Startup Repair will start its scan. You’ll see a progress bar. This can take a few minutes or over an hour, depending on how bad the problems are and how fast your computer is.
Warning: If your drive is encrypted with BitLocker, you’ll likely need to enter your BitLocker recovery key. Make sure you have this key before you start. If you don’t know it, you can often find it by signing into your Microsoft account online.
What happens when Startup Repair is done?
After Startup Repair runs, it will let you know if it fixed any issues, and your PC should then start normally.
Reference:
https://support.microsoft.com/en-us/windows/startup-repair-85deb0b9-fa3d-44a3-a3d0-d0f1515c2c9b
Summary
Startup Repair is a helpful Windows 11 tool for fixing startup problems, accessed through the Recovery Environment by choosing Troubleshoot and Advanced options.
Was this guide helpful?

About the Author
Richard
Tech Writer, IT Professional
Richard, a writer for Geek Rewind, is a tech enthusiast who loves breaking down complex IT topics into simple, easy-to-understand ideas. With years of hands-on experience in system administration and enterprise IT operations, he’s developed a knack for offering practical tips and solutions. Richard aims to make technology more accessible and actionable. He's deeply committed to the Geek Rewind community, always ready to answer questions and engage in discussions.


No comments yet — be the first to share your thoughts!