
This simple guide shows you how to add or remove the Microsoft Store app icon on your Windows 11 taskbar. You’ll be able to open it quickly whenever you want.
What is the Microsoft Store?
It’s the app on Windows where you can find and download games, apps, and other cool things for your PC.
Usually, the Microsoft Store icon is already on your taskbar when you sign in. If it’s missing, don’t worry — you can pin it back easily.
What does “Pin to Taskbar” mean?
Pinning an app means putting its icon on the taskbar at the bottom of your screen. This way, you can open it anytime with just one click without searching for it in the Start menu.
How to Pin or Unpin Microsoft Store on Your Taskbar
Pin Microsoft Store to Taskbar
- Click the Start button (Windows icon) on the taskbar or press the Windows key on your keyboard.
- Type Microsoft Store in the search box.
- When the Microsoft Store app appears, right-click it.
- Choose Pin to taskbar.
Unpin Microsoft Store from Taskbar
- Find the Microsoft Store icon on your taskbar.
- Right-click the icon.
- Select Unpin from taskbar.
For Advanced Users: How to Allow or Prevent Pinning Microsoft Store Using Settings
If you’re managing multiple computers or want to control whether users can pin the Store app, there are two ways to do this: using the Local Group Policy Editor or the Registry Editor. These tools are usually for advanced users or system administrators.
1. Using Local Group Policy Editor
⚠️ Admin Privileges Required
Note: This tool is available only in Windows 11 Pro, Enterprise, or Education editions.
- Press Windows + R keys to open the Run box.
- Type
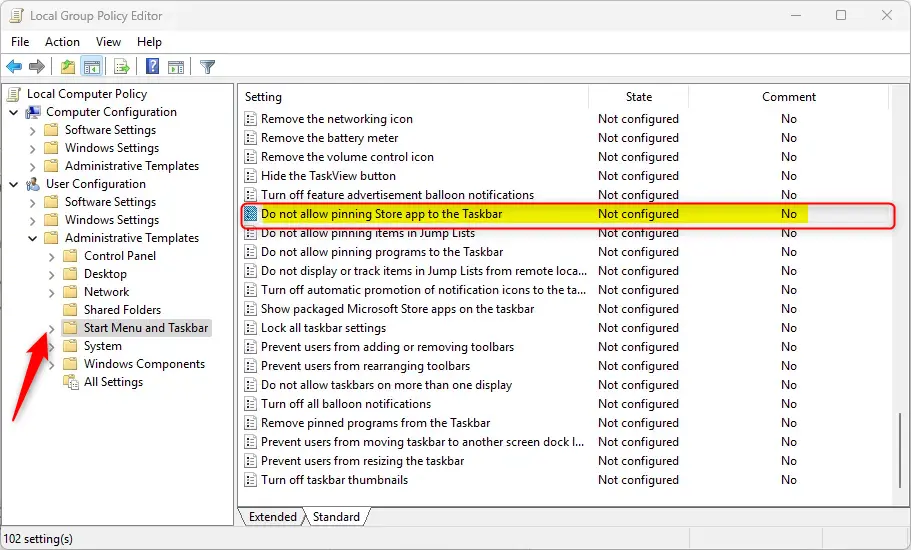
gpedit.mscand press Enter. - In the window that opens, go to: User Configuration > Administrative Templates > Start Menu and Taskbar
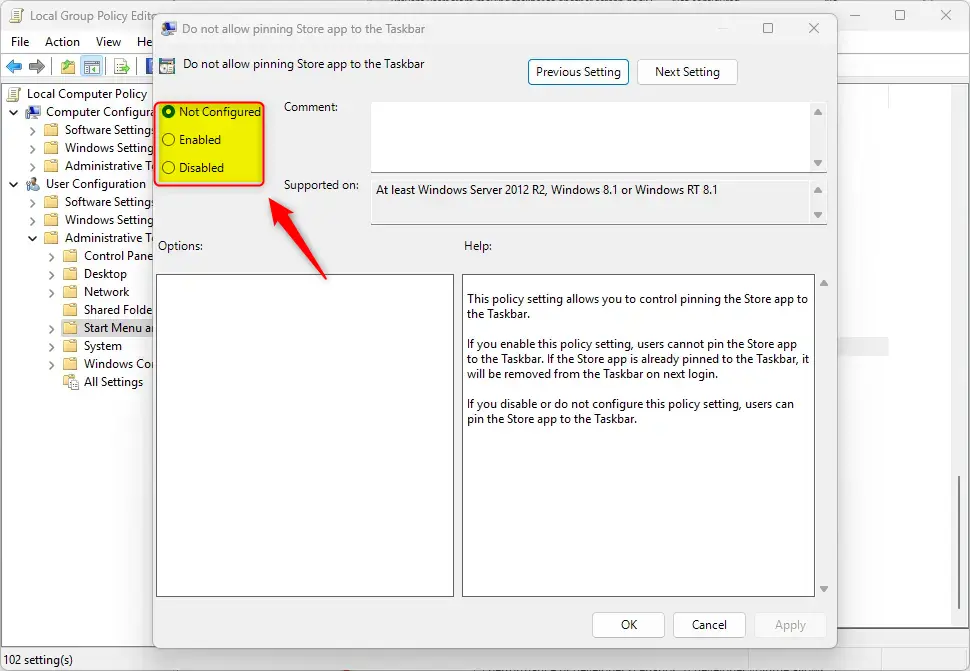
- On the right side, find and double-click Do not allow pinning Store app to the Taskbar.
- You’ll see three options:
- Not Configured – Default behavior (pinning allowed).
- Enabled – Prevents users from pinning the Microsoft Store app. It also removes the icon if it’s already pinned.
- Disabled – Allows pinning the Microsoft Store app.
- Choose the option you want, then click OK.
- Restart your PC to apply changes.
2. Using Windows Registry Editor
⚠️ Admin Privileges Required
Warning: Be careful when editing the registry. Creating backups before changes is a good idea.
- Press Windows + R, type
regedit, and press Enter to open the Registry Editor. - Navigate to one of these folders depending on who you want to affect:
HKEY_CURRENT_USER\SOFTWARE\Policies\Microsoft\Windows\Explorer(just your user account)- OR
HKEY_LOCAL_MACHINE\SOFTWARE\Policies\Microsoft\Windows\Explorer(all users on the PC)
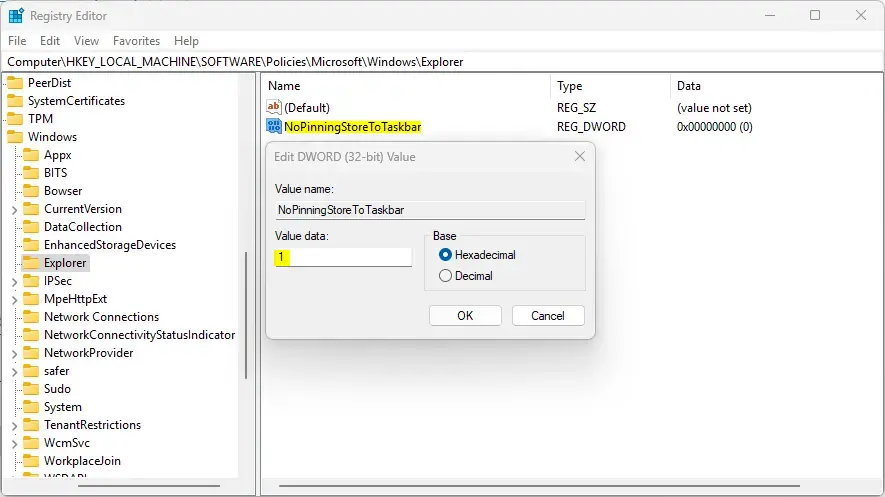
- Look for a value named NoPinningStoreToTaskbar on the right side.
- If it’s not there, right-click on the empty space, choose New > DWORD (32-bit) Value, and name it NoPinningStoreToTaskbar.
- Double-click NoPinningStoreToTaskbar and set the value to:
- 1 – Disable pinning the Microsoft Store app.
- 0 or delete the value – Allow pinning.
- Click OK, then close the Registry Editor.
- Restart your computer for the changes to take effect.
Summary
You can quickly add or remove the Microsoft Store icon from your taskbar by right-clicking the app and choosing “Pin to taskbar” or “Unpin from taskbar.” Why do this? It saves you time by giving you instant access to the app.
For system administrators, the Local Group Policy Editor and Registry Editor allow control over whether users can pin the Store app. What happens when you use these tools? You can manage pinning settings across multiple computers in an office.
These options help customize your Windows 11 experience or manage multiple computers. If you want more help or have questions, feel free to ask!
Leave a Reply