How to Open and Configure Camera Settings in Windows 11
Want to tweak your camera settings in Windows 11? You can do it all through the main Settings app.
Windows 11 puts all your camera controls in one place. You can adjust things like resolution, frame rate, and privacy settings for your webcam or built-in camera.
This control is essential whether you’re troubleshooting blurry video calls or optimizing for specific applications, offering detailed control beyond simple on/off switches.
Accessing these settings is a breeze. You can usually find them by searching for “Camera privacy settings” or navigating through the main Settings menu.
Open Settings, navigate to Bluetooth & devices, then select Cameras. Choose your camera from the list to adjust basic settings like brightness, contrast, and saturation, which save automatically.
Step 1Finding Your Camera Settings
Opening your Windows 11 camera settings is simple and lets you control how your camera works. You can find these settings by opening the main Settings app on your computer, which is like the central hub for all your device options.
Open the Settings app: You can do this by clicking the Start button (that’s the Windows icon) on your taskbar and then selecting the gear icon labeled “Settings.” Alternatively, try pressing the Windows key and the ‘I’ key on your keyboard together.
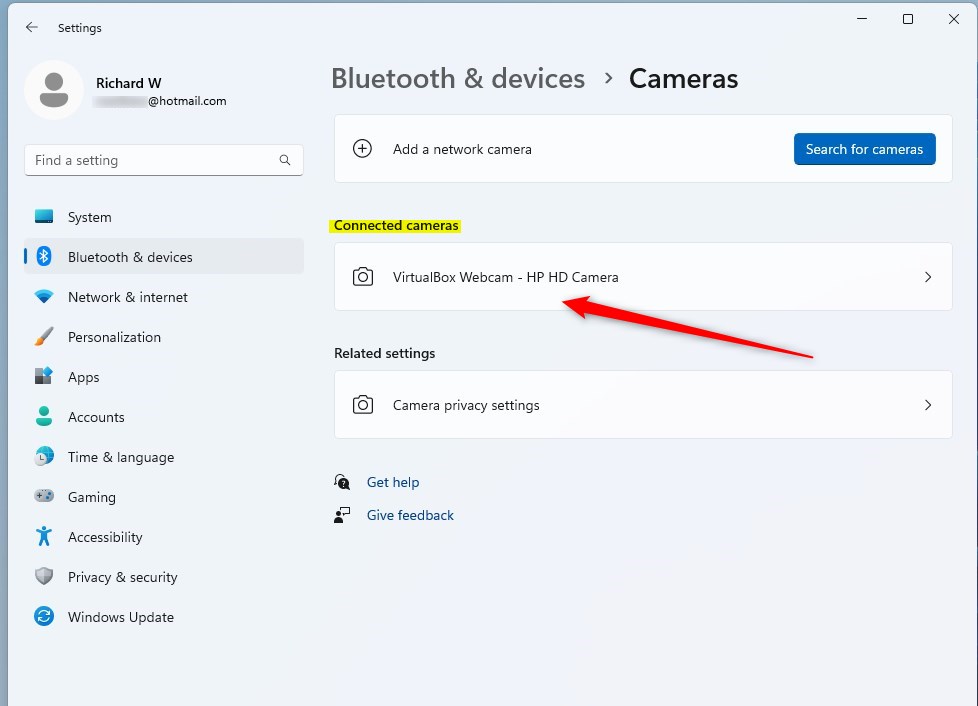
Navigate to Devices: Once Settings is open, find and click on “ Bluetooth & devices” in the left-hand menu. This section is where Windows manages information about your computer’s hardware.
Tip: If you are in a hurry, you can type “Cameras” into the Windows search bar. Then, click “Camera settings” from the results. This will take you right where you need to go.
Select Cameras: In the “ Bluetooth & devices” menu, scroll down until you see “Cameras,” then click on it.
Step 2Changing Individual Camera Settings
Once you’re in the Windows 11 camera settings, you’ll see a list of all cameras connected to your PC, letting you adjust each one individually. Simply click on the camera you want to change, whether it’s your laptop’s built-in camera or an external webcam, to start tweaking its options.
Choose your camera: Under the “Connected cameras” heading, you’ll see all the cameras Windows recognizes. Click the name of the camera you want to adjust. This could be your laptop’s built-in camera or an external webcam you plugged in.
Warning: You might find that some cameras don’t show up here. For example, cameras used for Windows Hello facial recognition, or some professional cameras that rely on their own software, might be managed differently.
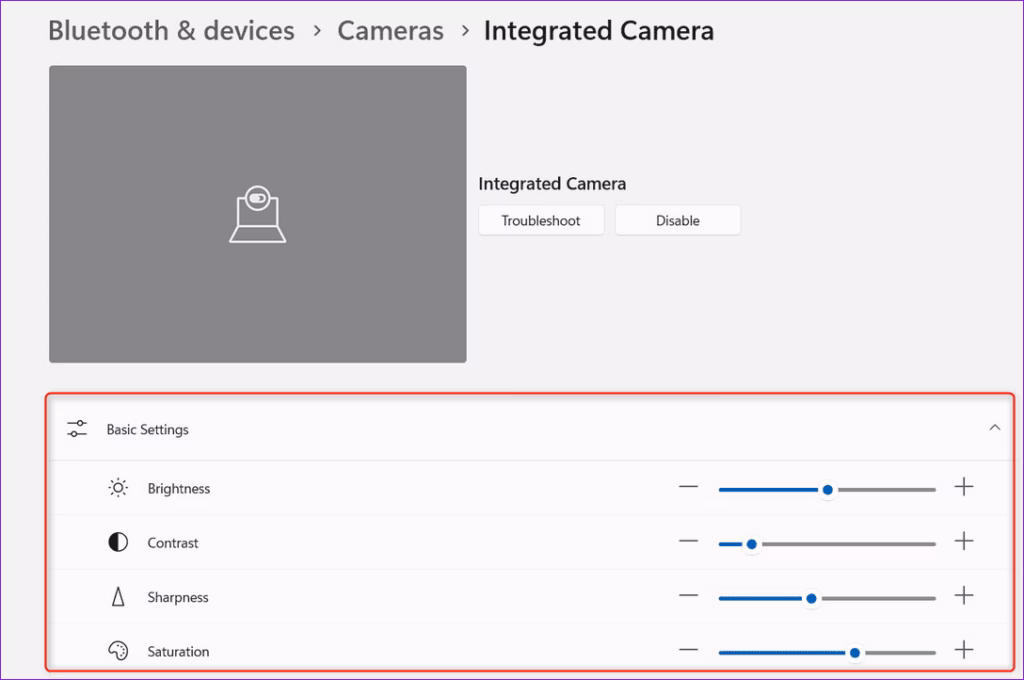
Look at the controls: When you select your camera, Windows might show a preview. This shows you what the camera sees. Below the preview, you’ll find controls. These are the basic settings for your camera.
Adjust basic settings: You will likely see options to change things like:
- Brightness: Makes the picture lighter or darker.
- Contrast: Changes the difference between the brightest and darkest parts of the picture.
- Saturation: Controls how strong the colors are.
- Sharpness: Makes the edges in the picture clearer or softer.
As you move these sliders, you’ll see the changes right away in the preview window. Play around with them until you like how it looks!
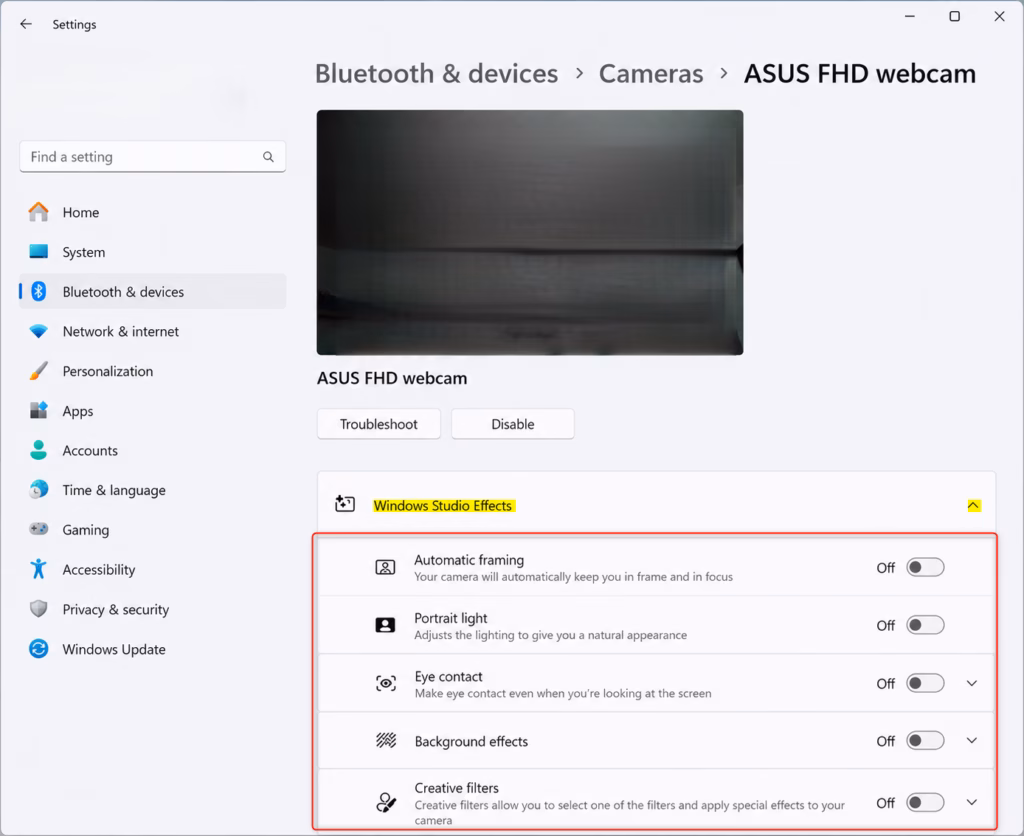
Advanced Options (if your camera supports them): Your camera and its software might offer even more powerful features:
- Windows Studio Effects: These can include things like blurring the background, keeping you centered in the frame, and adjusting your eyes. They are made to make you look good during video calls.
- Rotation: For some external cameras, you can turn the image if the camera is mounted upside down or sideways.
- Video HDR (High Dynamic Range): This setting helps show more detail in both very bright and very dark areas of your picture. This makes the picture look more natural.
Tip: Sometimes, the company that made your camera has its own software for even more detailed control. If this happens, you might see a button under “Related settings” that opens that company’s app.
Saving your changes: The good news is that any changes you make here are saved automatically. They become the new default settings for that camera. So, the next time you or an app uses it, it will start with the settings you like.
Important Note: Windows saves your default settings. However, some apps can change these settings. If you are using a specific video call app and the camera is not working as you expect, check the settings within that app too.
Conclusion
Managing your Windows 11 camera settings helps you control privacy and get the best video quality. Now that you know how to find and adjust options like brightness and app permissions, you can make sure your camera works exactly how you need it for calls or photos.
Summary
This guide covered how to find and change your Windows 11 camera settings, from opening the Settings app to adjusting options like brightness and sharpness. We also touched on advanced features and how app-specific settings might affect defaults, giving you a full picture of camera control.
How do I get to camera settings on 🪟 Windows 11?
To access camera settings in Windows 11, open the Settings app by clicking the Start button and selecting ‘Settings’ or by pressing Windows key + I. Then, navigate to ‘ Bluetooth & devices’ and click on ‘Camera’.
Where are my camera settings located?
Your camera settings in Windows 11 are located within the main Settings app. You can find them by going to ‘ Bluetooth & devices’ and then selecting ‘Camera’. Alternatively, a quick search for ‘Camera privacy settings’ will also lead you there.
How to fix camera problems in 🪟 Windows 11?
To fix camera problems in Windows 11, start by accessing the Camera settings. Ensure the camera is enabled, check app permissions, and update your camera driver through Device Manager. Restarting your PC can also resolve many common issues.
How can I adjust camera settings?
You can adjust camera settings in Windows 11 through the Settings app. Navigate to ‘ Bluetooth & devices’ > ‘Camera’. Here, you can manage resolution, frame rate, and privacy controls for your webcam or integrated camera.
Was this guide helpful?

About the Author
Richard
Tech Writer, IT Professional
Richard, a writer for Geek Rewind, is a tech enthusiast who loves breaking down complex IT topics into simple, easy-to-understand ideas. With years of hands-on experience in system administration and enterprise IT operations, he’s developed a knack for offering practical tips and solutions. Richard aims to make technology more accessible and actionable. He's deeply committed to the Geek Rewind community, always ready to answer questions and engage in discussions.


No comments yet — be the first to share your thoughts!