How to Install Nextcloud on Google Cloud Server


Nextcloud on a Google Cloud server lets you host your own private cloud storage for files, photos, and backups instead of relying on services like Google Drive or Dropbox. This open-source software runs on a virtual machine and gives you total ownership of your personal data.
This setup works on an Ubuntu Linux 20.04 LTS server and connects the Apache web server, PHP, and a database to run Nextcloud smoothly. You need a Google Cloud account, a basic domain name, and about 30 minutes to complete the steps.
Install Nextcloud by browsing your server’s IP address or hostname in a web browser once Apache/Nginx, PHP, and a database are set up. The setup wizard will guide you through completing the installation.
How to connect to Google Cloud servers
You can connect to Google Cloud servers directly from your web browser using SSH (Secure Shell, a secure way to control a remote computer). Open the Google Cloud Console, find your virtual machine instance in the list, and click the SSH button next to it. This opens a terminal window right in your browser so you can run commands without installing any extra software.
SSH from the browser supports the following:
- Web browsers
- The latest version of Google Chrome
- Firefox
- Microsoft Edge
- Microsoft Internet Explorer 11 and later
- Safari 8 and later. Note that Safari is not supported in private browser mode.
- Virtual machine configurations
- All Linux VM images are natively available in Google Cloud.
No additional software or browser extensions are needed. Log in to Google Cloud Console and go to Menu ==> Compute Engine ==> VM instances.
In the list of virtual machine instances, click the SSH button in the row for the instance you want to connect to.

Alternatively, click the instance name and then click SSH on its details page.
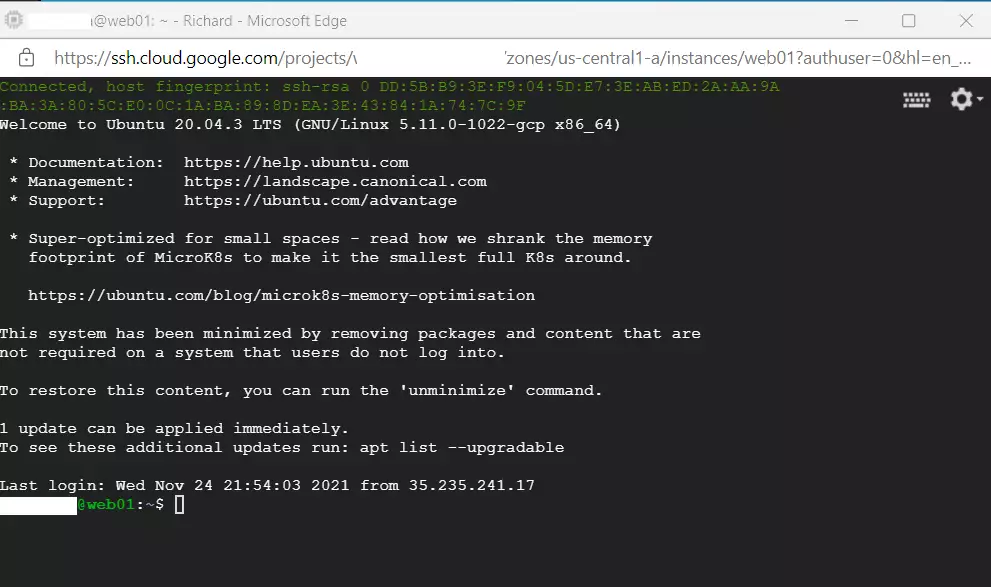
An SSH terminal window with the Ubuntu Linux instance created in the series's second post will open.
Running commands in Ubuntu Linux created on the Google Cloud server works right away.
Install Nextcloud on Google Cloud Servers
To install Nextcloud on Google Cloud servers, you need to set up a web server, database, and PHP on an Ubuntu Linux instance. Connect to your server via SSH, update your system packages, and download the Nextcloud files into your web directory. Once the files are in place, open your web browser and type your server IP address to finish the setup.
After installing all necessary packages, browser-based setup proceeds by navigating to your server's hostname or IP address.
These guides explain using either Apache or Nginx web servers for the installation process. Accessing these guides provides further information on both installing and managing Nextcloud on Ubuntu Linux.
How to install Nextcloud on Ubuntu Linux with Apache
How to install Nextcloud on Ubuntu Linux with Nginx
Each link above shows all the steps performed in previous posts to reach this point. Securing the Nextcloud website with free Let's Encrypt SSL certificates is also covered.
Following the links above and performing all the steps allows the creation of an online store using Nextcloud.
Conclusion:
This Nextcloud installation guide helps set up and manage Nextcloud on a Google Cloud server running Ubuntu Linux. The guide offers key information to help understand the installation process, including five essential tips for a successful Nextcloud setup on your Ubuntu Linux server.
- Nextcloud is a powerful, open-source cloud storage solution that can be hosted on your server.
- The installation process can be quickly completed through your web browser once your server and required packages are set up.
- Comprehensive resources are available to guide you through the installation of Nextcloud using both Apache and Nginx.
- Securing your Nextcloud instance with Let's Encrypt SSL certificates ensures your data remains safe during transfer.
- With your Nextcloud server up and running, you can begin managing and sharing your files, providing a dynamic, private cloud storage experience.
With the setup complete, this self-hosted platform handles file syncing and sharing as a secure alternative to mainstream services like Google Drive. Cloud storage needs, including secure file management, run reliably on Nextcloud.
Was this guide helpful?

About the Author
Richard
Tech Writer, IT Professional
Richard is a writer at Geek Rewind who turns complex IT tasks into clear, step-by-step guides. He draws on years of hands-on experience in system administration and enterprise IT operations, focusing on Windows, Linux and WordPress: the problems people actually run into, and the fixes that work. His server and WordPress guides come from systems he runs himself. Richard builds and maintains the platform behind Geek Rewind, from its Ubuntu servers and Nginx configuration to its custom WordPress plugins. Many new tutorials start with readers' questions, and he's always glad to answer them in the comments.



No comments yet — be the first to share your thoughts!