How to Hide the Mouse Pointer While Typing in Windows 11
You can hide the mouse cursor while typing in Windows 11 by enabling a specific accessibility setting.
This setting automatically hides your mouse cursor when you type, so it won’t get in the way of what you’re working on. This is particularly useful if you find the cursor distracting during longer typing sessions, helping you keep your focus on the words appearing on your screen. You can toggle this helpful option on or off within Windows 11’s settings.
Go to Control Panel, then Mouse, and select the Pointer Options tab. Check “Hide pointer while typing” to enable the feature. Uncheck it to disable.
Why Hide the Mouse Pointer While Typing?
Windows 11 actually hides the mouse pointer automatically when you type by default. This helps keep your screen clear and your text visible. However, if you prefer the pointer to stay visible all the time, you can change this setting.
How to Turn On or Off “Hide Pointer While Typing” Using Control Panel
You can easily hide your mouse pointer while typing in Windows 11 using the Control Panel. This simple setting makes your screen look cleaner when you’re focused on writing.
- Open the Settings app on your Windows 11 PC. Open the Control Panel
- Click on Hardware and Sound.
- Under Hardware and Sound, click on Mouse.
- In the Mouse Properties window, click on the Pointer Options tab.
- Look for the Visibility section.
- Check the box that says “Hide pointer while typing” to turn it on. Uncheck it to turn it off.
- Click OK to save your changes.
Here is what the mouse settings window looks like:
Mouse settings to hide pointer while typing
Alternative: Change the Setting Using Windows Registry Editor
For those comfortable with more advanced settings, you can also hide the mouse pointer while typing using the Windows Registry Editor.
⚠️ You’ll need administrator permissions to make changes with this method.
Here’s how:
- Open the Registry Editor by typing
regeditin the Start menu search and pressing Enter. Open the Windows Registry Editor - Navigate to this folder key:
HKEY_CURRENT_USER\Control Panel\Desktop - In the right pane, find UserPreferencesMask.
- Double-click UserPreferencesMask to edit its value.
- The setting for “Hide pointer while typing” is part of this value:
- 0 = feature OFF (show mouse pointer)
- 1 = feature ON (hide mouse pointer)
- Change the value accordingly and click OK.
- Close the Registry Editor and restart your PC for the changes to take effect.
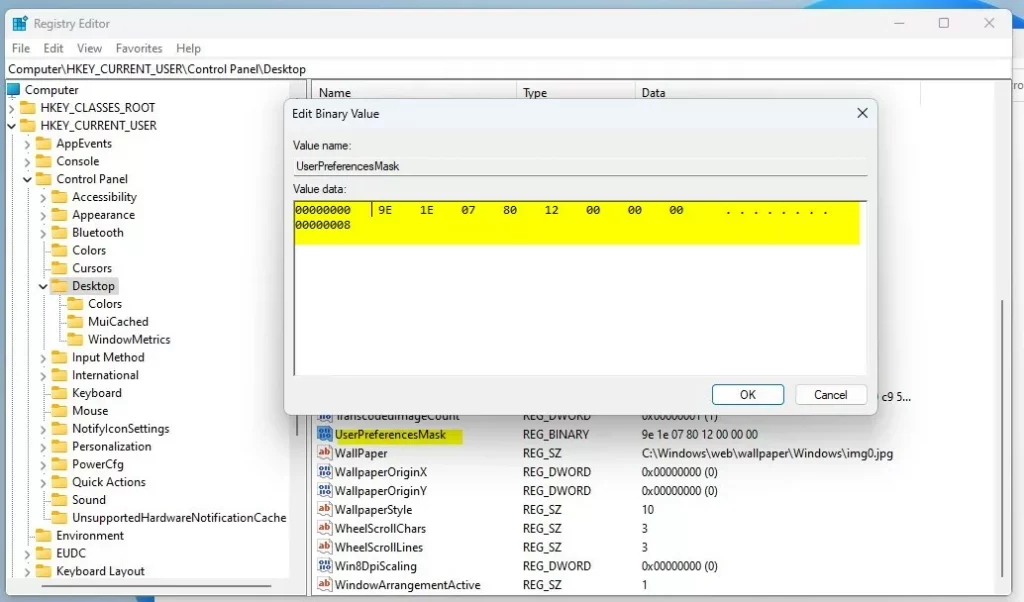
Editing the registry to hide mouse pointer while typing
Things to Remember
Keep in mind that not every application will automatically hide the mouse pointer when you’re typing, even if the setting is turned on.- Not all apps follow this setting. Some might still show the mouse pointer while typing.
- If you want to try other mouse pointer settings, like showing the pointer location or adding trails, you can explore more options in the Control Panel or online guides.
- Changing the registry is for advanced users. If you’re not comfortable with it, stick to the Control Panel method.
Summary
Hiding your mouse pointer while typing in Windows 11 is a simple way to make your screen tidier and your typing experience smoother.
How to hide mouse cursor while typing?
To hide the mouse cursor while typing, look for ‘Related settings’ on the right panel. Click on ‘Additional mouse settings’, then select the ‘Pointer Options’ tab.
How to unhide pointer while typing?
To unhide your mouse pointer while typing, you can reverse the steps by adjusting the ‘Pointer Options’ in the Control Panel.
How do you temporarily hide your cursor?
Press Alt+Shift+F12 to hide the cursor.
Was this guide helpful?

About the Author
Richard
Tech Writer, IT Professional
Richard, a writer for Geek Rewind, is a tech enthusiast who loves breaking down complex IT topics into simple, easy-to-understand ideas. With years of hands-on experience in system administration and enterprise IT operations, he’s developed a knack for offering practical tips and solutions. Richard aims to make technology more accessible and actionable. He's deeply committed to the Geek Rewind community, always ready to answer questions and engage in discussions.


No comments yet — be the first to share your thoughts!