How to Manage Activity History in Windows 11
You can manage your activity history in Windows 11 to control what data Microsoft collects about your app usage, file access, and website visits.
Activity history is Windows 11’s way of remembering your recent actions to provide personalized suggestions and help you resume tasks faster.
Activity history records your interactions locally on your PC and can optionally sync this history data to your Microsoft account. For example, the activity history logs actions like opening files or running applications.
By managing this history, you protect your digital privacy. Disabling it prevents Windows from recording your usage patterns for recommendations.
Once disabled, Windows stops collecting this data, ensuring your activities remain private.
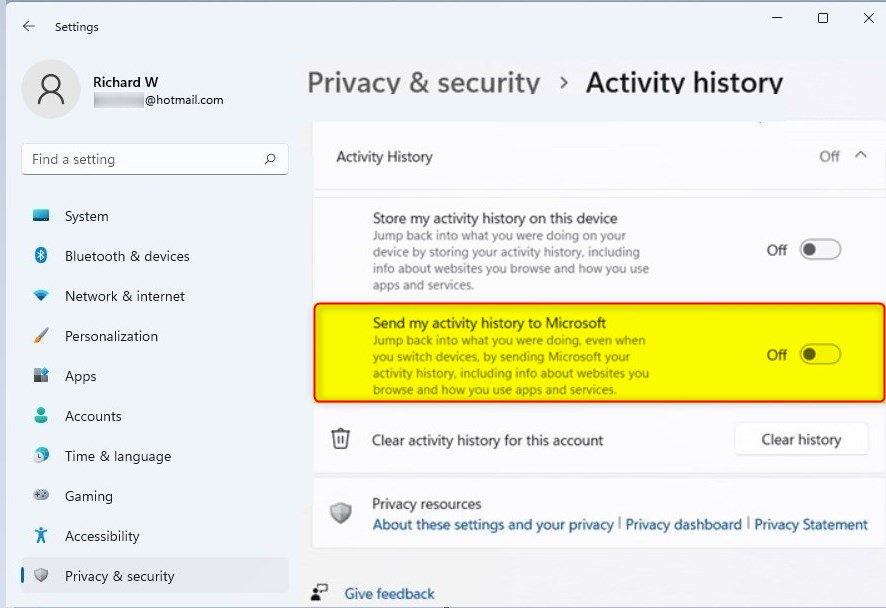
Manage your Windows 11 activity history by going to Settings > Privacy & security > Activity history. Toggle “Send my activity history to Microsoft” to On or Off. You can also clear your history via the Microsoft Account Dashboard.
How to View and Clear Activity History
You can easily see and delete your Windows 11 activity history by visiting the Microsoft Privacy Dashboard online. Just sign in with your Microsoft account, go to the Activity history tab, and you’ll see your recent activity. From there, you can click ‘Clear activity’ to remove it.
- Visit the Microsoft Privacy Dashboard in your web browser.
- Sign in with your Microsoft account.
- Navigate to the Activity history tab.
- Here, you can view your recent activity and click Clear activity to remove it from the cloud.
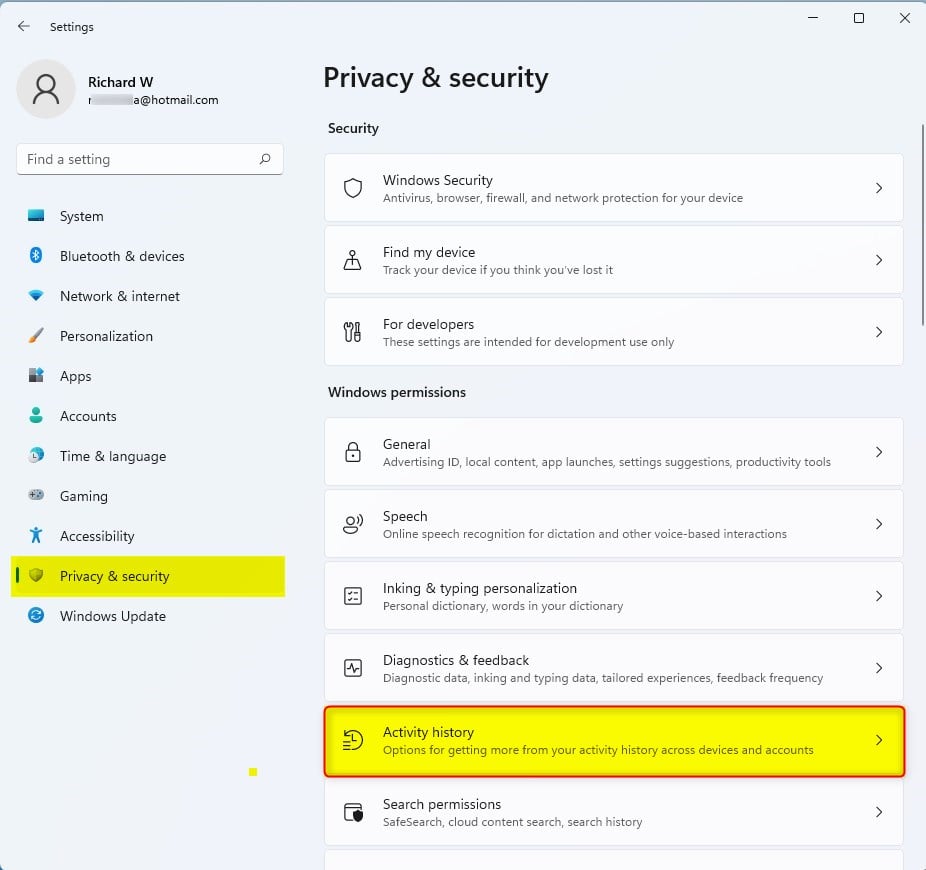
How to turn activity history settings on or off
You can easily turn Windows 11 activity history settings on or off right from your computer’s main Settings app. Open Settings by pressing Windows key + I, then click on ‘Privacy & security’, and finally select ‘Activity history’ to manage your preferences.
- Open the Settings app. You can do this by pressing the Windows key + I on your keyboard or by clicking Start then Settings.

- Once the Settings window opens, click on Privacy & security on the left sidebar.
- Select the Activity history tile on the right side of the screen.
- On the Activity history page, find the option labeled Send my activity history to Microsoft.
- Toggle the switch to On or Off based on your preference.
You do not need administrator rights to change Windows 11 privacy settings because these settings are personal to your account. This means your activity history and related privacy choices only affect your specific user profile on the device.
Summary
Managing your Windows 11 activity history helps protect your privacy, giving you control over what data Microsoft stores.
Does clearing activity history delete my files?
No, clearing your activity history does not delete your files, photos, or documents. It only removes the log of your recent interactions with those files. Your actual data remains safe on your hard drive, but Windows will no longer show those specific files in your recent items list.
How do I stop Windows from syncing my activity to the cloud?
You can stop Windows 11 from syncing your activity history to the cloud by changing a setting in the Privacy & security menu.
Is activity history the same as browser history?
No, they are different. Activity history tracks system-wide actions like opening apps and files. Browser history is specific to your web browser, such as Microsoft Edge or Chrome, and tracks the specific websites you visit. You must clear browser history separately within the settings of your chosen web browser.
Can I view my activity history for multiple accounts?
You can view your Windows 11 activity history for multiple accounts, but you need to sign into the Microsoft Account Dashboard separately for each one.
Was this guide helpful?

About the Author
Richard
Tech Writer, IT Professional
Richard, a writer for Geek Rewind, is a tech enthusiast who loves breaking down complex IT topics into simple, easy-to-understand ideas. With years of hands-on experience in system administration and enterprise IT operations, he’s developed a knack for offering practical tips and solutions. Richard aims to make technology more accessible and actionable. He's deeply committed to the Geek Rewind community, always ready to answer questions and engage in discussions.


No comments yet — be the first to share your thoughts!