

This article explains how to enable or disable the Windows Registry Editor (regedit.exe) in Windows 11.
The Windows registry is a database that stores all of Windows’s settings. Think of it like a filing cabinet for your computer. Most applications installed on your system save their settings here too.
Why would you use the Registry Editor? You can fix errors, tweak features, and make Windows run faster. However, not everyone should have access to it. If you want to prevent users from opening the Registry Editor app, you can turn it off. Once disabled, users will see a message saying the system administrator has disabled it.
Method 1: Use Group Policy Editor
Why use this method? It’s the easiest way for most people. What happens? You control who can access the Registry Editor.
Follow these steps:
- Open the Local Group Policy Editor.
- Navigate to these folders: User Configuration > Administrative Templates > System
- Click on the System folder on the left side.
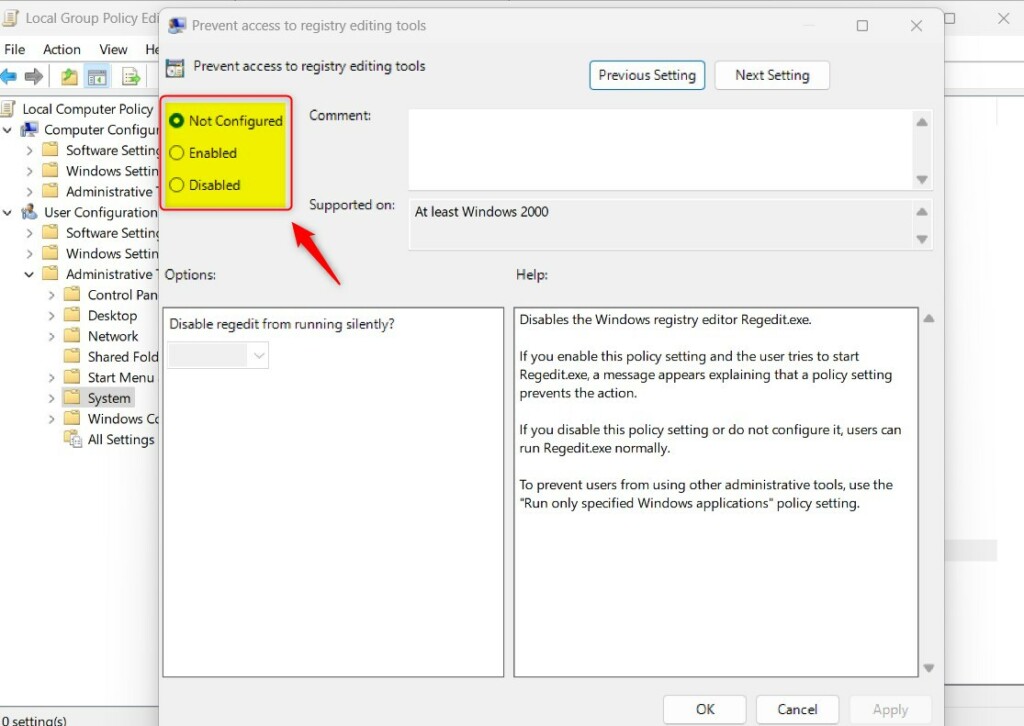
- Find and double-click “Prevent access to registry editing tools” on the right side.

A settings window will open. Choose one of these options:
- Not Configured – Users can open the Registry Editor.
- Enabled – Users cannot open the Registry Editor.
- Disabled – Users can open the Registry Editor.
Click OK to save your settings. Restart your computer for changes to take effect.
Method 2: Use Registry Editor ⚙️
Requires admin privileges.
Why use this method? It works on all Windows versions. What happens? You create a registry key that controls access.
If you can’t open the Group Policy Editor, use the Windows Registry Editor instead. Or try the Windows Registry.
Follow these steps:
- Open the Windows Registry.
- Navigate to one of these paths:
- For standard users only:
HKEY_CURRENT_USER\SOFTWARE\Microsoft\Windows\CurrentVersion\Policies\System - For all users:
HKEY_LOCAL_MACHINE\SOFTWARE\Microsoft\Windows\CurrentVersion\Policies\System
- For standard users only:
- If you don’t see the System folder, right-click on Policies, then create a new folder called System.

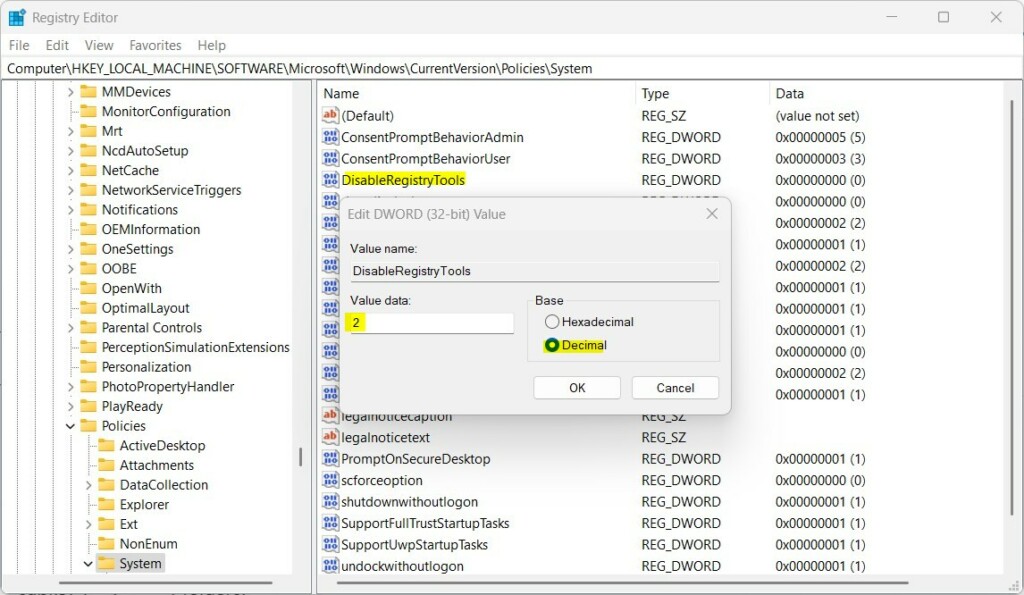
- Right-click in the empty space on the right side. Select New > DWORD (32-bit) Value.
- Name it DisableRegistryTools.
- Double-click the new key. Make sure Base is set to Decimal.
- To disable Registry Editor, enter value 2.
- To enable Registry Editor, delete the DisableRegistryTools key.
Close the Registry Editor and restart your computer.
Method 3: Use PowerShell ⚙️
Requires admin privileges.
Why use this method? It’s fast and works from the command line. What happens? PowerShell makes the registry change instantly.
- open Windows PowerShell as administrator.
- Run one of the commands below.
To enable the Registry Editor:
Remove-ItemProperty -Path HKCU:\Software\Microsoft\Windows\CurrentVersion\Policies\System -Name DisableRegistryTools -Force
Remove-ItemProperty -Path HKLM:\Software\Microsoft\Windows\CurrentVersion\Policies\System -Name DisableRegistryTools -Force
To disable the Registry Editor:
Set-ItemProperty -Path HKCU:\Software\Microsoft\Windows\CurrentVersion\Policies\System -Name DisableRegistryTools -Value 2 -Force
Set-ItemProperty -Path HKLM:\Software\Microsoft\Windows\CurrentVersion\Policies\System -Name DisableRegistryTools -Value 2 -Force
That’s it! Your changes take effect immediately.
Summary
You now have three ways to control who can use the Registry Editor in Windows 11. The Group Policy Editor method is easiest for most users. The Registry Editor method works on all Windows versions. The PowerShell method is fastest. All three methods let you either block or allow access to the Registry Editor. Remember: only make changes if you know what you’re doing. Incorrect changes can cause problems. Restart your computer after making changes with the first two methods. PowerShell changes happen right away. Choose the method that works best for your situation.


Leave a Reply