How to Enable Audio Hardware Acceleration in Windows 11
This guide explains how to turn audio hardware acceleration on or off in Windows 11.
Why do this? Hardware acceleration lets your sound card or audio driver handle sound tasks directly. This takes the workload off your computer’s main processor (CPU).
What happens when done? Your computer may run more efficiently when playing audio. If you have sound issues, turning this setting off can sometimes act as a quick fix.
If your device supports this feature, it will appear in your settings menu starting with Windows 11 build 29576.1000.
Option One
Enable or Disable Audio Hardware Acceleration in Settings
- Open Settings (press Win+I on your keyboard).
- Click on System on the left, then click on Sound. Open Sound settings

- Click on All sound devices. Open All sound devices settings

- Pick the input or output sound device you want to change.

- Look under Advanced settings and toggle Hardware acceleration to On or Off.
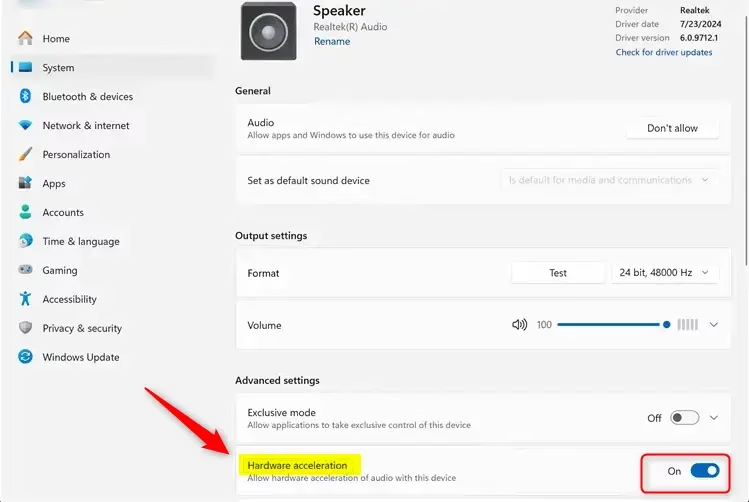
- Close the Settings window when you are finished.
Option Two
Enable or Disable Audio Hardware Acceleration in Control Panel
Note: This process may require administrator privileges depending on your system configuration.
- Open the Control Panel and click on the Sound icon.
- Select the Playback (for speakers/headphones) or Recording (for microphones) tab.
- Select your device from the list and click the Properties button.

- Go to the Advanced tab.
- Check or uncheck the box labeled Allow hardware acceleration of audio with this device.
- Click OK.

- Click OK again to save your changes.
Summary
You can manage audio hardware acceleration through either the modern Windows 11 Settings app or the traditional Control Panel. Enabling this feature helps your CPU by offloading audio processing to your hardware, while disabling it can be a useful troubleshooting step for audio playback or recording problems.
Was this guide helpful?


Leave a Reply Cancel reply