How to Enable Dolby Vision HDR in Windows 11
You can enable Dolby Vision HDR in Windows 11 to experience a wider range of colors and brighter images on compatible displays.
Dolby Vision HDR is a standard for high-dynamic-range video (HDR). It makes pictures look better by boosting contrast and color depth, so visuals are more vibrant and lifelike.
To turn on Dolby Vision, make sure your PC has a compatible display and graphics card. Windows 11 has a built-in setting for this, usually in Display settings.
For the best results, keep your graphics drivers updated and view content that’s also encoded with Dolby Vision. This feature really makes movies, streaming, and some games look much better.
Open Settings, navigate to System, then Display, and find the HDR section. Toggle on “Use HDR” and select your Dolby Vision compatible display to enable it. Your screen will then show enhanced colors and brightness.
What is Dolby Vision HDR?
Dolby Vision HDR makes your screen show brighter colors and clearer pictures, making movies and games look amazing. This technology is great for your computer if you want the best picture quality.
When your computer and display both support HDR, Windows often chooses Dolby Vision automatically. However, you can also switch it on or off yourself. Here’s how to do it!
How to Turn On or Off Dolby Vision HDR in 🪟 Windows 11
You can easily turn Dolby Vision HDR on or off in Windows 11 using the Settings app to get the best picture quality. Here’s how to find the setting quickly.
- Open Settings: Click the Start button (Windows icon) at the bottom left of your screen. Then click Settings. Or press
Windows key + Ion your keyboard to open Settings quickly. - Go to Display Settings: In the Settings window, click on System from the menu on the left side. Then click on Display on the right.
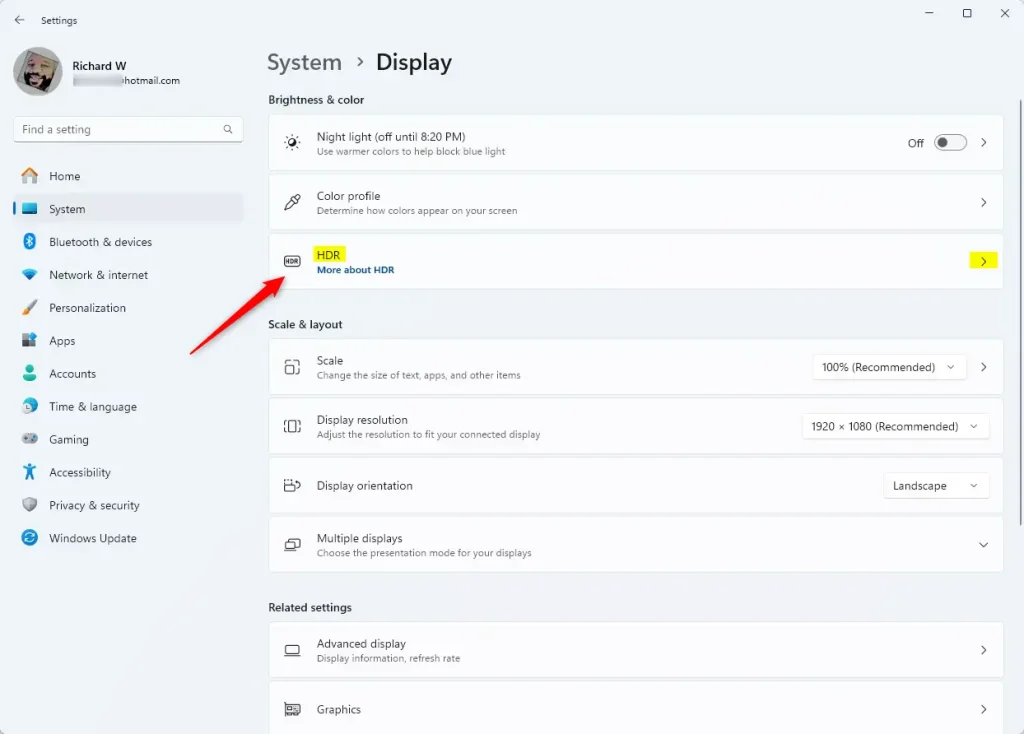
- Find HDR Settings: Scroll down on the Display page until you see the HDR section or tile. Click to open it.
- Enable Dolby Vision: Under HDR settings, find the option named Use HDR. Click it to expand more options. If you have more than one monitor connected, select the one that supports Dolby Vision. Then check the box or toggle the switch to turn on Dolby Vision HDR.
- Close Settings: Once done, you can close the Settings app. Your display should now show brighter, richer colors with Dolby Vision HDR enabled.
Open Display Settings in Windows 11
Find and open the HDR section

Turn on the “Use HDR” option
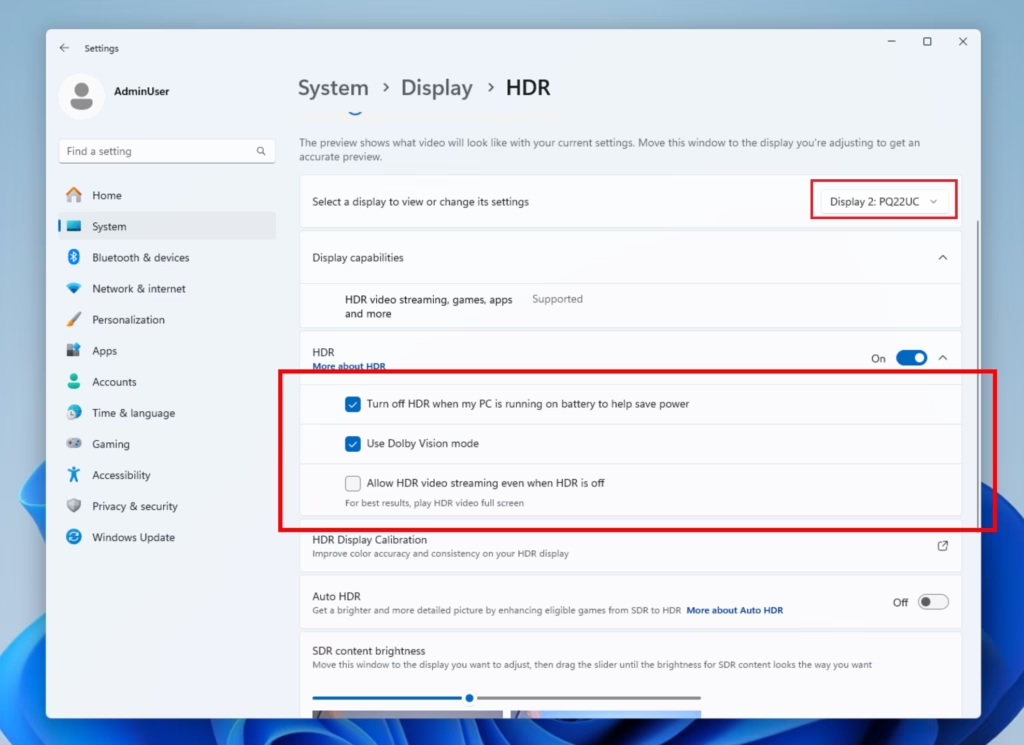
Select your Dolby Vision display and enable it
Tip: If you don’t see HDR options, your monitor or TV might not support HDR. Your PC’s graphics driver may also need updating.
Why Use Dolby Vision HDR?
- Better Picture Quality: Colors look more vivid and bright. Movies and games become more enjoyable.
- Automatic Setup: Windows 11 will use Dolby Vision if your hardware supports it.
- Easy to Use: You can turn Dolby Vision on or off anytime in the Settings app.
- Works with Multiple Screens: Choose which display gets Dolby Vision if you have more than one.
- Quick Access: All controls are in one place. Managing your display is simple.
Using Dolby Vision HDR gives you much better picture quality, making colors look more vivid and bright so movies and games are more enjoyable. It’s also set up automatically if your hardware supports it.
Summary
Dolby Vision HDR in Windows 11 offers a significant upgrade to picture quality, making colors pop and images brighter, and it’s easy to turn on or off in your display settings if your hardware supports it.
More Info
For official details from Microsoft, visit their blog: Microsoft Blog: Windows 11 Insider Preview Build
Why does Dolby Vision keep turning on 🪟 Windows 11?
If Dolby Vision HDR seems to keep turning itself on in Windows 11, it might be due to a setting mismatch; adjusting the output color format and dynamic range in your display settings can often fix this issue.
Was this guide helpful?

About the Author
Richard
Tech Writer, IT Professional
Richard, a writer for Geek Rewind, is a tech enthusiast who loves breaking down complex IT topics into simple, easy-to-understand ideas. With years of hands-on experience in system administration and enterprise IT operations, he’s developed a knack for offering practical tips and solutions. Richard aims to make technology more accessible and actionable. He's deeply committed to the Geek Rewind community, always ready to answer questions and engage in discussions.


No comments yet — be the first to share your thoughts!