How to Add or Remove Windows 11 Lock Screen Status
You can add or remove status information from your Windows 11 lock screen by configuring which app displays it.
The lock screen status allows you to see quick updates from a single chosen application, like calendar events or weather, without needing to sign in.
For example, you might want your Mail app to show unread message counts, or your Calendar app to display upcoming appointments.
Windows 11 offers a few built-in options, and you can easily switch between them from the Settings app.
This tutorial guides you through selecting or deselecting an app for your lock screen status in just a few simple steps.
Go to Settings > Personalization > Lock screen. Click the Lock screen status dropdown and select an app like Mail or Weather, or choose None to remove the status. Your selection saves automatically.
What is the Lock Screen?
The Windows 11 lock screen is the very first thing you see when you start your computer or when you lock it, showing the time, date, and quick info from apps before you sign in.
You can also customize your lock screen background with pictures, slideshows, or Windows Spotlight. Windows Spotlight automatically shows beautiful images. Learn more here:
How to set a Slideshow Background
In the latest Windows 11 update, Microsoft added a weather feature on the lock screen. You can hover over the weather information to see more details. If you don’t want that, you can switch it off by changing the lock screen status to None.
How to Choose Which App Shows Information on Your Lock Screen
You can easily change which app shows quick updates on your Windows 11 lock screen by opening the Settings app and going to Personalization, then Lock screen.
- Open Settings: Click the Start menu and select Settings. Or press the Windows key + I on your keyboard to open the Settings app.
- Go to Personalization: In the Settings window, click Personalization on the left side.
Windows 11 Personalization Settings
Open Lock Screen settings: On the right side, click the Lock screen option.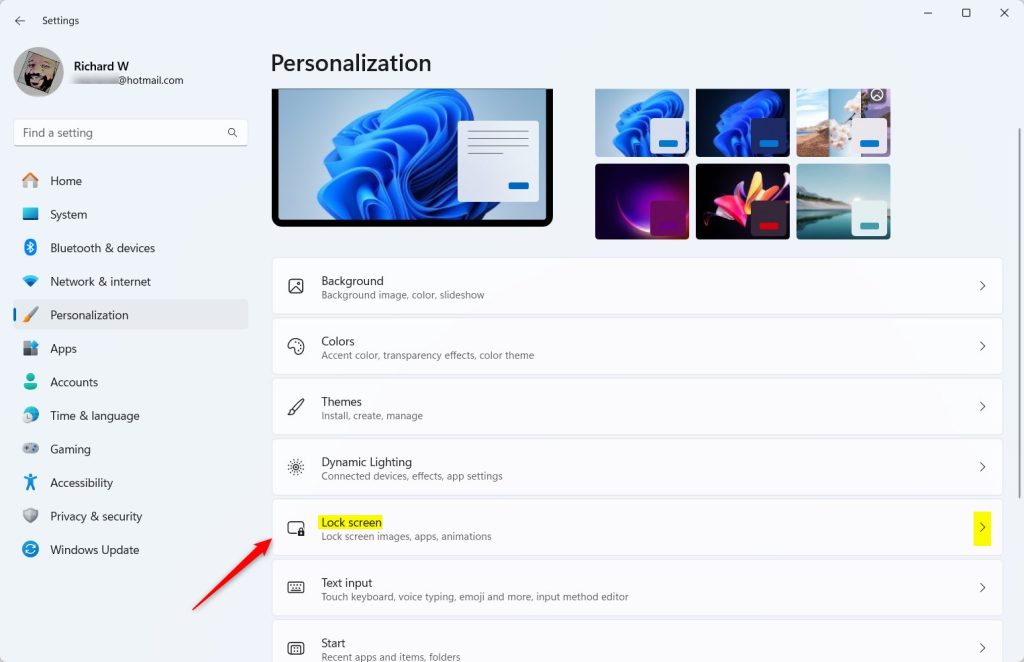
Windows 11 Lock Screen Settings
Pick your Lock Screen Status app: Find the Lock screen status setting and click it. A list will appear where you can pick an app to show detailed information on your lock screen.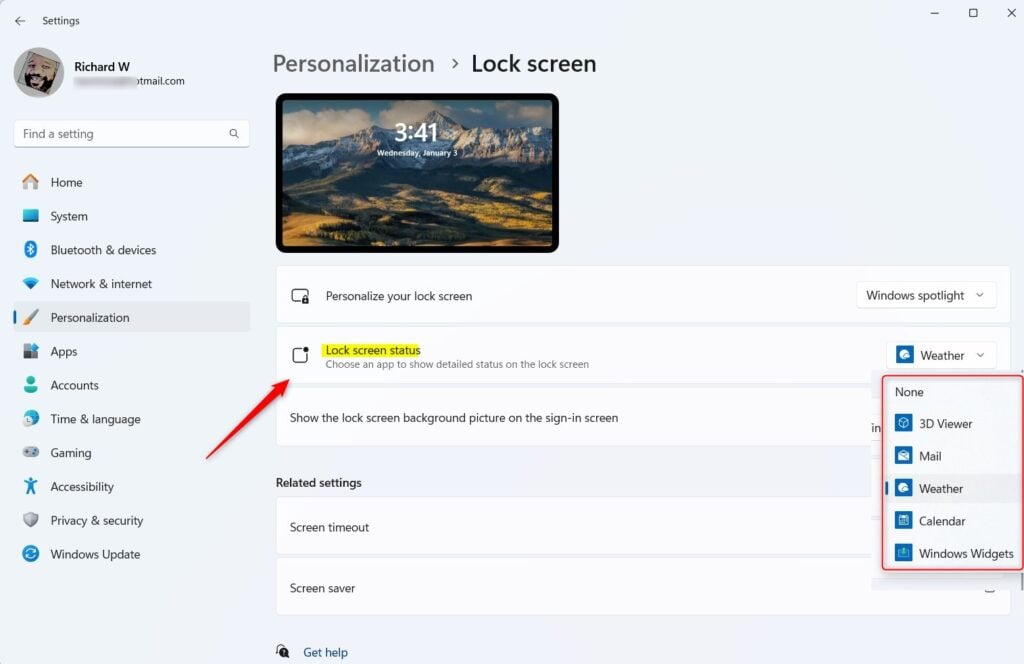
Lock screen status options - Choose one from the list:
- None – no detailed app information shown
- 3D Viewer
- Mail – see your email notifications
- Weather – get weather updates
- Windows Widgets
Close the Settings app when you’re done. Your choice will save automatically.
That’s it! Now your lock screen will show details from the app you chose. You can get quick information without unlocking your computer.
Why Customize Your Lock Screen Status?
- You can see important information at a glance. For example, weather or email updates.
- It helps you stay informed without having to sign in every time.
- You can pick the app that fits your needs best.
- It’s easy to change anytime you want.
Enjoy your personalized Windows 11 lock screen!
Summary
Customizing your Windows 11 lock screen status is simple and lets you see important app information at a glance, like weather or mail, right on the lock screen before you log in.
Was this guide helpful?

About the Author
Richard
Tech Writer, IT Professional
Richard, a writer for Geek Rewind, is a tech enthusiast who loves breaking down complex IT topics into simple, easy-to-understand ideas. With years of hands-on experience in system administration and enterprise IT operations, he’s developed a knack for offering practical tips and solutions. Richard aims to make technology more accessible and actionable. He's deeply committed to the Geek Rewind community, always ready to answer questions and engage in discussions.
No comments yet — be the first to share your thoughts!