How to Connect Xbox Controller to Windows 11
You connect an Xbox controller to Windows 11 using a USB cable, Bluetooth, or the official Xbox Wireless Adapter.
Connecting your Xbox controller transforms your PC gaming experience, offering enhanced comfort and precision for titles both at your desk and on the big screen.
This setup is surprisingly straightforward. Windows 11 instantly recognizes your controller after a successful connection, allowing immediate use in supported games and system navigation.
For the smoothest wireless experience via Bluetooth, ensure your controller firmware is updated to at least version 5.0. This specific update guarantees a faster, more responsive connection.
Connect your Xbox controller to Windows 11 via USB, Bluetooth, or the Xbox Wireless Adapter. For Bluetooth, turn it on in Windows, then press the controller’s Pair button until the Xbox button flashes, and select “Xbox Wireless Controller” in Quick Settings. USB offers a simple plug-and-play experience.
Connect using a USB cable
Connecting your Xbox controller to Windows 11 with a USB cable is the easiest method, giving you a direct and stable link without any fuss.
- For older controllers, use a micro-USB cable.
- For newer controllers like the Xbox Series X|S, use a USB-C cable.
If your controller doesn’t wake up after your PC sleeps, try pressing the Xbox button on it or unplugging and replugging the cable.
Connect using Bluetooth
You can connect your Xbox controller to Windows 11 wirelessly using Bluetooth if your computer has it. Just turn on Bluetooth on your PC and press the pair button on your controller until the Xbox light flashes.
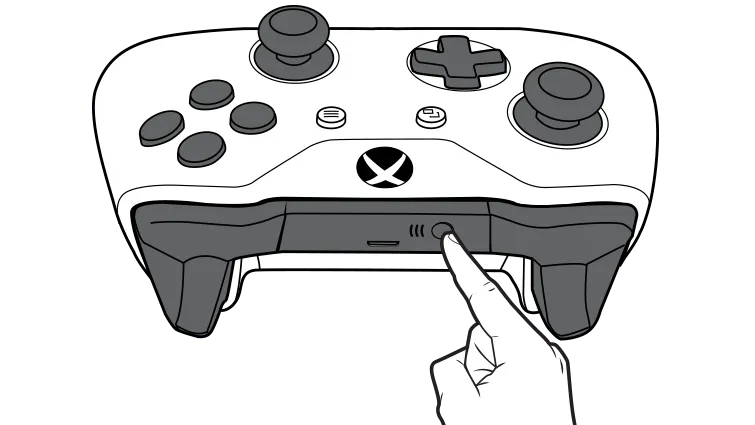
First, turn on Bluetooth on Windows 11. Press and hold the Pair button on the top of your controller for three seconds until the Xbox button starts to flash quickly.
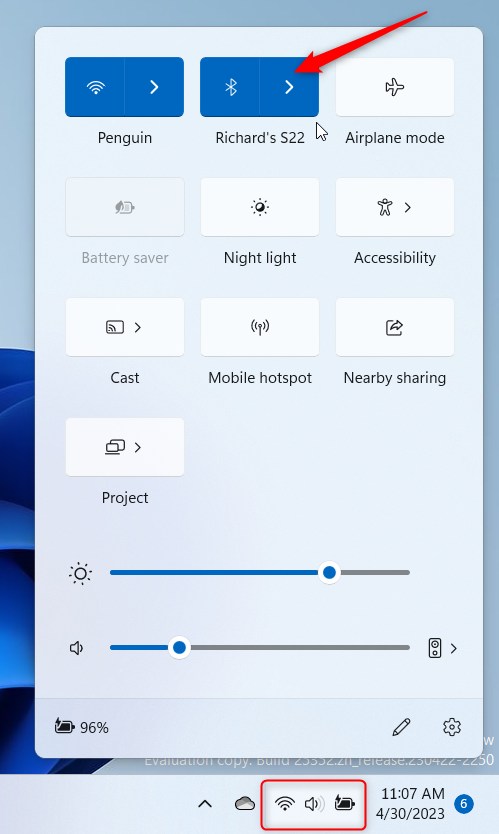
Open Quick Settings (Windows key + A) and find the arrow next to Manage Bluetooth devices. This displays a list of devices ready to connect.
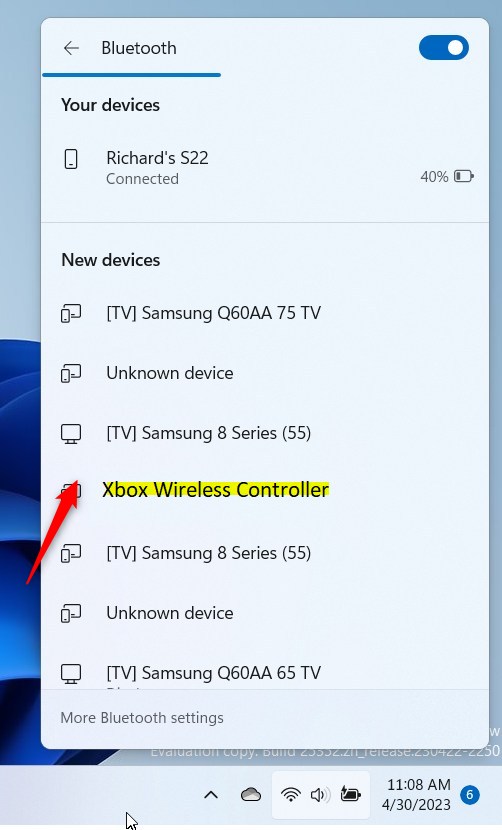
Look for “Xbox Wireless Controller” or “Xbox Elite Wireless Controller” in the list and click it to pair. You can also navigate to Settings > Bluetooth & devices and click Add a device.
Xbox Wireless Adapter
If you’re having issues with your Xbox controller disconnecting or lagging when using Bluetooth on Windows 11, the official Xbox Wireless Adapter is a great fix. Simply plug it into your PC, press its button, and then pair your controller.
Updating Controller Firmware
Updating your Xbox controller’s firmware on Windows 11 helps it run smoothly and can fix connection problems. Download the free Xbox Accessories App from the Microsoft Store, connect your controller with a USB cable, and check for updates.
Troubleshooting Connectivity Issues
If your Xbox controller keeps disconnecting from Windows 11, try checking the batteries first, as low power is a common cause. You can also try updating Windows or restarting your Bluetooth connection to fix connectivity issues.
- Check Batteries: Low power often causes random disconnects.
- Update Windows: Go to Settings > Windows Update to ensure your system is current.
- Restart Bluetooth: Toggle Bluetooth off and on in the Quick Settings menu.
- Remove and Re-pair: Go to Bluetooth & devices, remove the controller from the list, and pair it again.
Summary
Connecting your Xbox controller to Windows 11 is simple with USB, Bluetooth, or the Xbox Wireless Adapter. For the best experience, keep your firmware updated using the Xbox Accessories app and ensure your Windows drivers are current. These steps ensure a smooth, lag-free gaming experience.
Why does my Xbox controller keep disconnecting from 🪟 Windows 11?
Frequent disconnections are usually caused by low batteries, outdated controller firmware, or Bluetooth interference. Ensure your controller has fresh batteries, update the firmware via the Xbox Accessories app, and keep the controller within range of your PC to maintain a stable wireless signal.
Can I connect multiple Xbox controllers to one PC?
Yes, you can connect up to 8 Xbox Wireless Controllers simultaneously using USB or the Xbox Wireless Adapter. If using Bluetooth, the limit is typically 4 controllers, though this can vary based on your PC’s Bluetooth hardware capabilities and potential signal interference between devices.
Was this guide helpful?

About the Author
Richard
Tech Writer, IT Professional
Richard, a writer for Geek Rewind, is a tech enthusiast who loves breaking down complex IT topics into simple, easy-to-understand ideas. With years of hands-on experience in system administration and enterprise IT operations, he’s developed a knack for offering practical tips and solutions. Richard aims to make technology more accessible and actionable. He's deeply committed to the Geek Rewind community, always ready to answer questions and engage in discussions.


No comments yet — be the first to share your thoughts!