How to Configure Widgets Notifications on the Taskbar in Windows 11
You can configure Windows 11 taskbar widget notifications by adjusting specific settings within the Widgets panel and Windows Notification settings.
Widgets in Windows 11 provide glanceable information, but you might miss important alerts if their notifications aren’t set up correctly. This guide helps you ensure those crucial updates appear when you need them.
For instance, you can enable notification badges that appear directly on the Widgets icon on your taskbar, ensuring you don’t miss anything from your favorite news feeds or weather updates.
Enable taskbar notifications by opening the Widgets board, clicking the gear icon for settings, and toggling “Show notification badges on the taskbar” and “Show announcements on the taskbar” to your preference. These options appear within the Notifications section of the Widgets settings.
Understanding Widget Notifications
Before we change settings, let’s understand what kind of notifications Widgets can give you. They are meant to be helpful, not annoying.
Rotating Announcements
Windows 11 widget notifications can show quick, rotating announcements right on your taskbar when something important happens, like big news or a sports update.
Badges
Windows 11 widget notifications sometimes appear as badges on your taskbar for alerts that need to stick around, such as severe weather warnings or breaking news.
Pro Tip: If you are in a “focus session” in Windows, these announcements and badges will be hidden on the taskbar. This keeps your work area clear when you need to concentrate.
Step-by-Step: Setting Up Taskbar Notifications for Widgets
Ready to set up these notifications? Follow these steps to control what shows up on your taskbar.
Open the Widgets Board
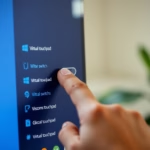
First, open the Widgets board. Click the Widgets icon on your taskbar (it often looks like a weather or news icon). You can also press the Windows key + W on your keyboard. This is a quick and useful shortcut.Access Widget Settings
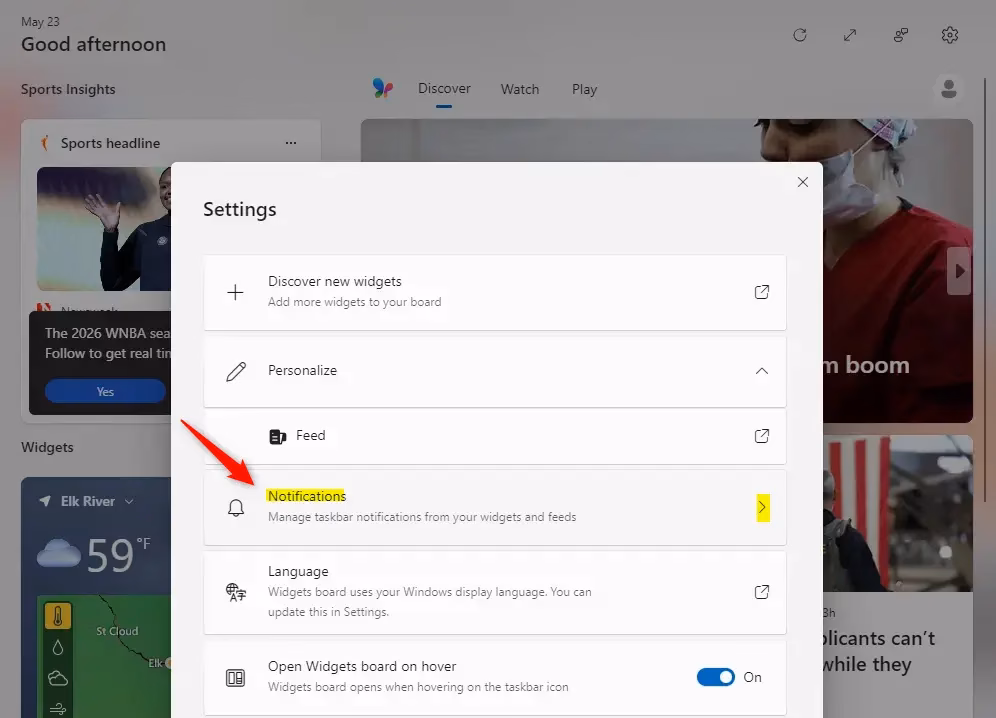
Once the Widgets board is open, find the settings button. It usually looks like a gear icon. Click it.Navigate to Notifications
In the settings menu, you’ll see different options. Find and click on the section called Notifications.Toggle Taskbar Badges
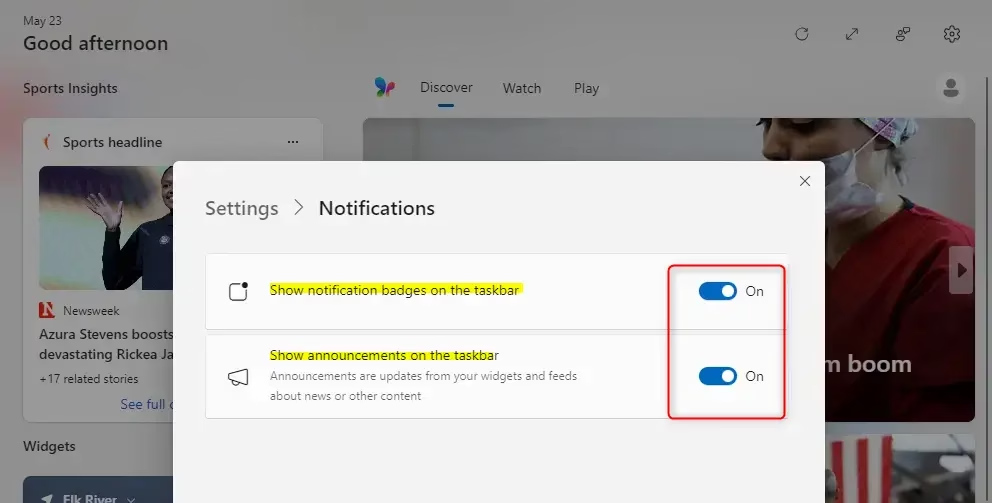
Here, you’ll see an option called “Show notification badges on the taskbar”. You can turn this On or Off. If you want those alert icons to show up, make sure it is switched to On.You can easily toggle windows 11 widget notification badges on or off directly from your taskbar settings.
Toggle Taskbar Announcements
Next, you will see “Show announcements on the taskbar”. Like badges, you can turn this On or Off. If you want those quick, rotating alerts to appear, leave it On. If you prefer your taskbar to show its normal display, switch it Off.
Summary
Adjusting your windows 11 widget notification settings helps you stay informed without feeling overwhelmed by too many alerts.
Try out the settings. Turn things on and off to see what feels best for your day. With a few changes, your Widgets can be a better tool to help you stay informed and organized. Have fun customizing!
How do I add widgets to 🪟 Windows 11 taskbar?
Widgets are integrated into the Windows 11 taskbar by default. To access them, simply click the Widgets icon on the far left of your taskbar. You can then customize which widgets appear by clicking the '+' icon within the Widgets board to add new ones or manage existing ones.
How to customize widgets on taskbar?
To customize widgets on your Windows 11 taskbar, click the Widgets icon. Inside the Widgets board, click the '+' icon to add new widgets or manage your existing ones. You can rearrange, resize, and remove widgets to tailor the information displayed to your preferences.
How to get notifications on taskbar 🪟 Windows 11?
Enable taskbar notifications for widgets by going to Settings > Personalization > Taskbar. Toggle on 'Show badges on taskbar apps' and ensure notifications are enabled within the Widgets panel settings. This will display badges or brief announcements for important updates from your widgets.
Why are widgets not working on my taskbar 🪟 Windows 11?
If widgets aren't working on your Windows 11 taskbar, first ensure your system is updated. Try restarting the Widgets service or your PC. Check if Widgets are enabled in Taskbar settings and if your Microsoft account is properly signed in. Corrupted system files can also cause issues.
Was this guide helpful?

About the Author
Richard
Tech Writer, IT Professional
Richard, a writer for Geek Rewind, is a tech enthusiast who loves breaking down complex IT topics into simple, easy-to-understand ideas. With years of hands-on experience in system administration and enterprise IT operations, he’s developed a knack for offering practical tips and solutions. Richard aims to make technology more accessible and actionable. He's deeply committed to the Geek Rewind community, always ready to answer questions and engage in discussions.
No comments yet — be the first to share your thoughts!