How to Clear and Reset TPM in Windows 11
This guide explains what the Trusted Platform Module (TPM) is and shows you how to clear and reset it on your Windows 11 PC.
Clear TPM using the Windows Security app by navigating to Device security, then Security processor details, and finally clicking Clear TPM. Alternatively, use PowerShell with the Clear-TPM command or the TPM Management Console (tpm.msc). Back up your data before proceeding.
What is TPM?
TPM is a security chip built into your computer that helps keep your system safe. It stores special security keys protecting your information and making your device more secure.
If your computer has problems with TPM, clearing and resetting it can often fix the issue.
Important: Before you start, make sure to back up your important files. Clearing TPM can remove some security settings, like your PIN, so being cautious is a good idea!
How to Reset TPM Using Windows Security App
Here’s how you can clear and reset TPM using the Windows Security app:
Open the Windows Security app:
- Click the Start menu (the Windows icon in the bottom-left corner).
- Type Windows Security in the search box.
- Click on the Windows Security app from the results.
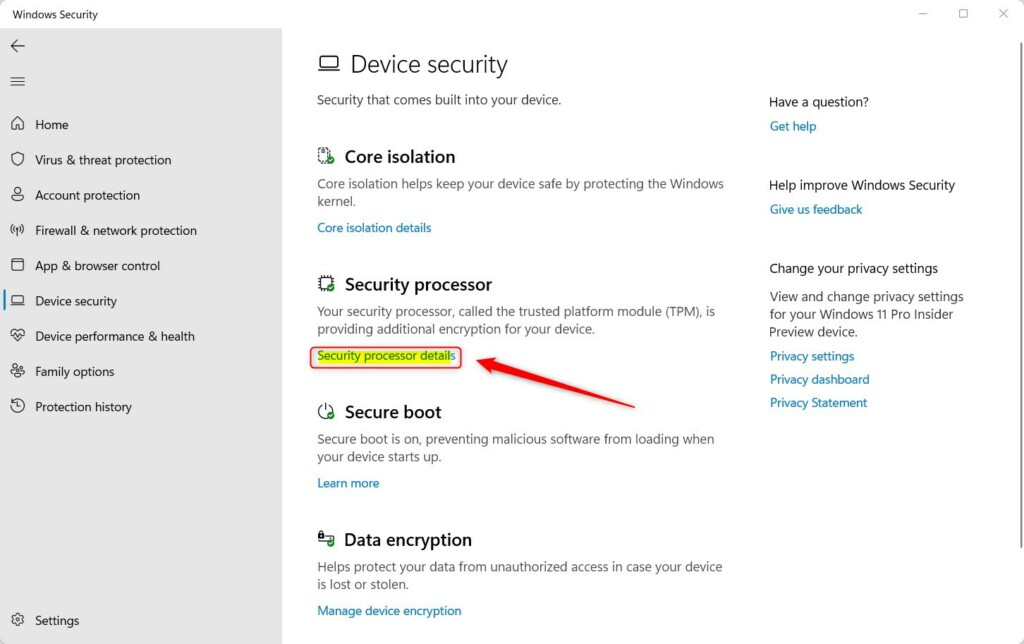
- In the app, go to Device security on the left menu or click its icon on the main page.
- Click on Security processor details under the Security processor section.
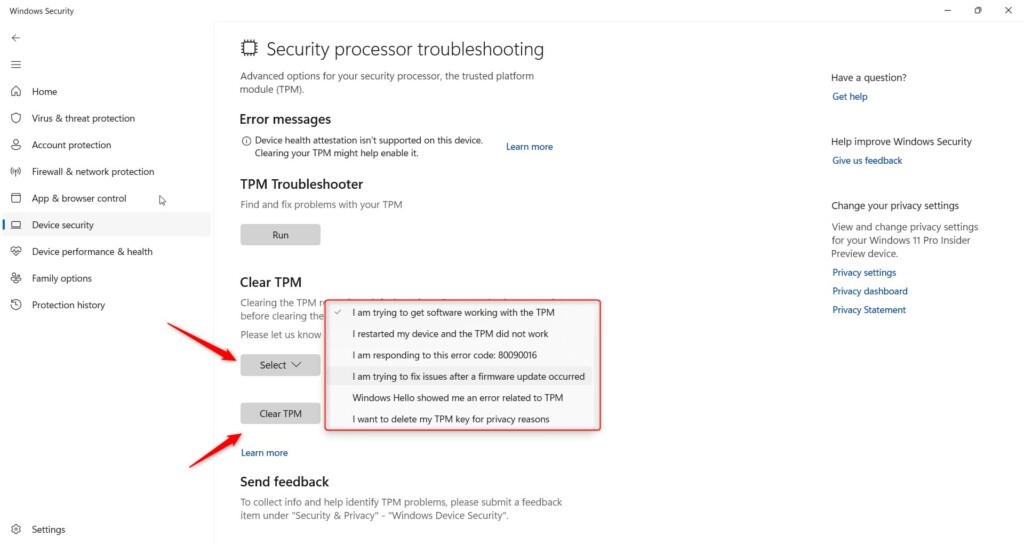
- Next, click on Security processor troubleshooting.

- Under the Clear TPM section, choose a reason why you want to clear TPM.
- Click the Clear TPM button.
Your PC will restart, and TPM will be reset to its default settings.
Note: Clearing TPM will remove your PIN and other security info, so you may need to set those up again after the reset.
How to Reset TPM Using PowerShell
Prefer using commands? Here’s how to clear TPM with PowerShell:
Open PowerShell:
- Click Start, type PowerShell, right-click on it, and choose Run as administrator. ⚠️ Requires admin privileges
- Type this command and press Enter:
Clear-TPMYour PC will restart and reset TPM.
How to Reset TPM Using TPM Management Console
You can also use the TPM Management Console to reset TPM:
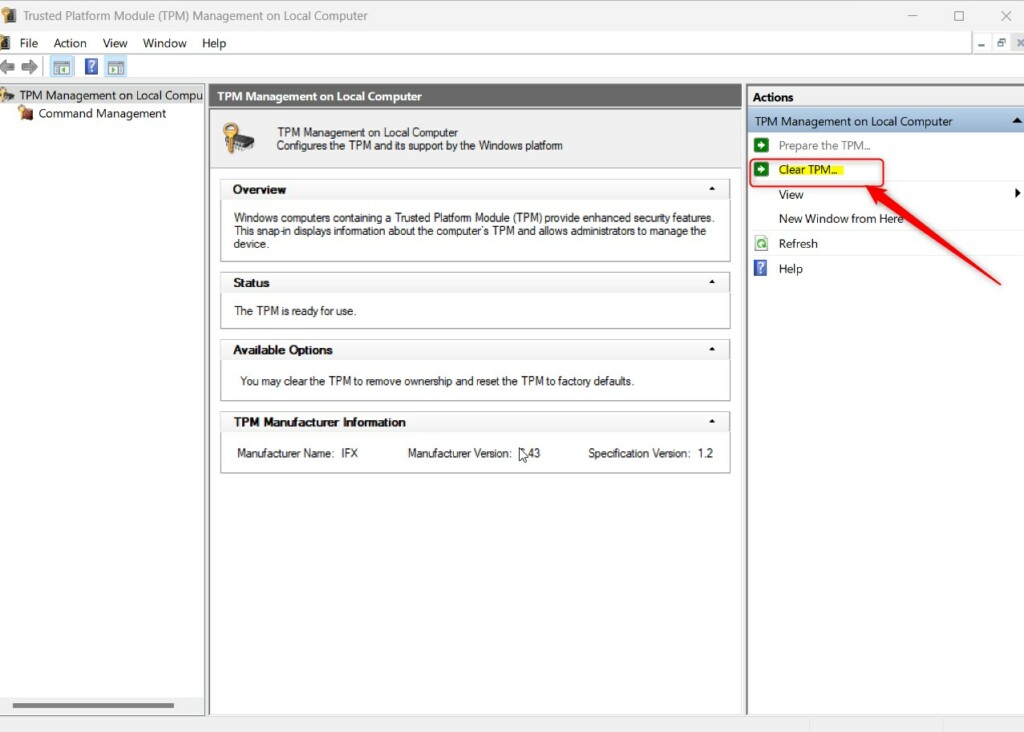
- Click the Start menu and type tpm.msc or Trusted Platform Module (TPM) Management, then open it. ⚠️ Requires admin privileges
- In the top right corner of the window, click Clear TPM.
Your PC might ask you to press a key to confirm clearing TPM before restarting.
After restart, TPM will be reset.
Common TPM Problem Messages
If TPM isn’t working right, you might see these messages:
- A firmware update is needed for your TPM.
- TPM is disabled and needs your attention.
- TPM storage is not available. Please clear your TPM.
- Device health attestation isn’t available. Please clear your TPM.
- Device health attestation isn’t supported on this device.
- Your TPM isn’t compatible with your firmware and may not work properly.
- TPM measured boot log is missing. Try restarting your device.
- There is a problem with your TPM. Try restarting your device.
If you see any of these, clearing and resetting TPM might help fix the problem.
Summary
- TPM is a security chip that can sometimes cause issues on your PC.
- You can clear and reset TPM using the Windows Security app, PowerShell, or TPM Management Console.
- Always back up your important data before clearing TPM to avoid losing info like your PIN.
- Resetting TPM can fix many TPM-related errors and problems.
- For more help, see the official Microsoft page on Security Processor Troubleshooting.
That’s it! You now know how to clear and reset TPM on your Windows 11 computer.
Should I clear my TPM in 🪟 Windows 11?
Clearing the TPM can result in data loss. To protect against such loss, review the following precautions: Clearing the TPM causes you to lose all created keys associated with the TPM, and data protected by those keys, such as a virtual smart card or a sign-in PIN.
Can you reset TPM from BIOS?
Clear TPM from your computer’s BIOS/UEFI settings: Look for an option related to TPM, which might be listed under Security, Trusted Computing, or similar sections. Find and select the option to clear the TPM. Save and exit the BIOS/UEFI settings. Your computer should restart and complete the TPM clearing process.
How do I reset the TPM on 🪟 Windows 11?
If this option is not available then go to settings. In search word type security processors troubleshooting.
What happens if I clear and reset TPM?
When you clear the TPM, it’s like unlinking it from your system. Windows will then automatically set it up again and take control. Clearing the TPM can result in data loss.
Was this guide helpful?

About the Author
Richard
Tech Writer, IT Professional
Richard, a writer for Geek Rewind, is a tech enthusiast who loves breaking down complex IT topics into simple, easy-to-understand ideas. With years of hands-on experience in system administration and enterprise IT operations, he’s developed a knack for offering practical tips and solutions. Richard aims to make technology more accessible and actionable. He's deeply committed to the Geek Rewind community, always ready to answer questions and engage in discussions.

No comments yet — be the first to share your thoughts!