How to Clear Activity History in Windows 11


Clearing your activity history in Windows 11 removes the local record of applications you have used and files you have viewed. It takes about a minute in the Settings app, and it works the same on Windows 11 Home and Pro.
Press Win+I to open Settings , go to Privacy & security, click Activity history, then click Clear next to Clear activity history for this account. Windows removes your local record of recent apps and files without deleting anything or requiring a restart.
Why Clear Activity History?
Clearing your activity history protects your privacy by removing records of the apps you use and files you open. This matters most on a shared PC, a family computer, or a work laptop you might hand to someone else. Anyone using your account could otherwise see what you were working on recently.
What Happens When You Clear History?
This resets suggestions in your Start menu or search bar . It does not uninstall apps or delete personal files. It only removes the log of recent interactions.
You do not need to restart afterward. The history is not something you can restore once it is cleared. Windows starts building a new record as you keep using your apps and files, so suggestions will slowly come back.
Browser History vs. Windows Activity History
Browser history tracks the websites you visit in Chrome or Edge. Windows activity history records the broader applications and files you open on your computer. Clearing one leaves the other intact. Browser caches and cookies must be cleared inside your web browser.
How to Clear Activity History in 🪟 Windows 11
Clearing your activity history in Windows 11 is done in the Settings app. Here is the short version:
- Press Windows key + I to open Settings.
- Select Privacy & security from the left menu.
- Click Activity history.
- Click Clear next to Clear activity history for this account.
The full steps follow, with what you should see at each stage.
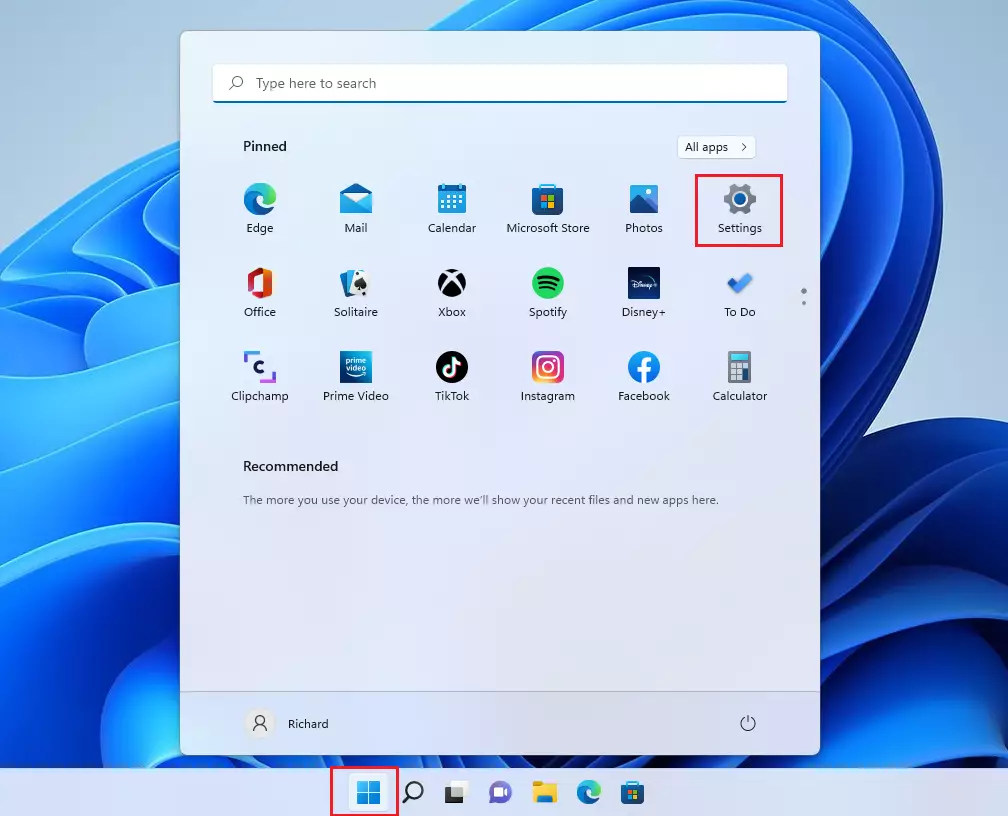
- Press Windows key + I to open Settings. The Settings window opens with a list of categories on the left. If the shortcut does nothing, right-click the Start button and choose Settings.
- Go to Privacy & security in the left-hand menu. The right pane now shows the privacy options, split into groups such as Windows permissions and App permissions.
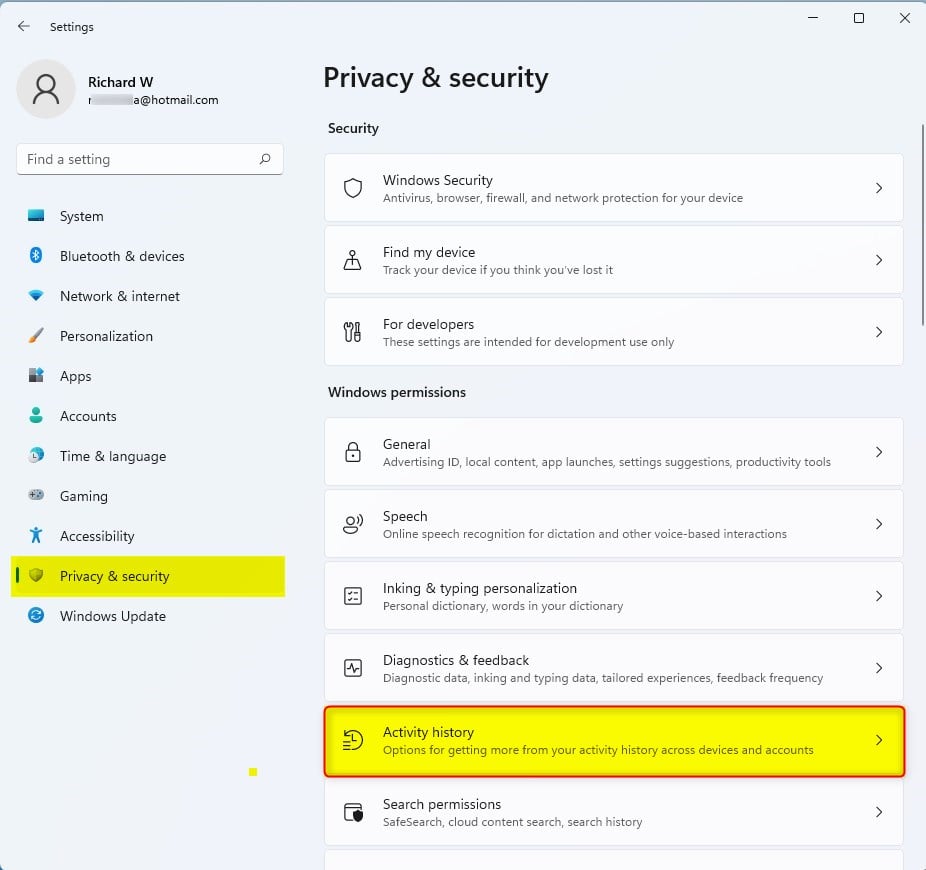
- Click the Activity history tile. You may need to scroll down in the right pane to find it. The Activity history page opens.
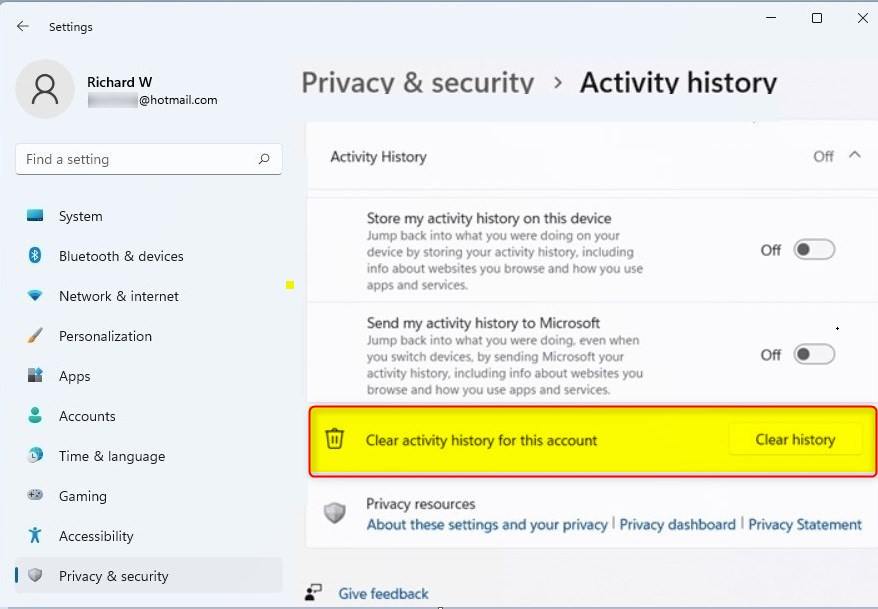
- Find Clear activity history for this account and click Clear. Windows removes the local record of your recent activity. Depending on your build, you may see a short confirmation, or the button may simply finish without a message.
If you do not see an Activity history tile, your Windows 11 build probably no longer includes that page. Microsoft has changed and removed parts of this feature in newer releases. Install pending updates and check again. If the page is still missing, there is nothing to clear in this location on that build.
If you are on a managed work or school computer, some settings may be locked by your administrator. A greyed-out button or a message saying Some settings are managed by your organization means a policy is controlling it. Ask your IT department to change it.
Managing Cloud Data via Microsoft Privacy Dashboard
If you sign in with a Microsoft account, some activity data might be sent to and saved online. Clearing it in Settings does not remove that copy. To remove this data, follow these steps:
- Visit the Microsoft Privacy Dashboard.
- Sign in with the same Microsoft account you use on your PC.
- Go to the App and Services activity section.
- Clear your cloud-stored data. This removes it permanently, so check what you are deleting first.
If you use a local account instead, there is no cloud copy, and the Settings steps above are all you need.
Summary
Wiping local logs through Settings gives you a quick privacy boost on shared computers and personal setups alike. If you share a PC, repeat it from time to time, and clear your browser data separately.
Did this guide fix your problem?

About the Author
Richard
Tech Writer, IT Professional
Richard is a writer at Geek Rewind who turns complex IT tasks into clear, step-by-step guides. He draws on years of hands-on experience in system administration and enterprise IT operations, focusing on Windows, Linux and WordPress: the problems people actually run into, and the fixes that work. His server and WordPress guides come from systems he runs himself. Richard builds and maintains the platform behind Geek Rewind, from its Ubuntu servers and Nginx configuration to its custom WordPress plugins. Many new tutorials start with readers' questions, and he's always glad to answer them in the comments.
No comments yet — be the first to share your thoughts!